
Replacement Part List


As an aid to reassembly, take notice of wire routings and position
in wire guides and traps while dismantling tool.
Be sure that all components of electronics kit are seated firmly
and squarely in housing recesses.
Avoid pinched wires, be sure that all wires and sleeves are
pressed completely down in wire traps.
Prior to securing housing cover onto the housing
support, be sure that there are no interferences.
Before installing the battery, check for proper
functionality of shuttles and triggers.
Install battery and depress switch triggers to
assure tool is operating properly.
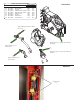
Stator Assembly is contained inside
Motor Insulator
Rotor Assembly is contained inside Stator
Control Board
Lock-Off Shuttle
On-Off Switch
Battery Terminal Block
1. Remove battery prior to doing any adjustments to tool!
2. The chain can be adjusted by using the Chain Tensioner Adjustment Screw. Chain
should be tensioned to 18-22 kgf/cm (15-19 in/lbs) by using a torque screwdriver.
3. Manually check chain by pulling away from guide bar approximately 3mm (1/8”),
chain should snap back. Chain should be able to be pulled without difficulty.
Chain Tensioner
Adjustment
Screw