
Use and Care Manual


page 7
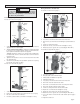
Leveling
Screws
Vacuum Line Coupler
Vacuum
Pad
Vacuum
Pad Stud
Vacuum Pad Nut
Fig. 12
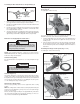
Securing the Equipment to the Work Surface - Using an Expansion-Type
Anchor (Fig. 10)
For Catalog No. 4125 & 4130 only.
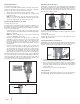
Assembling the Water Shut-Off Valve to the Dymodrill (Fig. 9)
Methods for Securing Equipment to Work Surface
NOTE: Some building materials contain steel reinforcements.
MILWAUKEE Dymobits can cut through embedded steel, but are not recom-
mended for coring solid steel plates.
Horizontal Coring (walls)
For specifi c instructions on using anchors, see "Using an Expansion-Type
Anchor".
Vertical Coring (fl oors)
Two methods will work to secure the rig for vertical coring: either an expan-
sion-type anchor OR a vacuum pump and vacuum pad system. Securing
the rig with an anchor gives better bit performance because the attachment
is more rigid. For specifi c instructions on assembling the vacuum system,
see "Assembling and Using a Vacuum System".
Optional Telescoping Assembly
The telescoping assembly can be used to supplement either securing
method.
NOTE: Vac-U-Rig
®
Cat. No. 4136 includes a vacuum pump and vacuum pad.
However, for some applications, you may choose to use an expansion-type
anchor to secure the tool.
Anchors and Telescoping Assembly are not supplied with any of the above
rigs. Telescoping Assembly can be purchased separately (see “Accesso-
ries”). Anchors unavailable through MILWAUKEE.
Fig. 9
Attach to
Dymodrill
Hose nut
Rubber
washer
Shut-off
valve
Hose adapter
1. Remove the water shut-off valve components from the accessory bag.
(The copper washers inside the bag are for bit installation.)
2. Insert the hose adapter into the hose nut. Then insert the rubber washer
into the hose nut.
3. Insert the hose nut assembly into the shut-off valve and securely tighten
the assembly with the supplied socket wrench; some threads on the
hose adapter will still be exposed.
4. Screw the shut-off valve assembly into the water swivel housing on the
Dymodrill motor (Fig. 8). Hand-tighten the assembly and then tighten it
approximately 1/4 turn with an adjustable wrench (not provided).
WARNING!
WARNING!
To reduce the risk of injury always secure the rig to
the work surface to help prevent personal injury and
to protect the rig. An unsecured rig could rotate during
coring and possibly cause injury.
To reduce the risk of injury always use an expansion-
type anchor during horizontal coring. Vacuum systems
can slip when used on a vertical surface.
OPERATION
Use a 5/8" expansion-type anchor (not supplied) that will accept a 5/8"
threaded rod or bolt to secure the base to the work surface.
1. Level the stand with the four (4) leveling screws using the bubble level
as a guide. When the stand is level, tighten the four (4) nuts on the
leveling screws.
2. Using an expansion-type anchor, insert a threaded rod or bolt through
the slot located on the base of the Dymorig and tighten the bolt or
washer and nut fi rmly in the anchor following the anchor manufacturer's
instructions.
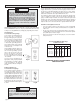
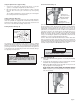
Assembling and Using a Vacuum System (Fig. 11 & 12)
For Catalog No. 4115, 4125 & 4130 only.
Leveling
Screws
Rod or Bolt
Nut & Washer
or Vacuum
Pad Nut
Fig. 10
Coupler
Vacuum Release
Valve
Filter Jar
Vacuum
Gauge
Small Hole for At-
taching Pump to
Dymorig Stand
Vacuum Hose
Fig. 11