
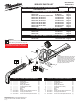
Replacement Parts List

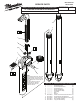

1
2
8
3 6
6a
7
1
4
5
2
6
6a
3
FIG. PART NO. DESCRIPTION OF PART NO. REQ.
1 --------------- 24" Oset Hook Jaw (1)
2 --------------- 24" Adjustment Nut (1)
3 --------------- 24" Heel Jaw (1)
4 44-66-0403 Spring Plate Bracket (1)
5 --------------- 24" Straight Wrench Body (1)
6 --------------- Rivet (1)
6a --------------- Roll Pin (1)
7 43-90-2003 24" Heel Jaw with Rivet & Roll Pin Kit (1)
8 43-90-0253 24" Oset Hook Jaw with
Adjustment Nut Kit (1)
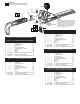
FIG. PART NO. DESCRIPTION OF PART NO. REQ.
1 --------------- 18" Oset Hook Jaw (1)
2 --------------- 18" Adjustment Nut (1)
3 --------------- 18" Heel Jaw (1)
4 44-66-0402 Spring Plate Bracket (1)
5 --------------- 18" Straight Wrench Body (1)
6 --------------- Rivet (1)
6a --------------- Roll Pin (1)
7 43-90-2002 18" Heel Jaw with Rivet & Roll Pin Kit (1)
8 43-90-0252 18" Oset Hook Jaw with
Adjustment Nut Kit (1)
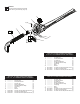
FIG. PART NO. DESCRIPTION OF PART NO. REQ.
1 --------------- 14" Oset Hook Jaw (1)
2 --------------- 14" Adjustment Nut (1)
3 --------------- 14" Heel Jaw (1)
4 44-66-0401 Spring Plate Bracket (1)
5 --------------- 14" Straight Wrench Body (1)
6 --------------- Rivet (1)
6a --------------- Roll Pin (1)
7 43-90-2001 14" Heel Jaw with Rivet & Roll Pin Kit (1)
8 43-90-0251 14" Oset Hook Jaw with
Adjustment Nut Kit (1)
48-22-7182 24" ALUMINUM OFFSET PIPE WRENCH
48-22-7185 18" ALUMINUM OFFSET PIPE WRENCH
48-22-7184 14" ALUMINUM OFFSET PIPE WRENCH
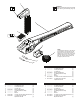
EXAMPLE:
Component Parts (Small #) Are Included
When Ordering The Assembly (Large #).
0
00
NOTE:
To install Heel Jaw Kit (7), the head of
the production rivet (6) must be care-
fully ground o. Use a thin tool like a
metal punch or nail to tap out the rivet.
Place the heel jaw (3) on the wrench
body (5), align the holes and tap roll
pin (6a) in place to secure.