
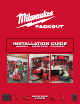
Instructions / Assembly
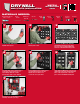
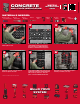

CONCRETE
WALL PLATE INSTALLATION
INSTALLATION
VIDEO
WATCH
SCAN
SCAN
or visit https://qr.mke.tl/26sgs
MATERIALS NEEDED:
n
1/4" x 1-1/4"
Concrete Anchors*
n
3/16"
Masonry Bit
n
5/16"
Nut Driver
n
N95
Respirator
n
Impact
Driver
n
Level
n
Hammer
Drill
n
Safety
Glasses
n
Gloves
BUILD YOUR
SYSTEM
1
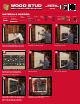
Hold Wall Plate in desired location.
Ensure plate is level.
6
Repeat process to add additional plates
and fully customize your shop.
4
Using 1/4" x 1-1/4" concrete anchors,
fasten the plate to the wall.
5
Slide additional Wall Plates into place by
guiding the new plate’s Quick Alignment
Tabs on the top, bottom or sides into
place on the first Wall Mounted Plate.
3
Pre-drill holes with 3/16" masonry bit.
2
If using a Large Wall Plate, mark the
10 identified fastening points with a
pencil. If using a Compact Wall Plate,
mark the 5 identified fastening points.
*Certain concrete materials may require longer anchors