
Use and Care Manual


6
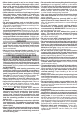
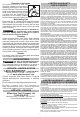
Attaching the Shoulder Strap
(Available as an accessory)
When using this attachment with larger-capacity
battery packs, use the shoulder strap to reduce
user fatigue and help in maintaining control of the
tool during use.
To install the strap:
Nut
Bolt
Pole
clip
Bevel
Gate
Carabiner
1. Remove the battery
pack.
2. Fit the pole clip around
the power head pole
between the front han-
dle and rear handle in
a location comfortable
during use.
3. Insert the bolt through
the pole clip and strap
bevel. Thread the nut
onto the bolt and tight-
en securely.
4. Clip the strap cara-
biner to the bevel.
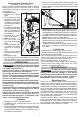
To wear the strap:
1. Put your right arm
and head through the
strap.
2. Adjust the strap clips
to change the strap
length to t comfort-
ably.
3. Slide the neck pad to
the appropriate posi-
tion.
To unclip the strap:
1. Hold the tool by the front handle with your left hand.
2. Grip the carabiner with your right hand and unclip
by pushing in the gate and it sliding o the bevel.
OPERATION
WARNING
To reduce the risk of injury, always
wear proper eye protection marked
to comply with ANSI Z87.1.
Always remove battery pack before changing or
removing accessories or attachments.
Do not operate the tool without the front handle
in place. The front handle must be attached prop-
erly for use. Using one hand could cause loss of
control and result in serious injury.
Do not operate the tool without the guard in place.
The guard must be attached properly during use.
Operating the tool without the guard will cause
serious injury.
Use both hands when operating the tool. Maintain
a rm grip. Using one hand could cause loss of
control and result in serious injury.
Inspect the area before use. Remove all debris
and hard objects such as rocks, glass, wire, etc.
that can ricochet, be thrown, or otherwise cause
injury or damage during operation.
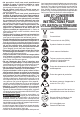
Trimming
1. Grasp the tool rmly by both handles.
2. To start the tool, squeeze the lock-o lever and
pull the trigger.
3. To vary the speed, increase or decrease the pres-
sure on the trigger. The further the trigger is pulled,
the greater the speed up to the maximum set by
the speed control button.
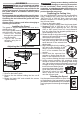
4. Allow the tool to angle down, keeping at least 12"
between the trimmer head and any body part. Hold
the tool just above the ground and swing the head
side to side.
12" MINIMUM
5. WARNING! Do not use tool as an edger. Do not tilt
tool to create a right angle to the ground. Keep trim-
mer head and line parallel to the ground. Guard can-
not protect against ying debris in this orientation.
6. To feed out the line, bump it against the ground
gently while running a normal speed.
NOTE: When used near abrasive surfaces or in
dense growth, the cutting line will wear faster and
require "bumping" more often.
7. To stop the tool release the trigger. Make sure the
tool comes to a complete stop before laying the
tool down.
Cutting Tips
• Allow the ends of the line to do the cutting.
• Contact between the line and solid objects will cause
extra line wear and breakage.
• Do not drag the spool cover along the ground or
bump it too hard. Only bump spool on the ground.
Do not bump against rocks, driveways, etc.
• Make multiple passes in long growth.
• Avoid ornamental trees, shrubs, and plantings.
Avoid contact with siding, fence posts, etc. They
can all be damaged by the tool.
MAINTENANCE
WARNING
To reduce the risk of injury, always
unplug the charger and remove the
battery pack from the charger or tool before
performing any maintenance. Never disassemble
the tool, battery pack or charger. Contact a
MILWAUKEE service facility for ALL repairs.
Maintaining Tool
Keep your tool, battery pack and charger in good
repair by adopting a regular maintenance program.
Inspect your tool for issues such as undue noise,
misalignment or binding of moving parts, breakage of
parts, or any other condition that may aect the tool
operation. Return the tool, battery pack, and charger
to a MILWAUKEE service facility for repair. After six
months to one year, depending on use, return the
tool, battery pack and charger to a MILWAUKEE
service facility for inspection.
If the tool does not start or operate at full power with
a fully charged battery pack, clean the contacts on
the battery pack. If the tool still does not work prop-
erly, return the tool, charger and battery pack, to a
MILWAUKEE service facility for repairs.