
Use and Care Manual


5
ASSEMBLY
WARNING
Before use, read manual and labels
of the power head. Important as-
sembly and use instructions are provided in the
power head manual. Connect the attachment to
the power head in accordance with the power
head manual.
Do not operate the tool without the guard in place.
The guard must be attached properly during use.
Operating the tool without the guard will cause
serious injury.
Always remove battery pack before changing or
removing accessories.
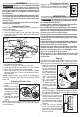
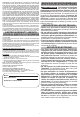
Replacing the Blade
Always inspect blades before use and replace if
worn or damaged.
1. Remove the battery pack.
2. Turn the gear head on its side and rotate the
blade until the slots align. Slide the holding pin
through the slots.
Holding pin
Blade nut
Blade
Slots
Flange
3. Use the 13 mm socket wrench provided to loosen
the blade nut (clockwise).
4. Remove the blade nut, ange, and blade.
5. Clean any debris from the ange, nut, and spindle.
6. Place the new blade at on the spindle.
7. Place the ange and nut on the spindle. Tighten
securely with the 13 mm socket wrench (coun-
terclockwise).
NOTE: Always make sure blade is undamaged,
correctly installed, and securely fastened before
each use.
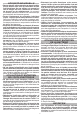
Adjusting Depth of Cut
1. Remove the battery
Adjustment knob
Increase
Decrease
;
=
pack.
2. Loosen the height
adjusting knob and
slide the wheel up to
increase the depth,
or down to decrease
the depth.
3. Tighten the height
adjusting knob se-
curely.
NOTE: Start the job with a shallow blade depth (1/2"
to 1") and increase depth by 1/2" until the desired
cut is achieved.
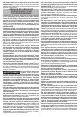
Selecting the Speed
When using this attachment, only HIGH
High
Low
SPEED is recommended. Use the speed
control button to select HIGH SPEED.
OPERATION
WARNING
To reduce the risk of injury, always
wear proper eye protection marked
to comply with ANSI Z87.1.
Always remove battery pack before changing or
removing accessories or attachments.
Do not operate the tool without the front handle
in place. The front handle must be attached prop-
erly for use. Using one hand could cause loss of
control and result in serious injury.
Do not operate the tool without the guard in place.
The guard must be attached properly during use.
Operating the tool without the guard will cause
serious injury.
Use both hands when operating the tool. Maintain
a rm grip. Using one hand could cause loss of
control and result in serious injury.
Inspect the area before use. Remove all debris
and hard objects such as rocks, glass, wire, etc.
that can ricochet, be thrown, or otherwise cause
injury or damage during operation.
Keep all parts of your body back and to the left
of the blade. Do not stand in line or to the right
of the blade.
Edging
Use this
tool for edging along hard surfaces, such as
sidewalks, driveways, ower beds, curbs, and similar
areas. Do not use the tool on or near gravel surfaces.
1. Grasp the tool rmly
with your right hand
on the rear handle
and your left hand on
the front handle.
Al-
ways stand behind
the guard. Hold the
tool in a comfort-
able position with
the rear handle
about hip height.
2. To start the tool,
squeeze the lock-
o lever and pull the
trigger.
3. To vary the speed, increase or decrease the pres-
sure on the trigger. The further the trigger is pulled,
the greater the speed up to the maximum set by
the speed control button.
4. Slide the tool along the
Blade
ridge
surface, taking care to avoid
contact with hard objects.
5. Use the blade ridge to align
the blade with the edging
surface.
6. Push the tool at a steady
pace. If the blade begins to
bog down, slow the cutting
pace. Do not force the blade
into the ground.