
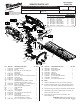
Replacement Part List

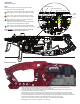

3.50”
NOTE:
The service
replacement blade
assembly (1) is shipped
in a clear poly sleeve and
cardboard. It is recommended
to keep the cutting blade portion
of assembly in the poly sleeve/card-
board for safe handling during installation.
Gear case grooves to
capture felt seal
Poly Sleeve/Cardboard
Eccentric
Surface ‘A’
Connecting
Plate (12a)
Eccentric
Surface ‘B’
Connecting
Plate (12b)
7(6x)
6
8
12b
1
2(2x) 3(2x) 38
Felt
Seal (38)
Support the tool body so the bottom of
the tool is parallel with the work surface
INSTALLING REPLACEMENT BLADE ASSEMBLY
• Remove battery pack
• Be sure top of Connecting Plate (12a) is ush with surface 'A' of the eccentric on the Gear/
Crank Shaft Assembly (43).
• Install new Blade Assembly (1) onto connecting plate (12a) as shown by placing the hole of the
blade assembly over the lug on the connecting plate.
• As an aid to keeping the connecting plate (12a) ush to the 'A' surface of the eccentric,
support the tool housing on one end being sure the bottom of the gear case is parallel with the
work surface. Place a 3-1/2" wood block on the other end under the tip of the replacement blade
assembly, see illustration below.
• Place Connecting Plate (12b) over the bearing and onto the eccentric of the Gear/Crank Shaft
Assembly (43). Place the lug of connecting plate (12b) into the hole of the blade assembly.
NOTE: An instrument such as a nail or small screwdriver may have to be inserted into the exhaust
vent to rotate the fan so the eccentric can turn and line up the hole with the lug. Be sure eccentric
surface 'B' is ush with the top surface of connecting plate (12b).
• Place Felt Seal (38) over the blade assembly. Tuck each end down into grooves on gear case.
• Place a light coating of lubrication onto the Bushings (2) and place onto slots of blade assembly.
• Place a drop of red locking sealant onto the threads of screws (3). Insert screws through the bush-
ings and secure to the gear case.
• Place Gear Cover (8) onto gear case.
• Place Gear Case Cover (6) over gear cover and onto the gear case. Secure with six screws (7).
• Remove plastic cover (if used) from blade assembly. Install battery and check for functionality.
ALWAYS REMOVE BATTERY PACK
BEFORE PERFORMING ANY
MAINTENANCE OR REPAIRS