
Operator's Manual S/N G64A


3
• Always use side handle assembly with the correct
neck diameter for the rotary hammer/hammer
drill. An ill-tting side handle will not tighten securely,
causing loss of control.
• Wear ear protectors. Exposure to noise can cause
hearing loss.
•
WARNING
To reduce the risk of injury, wear a
dust mask or use an OSHA compli
-
ant dust extraction solution when working in
dusty situations. Dust particles can harm your
lungs.
• Always use side handle(s) supplied with the tool.
Loss of control can cause personal injury.
• Hold power tool by insulated gripping surfaces,
when performing an operation where the fastener
may contact hidden wiring. Fasteners contacting
a “live” wire may make exposed metal parts of the
power tool “live” and could give the operator an
electric shock.
READ AND SAVE ALL
INSTRUCTIONS FOR
FUTURE USE
SPECIFICATIONS
Cat. No. .................................................... 5261-DE
Vacuum Port Diameter .......................2-1/2", 1-7/8"
1-1/2", 1-1/4"
Max Bit Diameter .............................................. 5/8"
Hammer Collar Sizes
Diameter Circumference
S = Ø 43-46 mm (1.7"-1.8") 135-144.5 mm (5.3"-5.7")
M = Ø 48-55 mm (1.9"-2.2") 151-173 mm (6"-6.9")
L = Ø 56-59 mm (2.2"-2.3") 76-185 mm (6.9"-7.2")
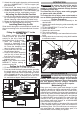
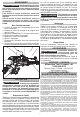
FUNCTIONAL DESCRIPTION
1. Vacuum Port
Side Handle Clamp
2. Attachment Point
3. Tool and Bit Adjustment
Button
4. Depth Gauge
5. Depth Gauge Button
6. Nozzle
7. Nozzle Assembly
8. Bit Brush
9. Side Handle Clamping Collar Assembly
10. Clamp Lever
11. Side Handle Grip
11
9
8
10
6
7
5
4
1
3
2
ASSEMBLY
Connecting the Vacuum Hose
Attach the vacuum hose to the port. Twist to form
a tight t.
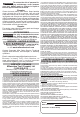
Installing/Removing Nozzle Assembly
To install the nozzle assembly supplied with the tool,
or accessory nozzles:
1. With the nozzle assembly
pointing straight up, line up
the lugs of the nozzle as-
sembly with the lugs on the
front of the HAMMERVAC™.
The unlock symbol
on the
nozzle assembly will line up
with the mark on the top of the
HAMMERVAC™.
2. Turn the nozzle assembly left
or right to lock into place. The
lock symbol
on the nozzle
assembly will line up with the
mark on the top of the HAM-
MERVAC™.
3. To remove, reverse the proce-
dure.
Installing/Removing Nozzle
Replace the nozzle:
• After drilling about 1500 holes,
• When the bit brush shows signs
of wear,
• When suction is reduced,
• When dust escapes through the
bit brush during use
To replace the nozzle (Cat. No.
49-90-2301), press in the release
button and pull out from the lower
nozzle assembly. Slide the new
nozzle into the lower nozzle assem-
bly until it snaps into place.
WARNING
To reduce the risk of injury, always
use side handle provided with dust
extractor when using with a rotary hammer/ham-
mer drill. When dust extractor is removed from
the tool, always use side handle(s) supplied with
the tool. Loss of control can cause personal injury.
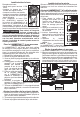
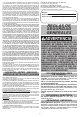
Attaching the HAMMERVAC™ to a
Rotary Hammer/Hammer Drill
The HAMMERVAC™ is provided with three clamping
collar assemblies and one side handle grip. Choose
the correct clamping collar assembly for the tool
being used (see Specications). The side handle grip
should be unscrewed from one assembly to be used
on another.
1
3
2
1. Disconnect power from
the tool.
2. Remove the tool side
handle.
3. Partially screw side handle
grip onto clamping collar
assembly
4. Slide the HAMMERVAC™
side handle clamping col-
lar assembly over the
chuck and onto the neck
of the tool. The clamp lever
must be facing up (3).