
Operator's Manual S/N G64A


4
OPERATION
WARNING
To reduce the risk of re and in-
jury, do not use to pick up am-
mable or combustible materials. Empty dust box
completely before use.
To reduce the risk of injury, wear safety goggles
or glasses with side shields.
To reduce the risk of injury, wear a dust mask or
use an OSHA compliant dust extraction solution.
Proper Operation
1. Install and position the nozzle assembly to the
desired side.
2. Attach side handle clamping collar assembly and
grip to tool.
3. Fit the HAMMERVAC™ to the Tool and Bit.
4. Set the drill depth.
5. Attach the vacuum hose.
6. Turn on the vacuum.
7. Begin use according to tool manufacturer instruc-
tions.
8. Always hold the tool securely using both handles
to maintain control.
MAINTENANCE
WARNING
To reduce the risk of injury, always
unplug the charger and remove the
battery pack from the charger or tool before
performing any maintenance. Never disassemble
the tool, battery pack or charger. Contact a
MILWAUKEE service facility for ALL repairs.
Maintaining Tool
Keep your tool, battery pack and charger in good
repair by adopting a regular maintenance program.
Inspect your tool for issues such as undue noise,
misalignment or binding of moving parts, breakage of
parts, or any other condition that may aect the tool
operation. Return the tool, battery pack, and charger
to a MILWAUKEE service facility for repair. After six
months to one year, depending on use, return the
tool, battery pack and charger to a MILWAUKEE
service facility for inspection.
If the tool does not start or operate at full power with
a fully charged battery pack, clean the contacts on
the battery pack. If the tool still does not work prop-
erly, return the tool, charger and battery pack, to a
MILWAUKEE service facility for repairs.
5. Attach the side handle clamping collar assembly
onto the HAMMERVAC™, rst the upper jaw,
then lower jaw.
6. Press down the clamp lever (3) to secure the
clamping collar assembly to the HAMMERVAC™.
7. Rotate the HAMMERVAC™ and side handle grip
to the desired position, and tighten securely.
Adjusting the Side Handle Position
1. Loosen the side handle clamping collar assembly
by unscrewing the side handle grip until the side
handle clamping collar assembly rotates freely.
2. Rotate the side handle grip to the desired position.
3. Tighten the side handle grip securely.
Installing/Removing the Bit
Slide the bit through the nozzle and then install into
the tool according to the tool manufacturer's instruc-
tions.
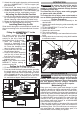
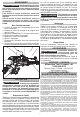
Fitting the HAMMERVAC™ to the
Tool and Bit
For proper suction and depth
Correct
Incorrect
Incorrect
control, position the nozzle as-
sembly so the bit is ush with
the forward face of the nozzle:
1. Slide the clamping collar
forward or backward to ac-
commodate the length of the
bit. Press the clamping lever
down to tighten securely.
2. Press and hold the tool and
bit adjustment button.
3. Push in the nozzle assembly
until the bit is ush with the
front face of the nozzle.
4. Release the tool and bit ad-
justment button.
NOTE: Fully extend the HAM-
MERVAC™ before storing to
preserve spring life.
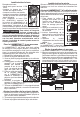
Setting the Drilling Depth
1. Fit the HAMMERVAC™ to the Tool and Bit.
2. Press and hold the depth gauge button and slide
the depth gauge to the desired depth. The drill-
ing depth is the last visible measurement shown
when viewed from the top of the tool. To ensure
the HAMMERVAC™ is properly set to the tool,
bit, and desired depth, always drill a test hole.
Drill Depth