
- MILWAUKEE OPERATOR'S MANUAL HEAVY-DUTY SANDERS AND GRINDERS 6065, 6065-6, 6066, 6066-6, 6072, 6078


page 7
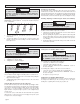
Fig. 3
Hold at a 5° to 15° angle
For best results, use only
this portion of the disc.
Removing Welds or Hammer Marks
When removing welds or hammer marks, limit coarse sanding to the
immediate area. Use successively finer grits to smooth surface.
Cross Sanding
When finishing a surface that has been prepared by a coarse disc or
wheel, sand at right angles to the strokes made by the coarser disc.
Finishing marks left from previous sanding are easily seen and removed
for a uniform finish. Failure to cross sand when changing from a coarse
disc to a finishing disc may result in deep scratches and circular marks.
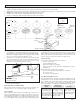
Installing Sanding Discs (Fig. 2)
1. Unplug tool and place it upside down on a level surface as shown. Remove any accessories from spindle.
2. Thread flange and nylon washer onto spindle. Attach backing pad and sanding disc using Fig. 2 to determine type and order of assembly.
NOTE: When installing flap disc without hub, position flap disc nut as shown.
3. To tighten, press in the spindle lock button while turning disc nut clockwise.
4. To remove sanding disc and backing pad, unplug tool and reverse procedure.
3. Use long, sweeping, side to side strokes, advancing forward to
produce the desired finish.
USING SANDING DISCS
Selecting Sanding Discs & Grit
Refer to the table below to select the correct type of sanding disc for your
job. Generally, use 16, 24 or 36 grit for heavy stock removal; 50, 60 or 80
grit for medium stock removal and 120 grit for finishing. Always begin
with a coarse grit, using successively finer grits to obtain the desired
finish. See Catalog for a complete list of MILWAUKEE sanding discs.
Finishing Metal
Constantly move across the surface. Work faster on curved surfaces
where contact areas are smaller and pressure is greater. Flat areas may
appear at the end of the stroke when pressure is too heavy. Ease up on
pressure at end of each stroke and when reversing strokes.
Troubleshooting
Deep scratches and circular marks can result from:
• Using too coarse a grit
• Using a partially glazed disc
• Dirt or loose metal on the workpiece
• Failure to sand across the grain when changing from coarse to
finishing discs
Bluish discoloration of metal surface indicates:
• Excessive heat caused by circular motion in a small area
• Excessive pressure
• Use of worn out or glazed discs
Ceramic
Aluminum
Zirconia Bi-Cut
Aluminum
Oxide
For fast cutting,
general purpose discs
for most metal jobs.
Best for cold-rolled
steel, stainless steel or
metals requiring tough,
fast cutting, long last-
ing abrasives.
Lasts up to 3 times
longer than aluminum
oxide discs. For
general metal working.
Ideal for tough jobs.
Unique grit pattern is
arranged in clusters
for faster stock
removal and cleaning.
Ideal for removing paint
from cars, boats, etc.
without clogging.
Fig. 2
Backing
pads
A. Polypropylene
B. Spiral
C. Rubber
D. Phenolic
Disc nut
Sanding
disc
Rubber
pad
Type 27
flange
Flap disk
without hub
Flap disk
with hub
BCDA
Sanding (Fig. 3)
1. Use a clamp, vise or other practical means to hold your work, free-
ing both hands to control your tool. Firmly grasp rear handle and side
handle before starting and while tool is in operation. Allow sanding
disc to come to full speed before beginning to sand.
2. Hold tool at 5° to 15° angle as shown to ensure proper sanding
pressure and control (Fig. 3). Too great an angle will result in too
much pressure and could cause excessive wear to the disc and
workpiece. Too small an angle will reduce control.
Spindle
Nylon washer
Spindle lock button
Flange
Flap disc
nut position