
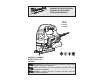
Operator`s manual


18
19
Selecting Speed
Rotate the speed selector dial to the desired maxi-
mum speed (1 through 6). Select "1" for a maximum
speed of 500 strokes per minute. Select "6" for a
maximum speed of 3000 strokes per minute.
Use lower speeds for materials such as plastics and
laminates. Also, use lower speeds for hard metals.
Use higher speeds for materials such as wood and
soft metals (aluminum, copper, brass, etc.).
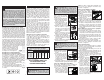
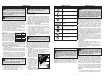
Adjusting the Orbital Action
The amount of orbital action
may be adjusted with the
orbital action selector lever.
In general, a large orbital ac-
tion (4) should be used with
soft materials and a no orbital
action (0) should be used with
hard materials. When a smooth cut is required, no
orbit (0) should be used.
Material
Orbital
Action
Wood 0-4
Metal 0-1
Aluminum 0-1
Plastic 0-2
Smooth Cut 0
WARNING To reduce the risk of injury,
always ensure that the trigger lock-on is in the
"off" position before plugging in tool.
Starting and stopping the tool
1. To start the tool, grasp the handle fi rmly and pull
the trigger.
2. To vary the speed, increase or decrease pres-
sure on the trigger. The further the trigger is
pulled, the greater the speed, up to the maximum
set by the speed selector dial.
3. To stop the tool, release the trigger. Allow the tool
to come to a complete stop before removing the
blade from a partial cut or laying the tool down.
Trigger Lock-On
The trigger lock-on button holds the trigger in the
ON position for continuous use.
1. To lock-on the trigger, pull the trigger and press
in the lock-on button. Release the trigger.
2. To unlock the trigger, pull the trigger and release.
WARNING To reduce the risk of injury,
do not start the tool with the blade contacting
the workpiece.
Making the Cut
1. Set the orbital action according the material to
be cut.
2. Position the tool with the front part of the shoe
on the workpiece and start the tool.
3. Hold the shoe fi rmly against the workpiece and
guide the tool along the desired cutting line. Do
not feed into the work too hard, light pressure on
the saw blade will achieve the optimum cutting
speed.
OPERATION
WARNING To reduce the risk of injury,
wear safety goggles or glasses with side
shields.
WARNING To reduce the risk of injury,
always unplug tool before attaching or remov-
ing accessories or making adjustments. Use
only specifi cally recommended accessories.
Others may be hazardous.
WARNING To reduce the risk of explo-
sion, electric shock and property damage,
always check the work area for hidden gas
pipes, electrical wires or water pipes when
making blind or plunge cuts.
Special Cutting Techniques
1. Straight cuts — To obtain a perfectly straight
cut, clamp a strip of wood as a guide along the
workpiece or use the rip guide (accessory).
2. Bevel cuts — adjust the shoe to the correct angle
(see Adjusting the Shoe).
3. Cutting Sheet Metal — sheet metal may vibrate
when being cut. To minimize vibration, clamp the
workpiece to a wood base.
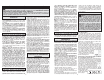
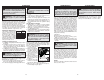
Plunge Cutting
Plunge cuts can be made into soft materials without
a pre-drilled hole. Harder materials require a starter
hole with a diameter slightly over the width of the
blade. To make a plunge cut:
1. Set the orbital action
selector lever to 0.
2. Make sure nothing be-
low the intended cut
area will be damaged.
3. Without turning the
tool on, place the front
edge of the shoe sol-
idly on workpiece.
4. Align the blade with
the intended cut line,
but keep it above the
workpiece.
5. Using the front edge
of the shoe as a pivot, turn on the tool and gradu-
ally lower the blade into the workpiece.
6. When the shoe is fl at against the workpiece,
normal cutting may take place.
MAINTENANCE
Maintaining Tools
Keep your tool in good repair by adopting a regular
maintenance program. Before use, examine the gen-
eral condition of your tool. Inspect guards, switches,
tool cord set and extension cord for damage. Check
for loose screws, misalignment, binding of moving
parts, improper mounting, broken parts and any
other condition that may affect its safe operation. If
abnormal noise or vibration occurs, turn the tool off
immediately and have the problem corrected before
further use. Do not use a damaged tool. Tag damaged
tools “DO NOT USE” until repaired (see “Repairs”).
Under normal conditions, relubrication is not neces-
sary until the motor brushes need to be replaced.
After six months to one year, depending on use,
return your tool to the nearest MILWAUKEE service
facility for the following:
• Lubrication
• Brush inspection and replacement
• Mechanical inspection and cleaning (gears,
spindles, bearings, housing, etc.)
• Electrical inspection (switch, cord, armature, etc.)
• Testing to assure proper mechanical and electrical
operation
WARNING To reduce the risk of
injury, always unplug your tool before
performing any maintenance. Never disas-
semble the tool or try to do any rewiring
on the tool’s electrical system. Contact a
MILWAUKEE service facility for ALL repairs.
Cleaning
Clean dust and debris from vents. Keep the tool
handles clean, dry and free of oil or grease. Use
only mild soap and a damp cloth to clean your tool
since certain cleaning agents and solvents are
harmful to plastics and other insulated parts. Some
of these include: gasoline, turpentine, lacquer thin-
ner, paint thinner, chlorinated cleaning solvents,
ammonia and household detergents containing
ammonia. Never use fl ammable or combustible
solvents around tools.
Repairs
If your tool is damaged, return the entire tool to the
nearest service center.
WARNING To reduce the risk of injury,
electric shock and damage to the tool, never
immerse your tool in liquid or allow a liquid
to fl ow inside the tool.
ACCESSORIES
For a complete listing of accessories refer to your
MILWAUKEE Electric Tool catalog or go on-line
to www.milwaukeetool.com. To obtain a catalog,
contact your local distributor or a service center.
WARNING To reduce the risk of injury,
always unplug the tool before attaching or
removing accessories. Use only specifi cally
recommended accessories. Others may be
hazardous.