
Product Manual


page 7
Fig. 7
Fig. 8
Fig. 9
Fig. 11
Bevel adjustment screw
Fig. 10
4. Move the bevel adjusting lever away from the blade and push down
to secure the position.
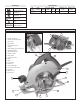
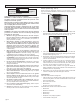
Adjusting Tilt-Lok™ Handle Angle (Fig. 8 & 9)
This circular saw is equipped with an adjustable handle. The Tilt-Lok™
feature allows the user to adjust the angle of the handle for optimum
cutting positions.
1. Unplug tool.
2. Press and hold the handle lever release button in.
3. Loosen the handle release lever by lifting it up and away from the
Tilt-Lok™ handle (Fig. 8).
3. Hold the front handle and rotate the saw by the Tilt-Lok™ handle to
the desired angle as indicated by the markings on the bevel scale
(Fig. 7).
4. To adjust the handle position, hold the front handle and rotate the
Tilt-Lok™ handle to the desired angle as indicated by the handle
rotation adjustment markings (Fig. 9). The Tilt-Lok™ feature has
eight (8) detents which allow the handle to snap into position. Allow
the detent to snap into place.
NOTE: The blade depth setting will determine the range of Tilt-Lok™
positions available for the application. See “Adjusting Depth” for
instructions on adjusting the blade depth.
5. Push the handle release lever back into the handle until it snaps into
place.
WARNING!
If the Tilt-Lok™ handle moves with the handle
release lever in the locked position, do not
operate saw. Return the circular saw to a
MILWAUKEE service facility for repair
immediately.
WARNING!
Do not operate saw with handle lever release
button pressed in or with handle not locked into
position.
NOTE: The saw will not operate if the handle release lever is not
properly secured.
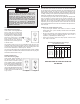
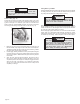
Adjusting the Blade to Shoe (Fig. 10 & 11)
The shoe has been adjusted at the factory to a 90 degree setting.
Inspect the saw regularly to make sure the blade is 90 degrees to the
shoe.
1. Unplug tool.
2. Set the bevel pointer to zero (Fig. 10).
4. To adjust the degree setting, loosen the bevel adjusting lever up by
lifting it up towards the blade. Turn the bevel adjustment screw in or
out until the blade is at a 90 degree angle with the shoe.
5. Check that the bevel pointer is at 0 degrees. To adjust the bevel
pointer, loosen the two screws in the front handle and reposition the
bevel pointer to 0 degrees.
3. To make sure the blade is 90 degrees to the shoe, place saw on the
blade side and retract lower guard. Place a square against the blade
and shoe to inspect the degree setting (Fig. 11).