
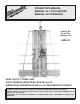
Product Manual


page 10
OPERATION
WARNING!
To reduce the risk of injury, wear safety goggles or glasses
with side shields.
Selecting a Blade
A Combination/Rip blade is supplied with the tool.
MILWAUKEE recommends using one of the blades listed in Accesso-
ries". These blades will provide the best tool performance and the best
cut. Always keep blades clean and sharp for the best performance. A
dull or dirty blade can bind and pinch, resulting in kick back or a poor cut.
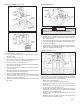
Changing Blades
1. Unplug the tool.
2. Remove the blade guard (see "Installing the Blade Guard").
3. To remove the bolt from the spindle, use the wrench provided with
the tool to turn the bolt counterclockwise while holding in the spindle
lock button.
4. Remove the outer flange, blade, and inner flange. Clean the spindle,
flanges, bolt and blade to remove buildup of dust and debris.
5. Replace the inner flange.
6. Install the blade with the arrow pointing counterclockwise.
7. Replace the outer flange. Tighten the bolt clockwise using the wrench
provided while holding in the spindle lock button.
8. Install the blade guard (see "Installing the Blade Guard").
NOTE: It may be necessary to readjust the rulers after changing or
resharpening blades (see Adjusting the Rulers).
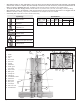
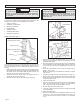
Making the Cut:
1. Rotate the saw motor to the cross-cutting position (Fig. 14). To
rotate the motor, pull out the indexing pin with one hand and rotate
the saw motor with the other hand. Lock the indexing pin into the
preset hole on the saw carriage. The pin is spring-loaded and should
snap into place.
2. Loosen the carriage lock and allow the saw motor to raise to the top
of the tool. The saw motor is attached to the counterbalance cable
and should raise to the top of the guide tubes by itself. If it does not,
see Lubricating Guide Tubes in the Maintenance section.
3. Plug in the tool.
4. Place the workpiece on the rollers. Do not to drop the material; this
may knock the rollers out of alignment.
Slide the workpiece to the desired position using the cross-cut ruler
as a measure.
5. Start the motor and allow it to reach full speed before beginning the
cut.
6. When the motor has reached full speed, slowly pull the saw motor
down through the workpiece, keeping your hand on the handle.
7. Once the cut is complete, turn the tool off and wait for the blade to
come to a complete stop.
8. Raise the saw motor and allow the saw motor to return to the top of
the guide tubes.
9. Tighten the carriage lock.
NOTE: A coasting blade can mar the edge of a freshly cut work-
piece.
Starting and Stopping the Motor
1. To start the saw motor, lift the switch up. The switch will stay up
until it is pushed down.
2. To stop the saw motor, push the switch down.
Fig. 14
Indexing
pin
Cross-cut
ruler
WARNING!
To reduce the risk of injury, do not place hands on or under
saw carriage or in the path of the saw blade.
WARNING!
To reduce the risk of injury, make sure the tool is OFF before
plugging in the tool.
Cross-Cutting
A cross-cut is a vertical cut that must always be done from the top to the
bottom of a workpiece.
MILWAUKEE recommends using the Hold Down Bar Kit for frequent
cutting of workpieces thinner than 3/4" (see "Accessories").
The workpiece must be supported by a minimum of two rollers. When
using the Midway Fence Kit , material must extend at least 4" beyond the
saw carriage on either side.
For easier cutting and best performance, MILWAUKEE recommends
using an Extension Kit when cross-cutting workpieces that extend be-
yond the blade by 5' or more on one side. Do not cross-cut workpieces
that exceed 8'.
WARNING!
Do not cut a workpieces that has a width smaller than that of
the saw carriage. Proper support for the workpiece must be
maintained to insure safety. When the carriage moves over
the workpiece, it would be impossible to safely support the
workpiece for the cut. Use a tool better suited for these
applications.