
Product Manual


page 7
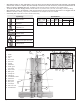
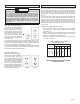
Mounting the Saw Motor (Fig. 4 & 5)
The motor is shipped with (3) washers, (3) nuts, (1) spacer, and (1) bolt.
Remove these items to mount the saw.
1. Loosen the carriage lock and lower the saw carriage to a comfort-
able work height.
2. Tighten the carriage lock securely.
3. Mount the motor to the saw carriage by inserting the studs on the
saw motor through the holes in the saw carriage (Fig. 4).
4. Install washers and nuts. Hand-tighten only.
5. Align the hole in the bracket that extends from the saw handle with
the hole on the saw carriage.
6. Place the spacer between the bracket on the carriage and bracket
on the saw handle.
7. Insert the bolt through the saw handle bracket, through the spacer,
and through the hole in the carriage bracket.
8. Thread a nut onto the bolt. Hand-tighten only.
9. Make sure the plate on the saw motor is flush against the leveling
screw to ensure the saw is square (Fig. 5). This screw is factory
set and does not require adjustments.
10. Tighten the two NUTS ON STUDS FIRST and tighten the NUT ON
BOLT LAST.
Fig. 4
Fig. 5
Bracket
Leveling
screw
Studs
Nuts and
washers
Spacer
Nut and
washer
Bolt
Bracket
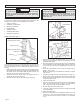
Installing Blades (Fig. 6)
Fig. 6
Bolt
Outer
flange
Inner flange
Blade
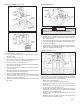
The tool is equipped with a rip ruler and two cross-cut rulers (one on
each side of the tool). The rip ruler is adjusted at the factory, but the two
cross-cut rulers must be adjusted. The blade must be installed before
setting the cross-cut rulers (see Installing Blades).
1. Make sure the tool is unplugged.
2. Loosen the carriage lock and lower the saw carriage.
3. To align the cross-cut ruler, use a square that measures at least 14"
on one side.
4. Line up one edge of the square with the tips on the saw blade and
the other edge of the square with the ruler.
5. Slide the ruler so its measure matches the measure on the square. A
magnet holds the ruler in place, but you may wrap clear tape around
the ruler and frame for additional hold.
6. Repeat the steps above to adjust the cross-cut ruler on the other
side of the tool.
NOTE: After the tool is completely assembled, make a sample cut to
verify that the ruler is adjusted correctly.
1. Make sure the tool is unplugged.
2. While holding in the spindle lock button, use the wrench provided
with the tool to turn the bolt on the saw motor spindle counterclock-
wise. Remove the bolt.
3. Remove the outer flange, but leave the inner flange on the spindle.
4. Install the blade with the arrow pointing counterclockwise (Fig. 6).
5. Replace the outer flange.
6. Tighten the bolt clockwise while holding in the spindle lock button.
7. Adjust the rulers (see "Adjusting the Rulers") and install the blade
guard (see "Installing the Blade Guard").
Adjusting the Rulers (Fig. 7)
WARNING!
To reduce the risk of injury, do not operate the saw without
the guards in place (see "Installing the Blade Guard").
Saw
carriage
Saw
blade
Square
Cross-cut
ruler
Fig. 7
Cross-cut
ruler