
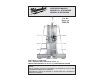
Use and Care Manual


4
5
reaction drives the unit rapidly back toward the
operator when cross-cutting and throws out the
workpiece if ripping.
If the blade becomes twisted or misaligned in the
cut, the teeth at the back edge of the blade can
dig into the top surface of the wood causing the
blade to climb out of the kerf and jump back toward
operator.
KICKBACK is the result of tool misuse and/or
incorrect operating procedures or conditions and
can be avoided by taking proper precautions as
given below:
• Keep blade clean and sharp. Unsharpened or
improperly set blades produce narrow kerf causing
excessive friction, blade binding and KICKBACK.
Any blade with a small set, even though sharp,
may be likely to kick back. A dull blade encourages
the operator to force the saw, causing reduced
control and blade binding. The excessive friction
generated can cause the blade to warp or bind.
Use only blades which are recommended for use
with your tool. Do not use blades with incorrect size
or shaped mounting holes. Never use defective
or incorrect blade washers or bolts. Be sure the
blade bolt is tight. Select the proper blade for the
application. Blade speed specifi cations must be
at least as high as nameplate RPM.
• Do not force tool. Let the saw do the work. A
saw is more readily controlled and will do a better
job when used in the manner for which it was
designed.
• Stay alert. Watch what you are doing and use
common sense. Do not allow yourself to be
distracted. Do not operate tool when tired, under
the infl uence of drugs or alcohol. Hold the tool or
material fi rmly and exercise control at all times.
Position yourself and co-workers out of the kick
back path. Repetitive cuts which lull the operator
into careless movements can also cause kick
back. A brief "stretch" may be all that is neces-
sary to avoid a problem.
• When blade is binding, or when interrupting
a cut for any reason, turn the switch off and
hold the saw motionless in the material until
the blade comes to a complete stop. Never
attempt to remove the saw from the work or
pull the saw backward while the blade is in
motion or KICKBACK may occur. Investigate
and take corrective actions to eliminate the
cause of blade binding.
• To remove the blade after stopping mid-cut,
allow the blade to stop and then back up the saw
(cross-cutting) or board (rip-cutting).
• When restarting a saw in the workpiece, center
the saw blade in the kerf and check that saw
teeth are not engaged into the material. If saw
blade is binding, it may walk up or KICKBACK
from the workpiece as the saw is restarted.
• Avoid cutting nails. Inspect for and remove all
nails before cutting.
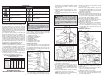
Specifi cations
Cat. No.
Volts
AC
Amps Speed
Blade
Size
Arbor
Capacity *
Thickness Height
6480-20
6486-20 (motor only)
120
120
15
15
5800
5800
8-1/4"
8-1/4"
5/8"
5/8"
1-3/4"
- -
50"
- -
* For additional limitations, see the "Rip Cutting" and "Cross-cutting" sections.
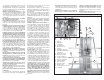
Functional Description
1. Handle
2. Switch
3. Lock
4. Hex wrench
5. Saw motor
6. Carriage
7. Spindle lock
8. Chatter guard (not shown)
9. Torque knobs
10. Blade guard
11. Carriage lock
12. Indexing pins
13. Counterbalance cable
14. Guide tubes
15. Frame of tool
16. Rear guard
17. Cord keeper
18. Saw motor cord
19. Counterbalance
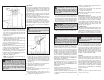
Grounded Tools: Tools with Three Prong Plugs
Tools marked “Grounding Required” have a three
wire cord and three prong grounding plug. The
plug must be connected to a properly grounded
outlet (See Figure A). If the tool should electrically
malfunction or break down, grounding provides a
low resistance path to carry electricity away from
the user, reducing the risk of electric shock.
The grounding prong in the plug is connected
through the green wire inside the cord to the
grounding system in the tool. The green wire in the
cord must be the only wire connected to the tool's
grounding system and must never be attached to
an electrically “live” terminal.
Your tool must be plugged into an appropriate
outlet, properly installed and grounded
in accordance with all codes and ordi-
nances. The plug and outlet should
look like those in Figure A.
Double Insulated Tools:
Tools with Two Prong Plugs
Tools marked “Double Insulated” do not require
grounding. They have a special double insula-
tion system which satisfi es OSHA requirements
and complies with the applicable standards of
Underwriters Laboratories, Inc.,
the Canadian Standard Asso-
ciation and the National Elec-
trical Code. Double Insulated
tools may be used in either of
the 120 volt outlets shown in
Figures B and C.
GROUNDING
WARNING Improperly connecting the
grounding wire can result in the risk of elec-
tric shock. Check with a qualifi ed electrician
if you are in doubt as to whether the outlet is
properly grounded. Do not modify the plug
provided with the tool. Never remove the
grounding prong from the plug. Do not use
the tool if the cord or plug is damaged. If
damaged, have it repaired by a MILWAUKEE
service facility before use. If the plug will not
fi t the outlet, have a proper outlet installed by
a qualifi ed electrician.
Fig. A
Fig. B
Fig. C
18
17
19
14
16
15
14
2
3
7
1
12
9
10
5
9
6
11
4
8