
Use and Care Manual


4
5
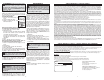
Grounded Tools: Tools with Three Prong Plugs
Tools marked “Grounding Required” have a three
wire cord and three prong grounding plug. The
plug must be connected to a properly grounded
outlet (See Figure A). If the tool should electrically
malfunction or break down, grounding provides a
low resistance path to carry electricity away from
the user, reducing the risk of electric shock.
The grounding prong in the plug is connected
through the green wire inside the cord to the
grounding system in the tool. The green wire in the
cord must be the only wire connected to the tool's
grounding system and must never be attached to
an electrically “live” terminal.
Your tool must be plugged into an appropriate
outlet, properly installed and grounded
in accordance with all codes and ordi-
nances. The plug and outlet should
look like those in Figure A.
Double Insulated Tools:
Tools with Two Prong Plugs
Tools marked “Double Insulated” do not require
grounding. They have a special double insula-
tion system which satisfi es OSHA requirements
and complies with the applicable standards of
Underwriters Laboratories, Inc.,
the Canadian Standard Asso-
ciation and the National Elec-
trical Code. Double Insulated
tools may be used in either of
the 120 volt outlets shown in
Figures B and C.
GROUNDING
WARNING Improperly connecting the
grounding wire can result in the risk of elec-
tric shock. Check with a qualifi ed electrician
if you are in doubt as to whether the outlet is
properly grounded. Do not modify the plug
provided with the tool. Never remove the
grounding prong from the plug. Do not use
the tool if the cord or plug is damaged. If
damaged, have it repaired by a MILWAUKEE
service facility before use. If the plug will not
fi t the outlet, have a proper outlet installed by
a qualifi ed electrician.
Fig. A
Fig. B
Fig. C
Grounded tools require a three wire extension
cord. Double insulated tools can use either a two
or three wire extension cord. As the distance from
the supply outlet increases, you must use a heavier
gauge extension cord. Using extension cords with
inadequately sized wire causes a serious drop in
voltage, resulting in loss of power and possible tool
damage. Refer to the table shown to determine the
required minimum wire size.
The smaller the gauge number of the wire, the
greater the capacity of the cord. For example, a 14
gauge cord can carry a higher current than a 16
gauge cord. When using more than one extension
cord to make up the total length, be sure each cord
contains at least the minimum wire size required. If
you are using one extension cord for more than one
tool, add the nameplate amperes and use the sum
to determine the required minimum wire size.
Guidelines for Using Extension Cords
• If you are using an extension cord outdoors, be sure
it is marked with the suffi x “W-A” (“W” in Canada)
to indicate that it is acceptable for outdoor use.
• Be sure your extension cord is properly wired
and in good electrical condition. Always replace a
damaged extension cord or have it repaired by a
qualifi ed person before using it.
• Protect your extension cords from sharp objects,
excessive heat and damp or wet areas.
READ AND SAVE ALL
INSTRUCTIONS FOR FUTURE USE.
Recommended Minimum Wire Gauge
for Extension Cords*
Extension Cord Length
* Based on limiting the line voltage drop to
fi ve volts at 150% of the rated amperes.
Nameplate
Amperes
0 - 2.0
2.1 - 3.4
3.5 - 5.0
5.1 - 7.0
7.1 - 12.0
12.1 - 16.0
16.1 - 20.0
25'
18
18
18
18
16
14
12
75'
18
18
16
14
12
10
100'
18
16
14
12
10
150'
16
14
12
12
50'
18
18
18
16
14
12
10
EXTENSION CORDS
SPECIFICATIONS
Cat. No.
Volts
AC
Amps For Materials
Tank Capacity
Gallons
Air Flow Cubic
Feet per Minute
Sealed Suction
in Water
8911
8912
8925
8926
8945
8965
120
120
120
120
120
120
7.5
9.2
9.2
9.2
9.2
6.2
Wet or Dry
Wet or Dry
Wet or Dry
Wet or Dry
Wet or Dry
Wet or Dry
11
11
15
21
no tank
10
94
92
92
92
92
133
84”
130”
130”
130”
130”
49”
WARNING To reduce the risk of fi re,
electric shock, injury, and damage to the
tool: Do not plug any tool or appliance rated
over 5 amps into the outlet on the vacuum
cleaner. Check nameplate on the tool for the
amp rating.
Starting and Stopping Vacuum Cleaner
To turn on the vacuum cleaner, set the ON/OFF
switch to the ON position.
To turn off the vacuum cleaner, set the ON/OFF
switch to the OFF position.
Using the Vacuum Cleaner To Pick Up Dry
Materials:
Make sure that the tank is dry before using the
vacuum cleaner to pick up dry materials. If the
vacuum cleaner tank is wet, run the vacuum cleaner
for about 5 minutes (without picking up anything)
to dry the inside of the tank.
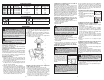
Installing Filters
1. Remove motor head (A) and set aside.
Caution: Use care when handling motor head.
Dropping motor head may cause permanent
damage.
2. If you are using Cat. No. 8965, place foam fi lter
sleeve (B) over fl oat value cage.
3. Install only one of the following fi lters:
If you plan to vacuum dry material into a fi lter bag,
expand the paper fi lter bag (E) and fi t cardboard
collar (G) onto the intake tube (F) as far as pos-
sible.
If you plan to vacuum medium fi ne to coarse,
sharp dry material directly into the tank without
a fi lter bag, fi t a dacron fi lter onto the cloth fi lter
assembly (C and D).
If you plan to vacuum extremely fi ne material
directly into the tank without a fi lter bag, fi t a
paper fi lter onto the tank.
4. Attach cloth fi lter (D)
to fi lter frame (D).
5. Set fi lter frame and
cloth fi lter assembly
(C and D) onto tank.
6. Replace motor head
and snap down tank
latches.
Changing Paper Filter Bag and Cleaning Cloth
Filter
1. Remove motor head and set aside.
2. Clean the cloth fi lter each time the tank is emp-
tied by shaking off loose material and brushing
the fi lter with a soft bristle brush. Do not wash
cloth fi lter with water. Washing can shrink the
fi lter and damage the gasket.
3. Pull bag out of the tank using care not the tear
bag on intake tube. Seal bag with cardboard
fl aps and discard.
Using the Vacuum Cleaner To Collect Dust Cre-
ated By Tools:
Many tools (such as sanders) are designed so they
can be used with vacuum cleaners. The vaccum
cleaners collect the dust that these tools create
before it gets into the air or onto the fl oor. Vacuum
cleaners with the AUTO setting are ideal for collect-
ing dust because they can be set up to turn on and
off automatically using the tool’s AUTO/ON/OFF
switch. Vacuum cleaners without an AUTO setting
can still collect dust. The operator will simply have
to turn the vacuum on and off.
Using a Vacuum Cleaner without an Automatic
Switch as a Dust Collection Device for a Tool
1. Connect vaccum hose to the tool’s dust collection
port.
2. Turn on the vacuum cleaner.
3. Turn on tool.
OPERATION
WARNING To reduce the risk of injury,
wear safety goggles or glasses with side
shields.
WARNING To reduce the risk of injury,
always unplug tool before attaching
or removing accessories or making adjust-
ments. Use only specifi cally recommended
accessories. Others may be hazardous.
Using a Vacuum Cleaner with an Automatic
Switch as a Dust Collection Device for a Tool
1. Connect vacuum hose to the tool.
2. Plug the tool into the electrical outlet on the
vacuum cleaner’s motor head.
3. Set the AUTO/ON/OFF switch to the AUTO posi-
tion.
4. Turn on the tool and the vacuum cleaner will start
automatically within a few seconds.
Using the Vacuum Cleaner To Pick Up Wet
Materials:
WARNING To reduce the risk of electric
shock, DO NOT pick up wet materials
unless the vacuum cleaner is properly set up
to pick up wet materials.
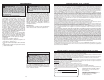
A fl oat valve shuts off suction
when the tank is full. Be sure
the fl oat is clean and moves
freely in the float cage to
ensure that the fl oat valve
works.
Float
cage
Float