
Use and Care Manual


Page 5
TOOL ASSEMBLY
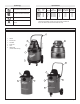
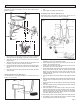
Assembling Dolly (Cat. No. 8955) (Fig. 1)
Assemble as shown in the diagram. You will need a hammer and a
phillips screwdriver.
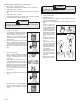
Installing Handle (Cat. No. 8955) (Fig. 2)
You will need either a flat blade screwdriver or a socket driver and a
wrench or a pair of pliers.
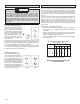
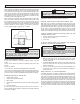
Assembling Dolly (Cat. No. 8938-20) (Fig. 3)
Assemble as show in the diagram. You will need: a hammer, two 1/2"
open end wrenches, and two 7/16" open end wrenches.
1. Insert 2-1/2" bolt (M) through the center hole in rear frame (P), attach
lockwasher (L) and nut (K) and tighten securely.
2. Attach support struts (D) to back of rear frame (P) with 5/8" bolt, star
washers, and nuts (finger tight only).
3. Position main frame inside rear frame. Attach with (2) 5/8" bolts and,
star washers, and nuts on each side (G).
4. Attach handle uprights, inside main frame (Q) (make sure that buttons
at the top face inward using 5/8" bolts, star washers and nuts finger
tighten only). Align holes at the top of the struts (D) with hole in the
handle uprights (G). Attach with 1-3/8" bolts, star washers, and nuts
and tighten securely.
5. Go back and tighten the bolts at the bottom of the uprights and struts
(D).
6. Attach caster socket plates (open end down) to front of main frame (R)
using 5/8" bolts, star washers and nuts and insert casters (T) into the
sockets.
7. Attach the handle (A) onto the uprights by pushing down and holding
buttons in.
8. Place tank retaining bracket (J) through the slot in the back of the rear
frame and thread on the knob.
9. Place axle upright on a hard surface and tap a capnut (O) on with a
hammer. Place one wheel on the axle and slide it down to the capnut.
Slide the axle through the rear of frame and slide on the other wheel.
Tap second capnut onto axle after checking that frame is assembled
correctly by placing the tank on the dolly.
10. Slide bumper (U) down over the socket plates until it snaps into place.
11. Hook basket (V) on the handle with the top hooks around the handle
and the bottom prongs in the holes in the handle.
1. Place wheels on rear frame (B) by tapping in the axle (C), fitting the
wheel (D) on the axle and tapping a cap nut (E) on with a hammer.
2. Insert caster socket (G) into front frame (F) and secure it with the
phillips screw (I).
3. Align front frame (F) and rear frame (B) so that they fit together and fit
lip of tank (J) into the grooves in front and rear frames.
4. Secure frame (B and F) to the tank by placing the hex bolts (K) through
the holes in dolly and securing them with nut (N) and washer (M) as
shown.
5. Insert caster (H) into into caster socket (G) and push down until caster
snaps into place.
Fig. 1
A
E
D
C
G
F
H
I
B
J
L
M
N
K
Fig. 2
1. Place dolly handle between tank and side handle on either side of the
tank.
2. Fasten tightly with slotted hex head screws.
Fig. 3