
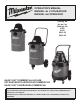
Use and Care Manual


Page 6
Installing and cleaning Cartridge Filters
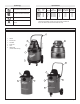
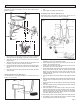
Attaching Caddy and Casters (Cat. No. 8936-20)
You will only need a Phillips screwdriver.
1. Slide caddy over attaching boss' on bottom of vacuum cleaner tank.
2. Install phillips screws and tighten.
3. Slide caster housings over attaching boss' on bottom of vacuum cleaner
tank.
4. Install phillips screws and tighten.
5. Push caster wheel shafts into attaching holes on bottom of caster
housings and bottom of caddy until they click.
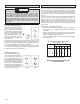
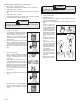
WARNING!
To reduce the risk of injury, always unplug the tool before
removing the motor head.
1. Unplug vacuum cleaner.
2. To remove filter for cleaning, hold onto base
of lid cage with one hand and turn retainer
counter clockwise to loosen (Fig. 4).
Caution: Use care when handling motor
head. Dropping motor head may cause per-
manent damage.
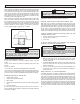
3. Remove filter cartridge from motor head
(Fig. 5). Handle filters carefully when re-
moving for cleaning. Even a small hole can
cause dust to be exhausted. Do not use a
filter with a hole or tear. Replace immedi-
ately.
4. Clean the filter (Fig. 6):
Clean a dry filter cartridge by by tapping
the filter cartridge on the inside of a waste
container or by blowing loose dirt using
exhaust port.
Clean a wet filter cartridge by rinsing it
from the inside. Make sure that the filter is
dry before using it to pick up dry material.
When wet (to prevent mold and/or mildew
build-up), the cartridge filter should be re-
moved and allowed to air dry for a 24-
hour period before being re-installed on
the filter cage.
5. Slide clean cartridge filter over filter cage
(Fig. 7).
6. Place filter retainer on top of cartridge filter.
7. Hold onto base of lid cage with one hand
and turn retainer clockwise to tighten
(Fig. 8).
Installing and cleaning foam filters
1. Unplug vacuum cleaner.
2. Remove motor head.
Caution: Use care when handling motor head. Dropping motor head
may cause permanent damage.
3. Remove the foam filter sleeve (and cloth filter if present) from motor
head.
4. Clean the foam filter
sleeve by rinsing it from
the inside. Make sure that
the filter is dry before us-
ing it to pick up dry mate-
rial. Clean cloth filters by
shaking off loose material
and brushing the filter
with a soft bristle brush
(Fig. 9).
5. Attach the clean foam fil-
ter sleeve to motor head
(Fig. 10).
If you plan to vacuum dry
material into a filter bag,
expand the paper filter
bag and fit cardboard col-
lar onto the intake tube as
far as possible.
If you plan to vacuum dry
material and you are us-
ing the foam filter sleeve,
you must also use the
cloth filter.
6. Replace motor head and
snap down tank latches.
dry materials
wet materials
Fig. 10
Fig. 9
WARNING!
To reduce the risk of injury, always unplug the tool before
removing the motor head.
Fig. 4
Fig. 5
Fig. 6
Fig. 8
Fig. 7