
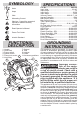
Use and Care Manual


4
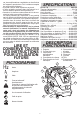
ASSEMBLY
Unpack accessories and parts from the tank by un-
latching the head and pulling it up and off the base.
Installing the Hose Hooks
1. Remove the screws from the hose hook locations.
2. Fit hose hooks to the brackets.
3. Insert screws and tighten securely.
4. Wrap hose around head, looping above and below
the hose hooks to secure.
Securing the
Power Cord
1. Loop the power cord and
secure in the rear bungee,
as shown.
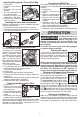
Filters can become clogged during heavy use.
To maintain the efciency of the dust extractor,
empty/change the lter bag and clean all of the
lters periodically. Milwaukee suggests cleaning
the lters after 200 holes (at 5/8” diameter, 4”
deep) or an equivalent amount of produced dust.
Installing/Changing the Plastic Dust Bag
1. Unplug tool.
!!
2. Unlatch and remove
head.
3. Remove old bag and
discard according to
regulations.
4. Open the bag fully and t
the cardboard inlet over
the inlet tube.
5. Pull the bag over the
edges of the tank. En-
sure the small holes around the edge of the bag
are pulled to the outside of the tank.
6. Tuck the bag inside the black
tab over the hose inlet. This
ensures the bag does not
come between the head and
tank connection, allowing the
antistatic system to discharge
properly during use.
7. Replace the head and latch it
in place.
MISE A LA TERRE
TIERRE
TOMA-
CORRIENTE
PRISE DE
COURANT
RELIÉE À LA
TERRE
BROCHE DE
MISE À LA TERRE
CUNS CAJA
TOMACORRIENTE
BOÎTE DE SORTIE
MISE À LA TERRE
ADAPTATEUR
ADAPTADOR
TORNILLO
DE METAL
VIS EN
MÉTAL
ONGLET POUR
VIS DE TERRAGE
PESTAÑA PARA
EL TORNILLO DE
PUESTA A TIERRA
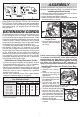
IN CANADA, THE USE OF A TEMPORARY
ADAPTER IS NOT PERMITTED BY THE CANADIAN
ELECTRICAL CODE. Make sure that the appliance
is connected to an outlet having the same congu-
ration as the plug. No adapter should be used with
this appliance.
EXTENSION CORDS
Grounded tools require a three wire extension cord.
As the distance from the supply outlet increases,
you must use a heavier gauge extension cord. Using
extension cords with inadequately sized wire causes
a serious drop in voltage, resulting in loss of power
and possible tool damage. Refer to the table shown
to determine the required minimum wire size.
The smaller the gauge number of the wire, the greater
the capacity of the cord. For example, a 14 gauge
cord can carry a higher current than a 16 gauge cord.
When using more than one extension cord to make
up the total length, be sure each cord contains at
least the minimum wire size required. If you are using
one extension cord for more than one tool, add the
nameplate amperes and use the sum to determine
the required minimum wire size.
Guidelines for Using Extension Cords
• If you are using an extension cord outdoors, be sure
it is marked with the sufx “W-A” (“W” in Canada) to
indicate that it is acceptable for outdoor use.
• Be sure your extension cord is properly wired and in
good electrical condition. Always replace a damaged
extension cord or have it repaired by a qualied
person before using it.
• Protect your extension cords from sharp objects,
excessive heat and damp or wet areas.
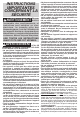
Recommended Minimum Wire Gauge
For Extension Cords*
Nameplate Amps
Extension Cord Length
25' 50' 75' 100' 150'
0 - 2.0
2.1 - 3.4
3.5 - 5.0
5.1 - 7.0
7.1 - 12.0
12.1 - 16.0
16.1 - 20.0
18
18
18
18
16
14
12
18
18
18
16
14
12
10
18
18
16
14
12
10
--
18
16
14
12
10
--
--
16
14
12
12
--
--
--
* Based on limiting the line voltage drop to ve volts at 150%
of the rated amperes.