
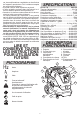
Use and Care Manual


5
Installing/Changing the Fleece Dust Bag
1. Unplug tool.
2. Unlatch and remove
head.
3. Remove old bag and
discard.
4. Fit the cardboard inlet
over the inlet tube.
5. Ensure the bag is con-
tained fully in the tank.
6. Replace the head and
latch it in place.
Installing the Hose and Accessories
Refer to "Accessories" for a list of adapters and dust
collection attachments.
1. Fit the hose into the inlet and twist to secure.
2. Choose the appropriate accessory and insert it
onto the hose. Twist to secure.
5
5
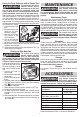
Cleaning/Changing the Main Filter
The dust extractor has an
Filter
automatic filter cleaning
system. During extremely
heavy or long uses, manu-
al cleaning may be neces-
sary. If manual cleaning
does not restore full suc-
tion, replace the lter. See
"Specications" for replace-
ment part number.
1. Turn on dust extractor.
2. To manually clean the lter, place palm of your
hand over the nozzle for 10 seconds.
3. Turn off the dust extractor.
4. Unplug tool.
5. Unlatch and open the lter compartment.
6. Remove the lter and shake or tap the edge over
trash can.
7. Replace the clean lter. If lter does not clean with
tapping, replace with a new lter.
8. Close and latch lter compartment.
Cleaning the Motor Intake Filter
1. Unplug tool.
2. Press in the lock tabs
and pull the cover away
from the head.
3. Pull out the sponge lter.
4. Clean the lter and re-
place.
5. Insert the cover into the
head until the lock tabs snap in place.
After particularly dusty applications, the motor intake
lter may become clogged and cause the tool to
overload. If overload occurs, unplug the tool for 5
minutes and clean the lters.
Changing the HEPA Filter
Periodically inspect the HEPA lter and replace if
necessary. See "Specications" for replacement part
number.
1. Unplug tool.
2. Unlatch and remove
head.
3. Place the head upside
down on a level surface.
4. Remove the 4 screws
holding the orange cover
in place.
5. Carefully remove the
HEPA lter. Note, there is a ring gasket below the
lter - do not discard the ring gasket.
6. Inspect and replace the lter and ring.
7. Replace the cover and tighten the 4 screws securely.
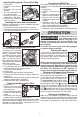
OPERATION
WARNING
To reduce the risk of in-
jury, always unplug tool
before changing or re-
moving accessories. Only use accessories spe-
cically recommended for this tool. Others may
be hazardous.
To reduce the risk of injury, wear safety goggles
or glasses with side shields.
Selecting Air Speed
To increase or decrease the air ow
speed, use the speed control dial. Turn
the dial clockwise to decrease the air
ow speed, and counter clockwise to
increase the airow speed.
Filters can become clogged during heavy use.
To maintain the efciency of the dust extractor,
empty/change the lter bag and clean all of the
lters periodically. Milwaukee suggests cleaning
the lters after 200 holes (at 5/8” diameter, 4”
deep) or an equivalent amount of produced dust.
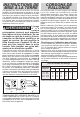
Starting and Stopping Dust Extractor
To turn on the dust extractor, set the
power switch to the ON position ( I ).
To turn off the dust extractor, set the
power switch to the OFF position (O).
To automatically start the dust extrac
-
tor using a power tool's switch, set the
power switch to the TOOL
position.
To use the tool without the automatic lter cleaning
function, set the power switch to the lter cleaning
OFF
symbol below the TOOL or ON positions. It is
recommended to turn off the automatic lter cleaning
when using the dust extractor for wet pickup.
Picking Up Dry Materials
Make sure that the tank is dry before using the dust
extractor to pick up dry materials. If the extractor tank
is wet, run the dust extractor for about 5 minutes (with-
out picking up anything) to dry the inside of the tank.