
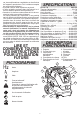
Use and Care Manual


6
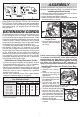
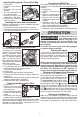
Using the Dust Extractor with a Power Tool
WARNING
To reduce the risk of re,
electric shock, injury,
and damage to the tool:
Do not plug any tool or appliance rated over
4.6 A / 550 W into the outlet on the dust extractor.
Check nameplate on the tool for the amp rating.
Many tools (such as sanders) are designed to be used
with dust extractors. The dust extractors collect the
dust that these tools create before it gets into the air
or onto the oor. Dust extractors with the AUTO set-
ting are ideal for collecting dust because they can be
set up to turn on and off automatically using the tool’s
AUTO/ON/OFF switch.
1. Connect hose to the
tool.
2. Plug the tool into the
outlet on the dust
extractor’s head.
3. Set the AUTO/ON/
OFF switch to the
AUTO position.
4. Turn on the tool and
the dust extractor
will start automatically within a few seconds.
5. When done, turn off the tool and the dust extractor
will stop automatically.
6. Unplug the tool and turn the dust extractor OFF (O)
when the job is complete.
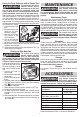
Picking Up Wet Materials
WARNING
To reduce the risk of
electric shock, DO NOT
pick up wet materials
unless tank has been cleaned of dust and the lter
bag has been removed. Turn off and unplug tool
if foam or liquid escapes from the tool.
A oat valve shuts off suc-
Float
tion when the tank is full.
Be sure the oat is clean
and moves freely before
use.
1. Unplug tool and re-
move head.
2. Remove lter bags and
clean tank.
3. Ensure the oat moves
freely.
4. Replace head and latch in place.
5. Turn the power switch to ON (I) and lter cleaning
OFF on the dust extractor.
6. Suction wet materials.
7. When nished, turn the power switch to OFF (O).
8. Unplug tool and remove head.
9. To drain liquid, block wheels and carefully dump
contents. Do not store dust extractor with liquid
in tank.
10. Rinse and dry tank. Run dust extractor for 5 minutes
to ensure tank is thoroughly dry before picking up
dry materials.
MAINTENANCE
WARNING
To reduce the risk of in-
jury, always unplug the
tool before performing
any maintenance. Never disassemble the tool.
Contact a MILWAUKEE service facility for ALL
repairs.
Maintaining Tools
Keep your tool in good repair by adopting a regular
maintenance program. Inspect your tool for issues
such as undue noise, misalignment or binding of
moving parts, breakage of parts, or any other condi-
tion that may affect the tool operation. Return the tool
to a MILWAUKEE service facility for repair. After six
months to one year, depending on use, return the
tool to a MILWAUKEE service facility for inspection.
WARNING
To reduce the risk of
personal injury, electric
shock and damage, nev-
er immerse your tool in liquid or allow a liquid to
ow inside it.
Cleaning
Clean dust and debris from vents. Keep handles
clean, dry and free of oil or grease. Use only mild
soap and a damp cloth to clean, since certain clean-
ing agents and solvents are harmful to plastics and
other insulated parts. Some of these include gasoline,
turpentine, lacquer thinner, paint thinner, chlorinated
cleaning solvents, ammonia and household deter-
gents containing ammonia. Never use ammable or
combustible solvents around tools.
Storage
Before storing the dust extractor, always empty and
clean the tank. Never allow debris to sit in the tank
for any extended period of time. The dust extrac-
tor should be stored indoors.
Repairs
For repairs, return the tool to the nearest service
center.
ACCESSORIES
WARNING
To reduce the risk of in-
jury, always unplug the
tool before attaching or
removing accessories. Use only specically recom-
mended accessories. Others may be hazardous.
Adapter Connection Chart
For Dust Extraction
Attachment: Use Hose Adapter:
49-40-6101 49-90-1959 &
49-90-1960
SDS Plus and
SDS Max Vacuum Bits
49-90-1957
49-40-6105 49-90-1958
5261-DE 49-90-1958
49-40-6110 49-90-1959
5317-DE 49-90-1959
5318-DE 49-90-1959
For a complete listing of accessories, go online to
www.milwaukeetool.com or contact a distributor.