
Jig Saw OPERATOR'S MANUAL


16 17
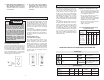
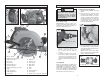
Pocket Cutting
Pocket cuts are made in the middle of the
workpiece when it can not be cut from an
edge. We recommend using a Sawzall
®
reciprocating saw or jig saw for this type
of cut. However, if you must use a circular
saw to make a pocket cut, USE EXTREME
CAUTION. To maintain control of the saw
during pocket cutting, keep both hands on
the saw (Fig. 20).
Fig. 20
Ripping Wood
Ripping is cutting lengthwise with the grain.
Select the proper blade for your job. Use a
rip fence for rips 4" wide or less. To install the
rip fence, slide the bar through the rip fence
slot in either side of the shoe. The width of
the cut is the distance from the inside of the
blade to the inside edge of the rip fence.
Adjust the rip fence for the desired width,
and lock the setting by tightening the rip
fence screws.
When ripping widths greater than 4", clamp
or tack 1" lumber to workpiece and use the
inside edge of the shoe as a guide.
Fig. 19
Cutting Large Panels
Large panels and long boards sag or bend
if they are not correctly supported. If you
attempt to cut without leveling and properly
supporting the workpiece, the blade will tend
to bind, causing KICKBACK.
Support large panels. Be sure to set the
depth of the cut so that you only cut through
the workpiece, not through the supports.
Fig. 18
WARNING
To reduce the risk of electric shock,
check work area for hidden pipes
and wires before making pocket
cuts.
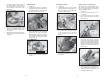
Cross-Cutting Wood
Cross-cutting is cutting across the grain.
Select the proper blade for your job. Ad-
vance the saw slowly to avoid splintering
the wood.
1. Beginning at a corner, line up the sight
line with your cutting line. Tilt the saw
forward, fi rmly fi xing the front of the shoe
on the workpiece. The blade should be
just above cutting line, but not touching
it. Raise the lower guard using the lower
guard lever.
2. Pull the trigger, allowing the blade to
come up to full speed. Using the front
of the shoe as a hinge point, gradually
lower the back end of the saw into the
workpiece.
3. When the shoe rests fl at against work-
piece, release the lower guard lever.
Advance the saw to the far corner. Re-
lease the trigger and allow the blade to
come to a complete stop before remov-
ing it from workpiece. Repeat the above
steps for each side of the opening. Use
a Sawzall
®
reciprocating saw, jig saw or
small hand saw to fi nish the corners if
they are not completely cut through.
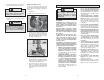
Cutting Masonry and Metal
Although MILWAUKEE Circular Saws are
primarily designed and intended for cutting
wood, they may also be used with abrasive
cutting wheels or dry cutting diamond blades
for cutting metal or masonry.
WARNING
Only use abrasive cutting wheels
with a maximum safe operating
speed greater than the RPM marked
on the tool's nameplate.
WARNING
D
ust, chips and grit can cause the
guard to hang up at any time. If the
saw is used with an abrasive cutting
wheel or dry cutting diamond blade,
reserve and mark it for that use only.
Before using it for wood cutting,
return it to a MILWAUKEE service
facility for cleaning and testing.
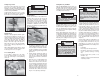
Maintaining Tools
Keep your tool in good repair by adopting a
regular maintenance program. Before use,
examine the general condition of your tool.
Inspect guards, switches, tool cord set and
extension cord for damage. Check for loose
screws, misalignment, binding of moving
parts, improper mounting, broken parts and
any other condition that may affect its safe
operation. If abnormal noise or vibration oc-
curs, turn the tool off immediately and have
the problem corrected before further use.
Do not use a damaged tool. Tag damaged
tools “DO NOT USE” until repaired (see
“Repairs”).
Under normal conditions, relubrication is not
necessary until the motor brushes need to
be replaced. After six months to one year,
depending on use, return your tool to the
nearest MILWAUKEE service facility for the
following:
• Lubrication
• Brush inspection and replacement
• Mechanical inspection and cleaning
(gears, spindles, bearings, housing,
etc.)
• Electrical inspection (switch, cord,
armature, etc.)
• Testing to assure proper mechanical and
electrical operation
WARNING
To reduce the risk of injury, always un-
plug your tool before performing any
maintenance. Never disassemble the
tool or try to do any rewiring on the
tool's electrical system. Contact a
MILWAUKEE service facility for ALL
repairs.
MAINTENANCE
When cutting masonry, use a dry cutting
diamond blade. Make successive passes
at depths of less than 1/4" to achieve the
desired depth. Cutting at a depth of more
than 1/4" will damage the wheel. Frequently
clean dust from air vents and guards. Always
wear a dust mask.
When cutting light gauge sheet metal, use
an aluminum oxide abrasive cutting wheel or
an appropriate blade designed specifi cally
for cutting metal. Set the depth of cut for
1/8" to 1/4" greater than the thickness of the
material you are cutting. Protect everyone in
the area from sparks.