
Operator's Manual


5
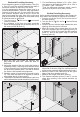
• Use the embedded magnets to secure the laser level
to framing steel studs, steel beams, etc.
• Use the keyhole slot to hang the laser level on the
wall with a nail or screw
Mounting/Adjusting the Laser Level
The pivot bracket can be used to mount the laser
level in multiple ways:
surface.
• Position the laser and/or wall mount on a stable
•
• Once the level is mounted, use the micro adjustment
Attaching/Removing the Riser
(L4 CPL)
use of the bottom plumb point, such as clearance
over steel stud track. To attach the riser, slide the riser
onto the pivot bracket from the rear until it locks into
place. To remove the riser, hold the laser securely
CAUTION
Use of controls or adjustments or
WARNING
To reduce the risk of injury or tem
on vision, do not
-
look directly into the laser when it is on.
lum to enable self-leveling.
ON Turns ON the laser and unlocks the pendu-
ON
performance of procedures other
-
ous radiation exposure.
NOTICE
Perform the Accuracy Field Check
procedure immediately upon unboxing
of each new Laser Level and before exposure to
jobsite conditions. See "Accuracy Field Check"
for information.
OFF
Turns ON the laser but does not unlock the
pendulum (self leveling is disabled). The
to indicate that the projected lines are not
level or plumb.
NOTICE: The ON mode disables self-
leveling and therefore is not intended for
projecting a level or plumb line.
Turns OFF the laser and locks the pen-
and store the Laser Level in the protective
carrying case.
Use the MODE button to cycle through the three
laser modes:
Horizontal Level Line
Vertical Plumb Line
Perpendicular Level & Plumb Lines **
The green laser mode indicators will display the
selected mode.
** Plumb points on Cat. No. 3522-20 only
Power Save
To put the tool into power save mode and extend
the
the
run time by dimming the laser, press and hold
MODE button for 3 seconds. Visual range is
decreased in power save mode. Pressing MODE
again for 3 seconds will deactivate power save if
battery level is above 3%.
Using the Laser Level
1. For best results, place the tool on a work surface
that is:
• sturdy
• level (within 4 degrees of true level)
• free of vibrations
• 90° to the work area
2. Turn on the tool.
3. The tool will self-level when placed on surfaces
within 4 degrees of true level.
4. The tool is ready once the emitted lines are con-
tinuous and no longer moving on the work surface.
Use the 1/4" - 20 threaded insert to mount on a
standard tripod with a corresponding mounting
point.
To turn on the laser and unlock the pendulum,
rotate the On/Off dial to the desired position. The
remaining battery life will be displayed.
Do not look directly into laser
apertures. Laser Mode Indicator LED will display,
and horizontal level line will immediately be emitted
from aperture in the laser housing.
WARNING
OPERATION
5.
Troubleshooting
If the tool does not turn on:
• Ensure battery is installed properly. Fuel gauge
should indicate remaining charge when correctly
installed.
• Ensure battery is charged.
•
Ensure the tool's internal temperature is within
specified operating ranges. If stored in excessive
heat or cold, allow at least 2 hours to an
appropriate ambient temperature between -10°C
to 40°C before turning on the tool.
If problem persists, please contact a MILWAUKEE
®
service facility for support.
If the tool cannot achieve a level state (i.e., the
work surface is > 4 degrees off true level), the
laser points will flash rapidly (3 flashes per
second). Relocate or adjust the work surface.