
Operator's Manual


8
Plunge Cutting
Plunge cuts are made in the middle of the workpiece
when it can not be cut from an edge. We recom-
mend using a Sawzall
®
reciprocating saw or jig
saw for this type of cut. However, if you must use a
circular saw to make a plunge cut, USE EXTREME
CAUTION. To maintain control of the saw during
plunge cutting, keep both hands on the saw.
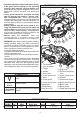
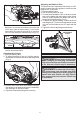
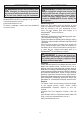
1. Beginning at a corner, line up the sight line with
your cutting line. Tilt the saw forward, rmly xing
the front of the shoe on the workpiece (Fig. 9).
The blade should be just above cutting line, but
not touching it. Raise the lower guard using the
lower guard lever.
2.
To start the saw, push the lock-off button down
while pulling the trigger. Allow the motor to reach
full speed before beginning cut. Using the front
of the shoe as a hinge point, gradually lower the
back end of the saw into the workpiece. Release
the lower guard lever and grasp the front handle.
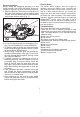
3. When the shoe rests at against workpiece,
advance the saw to the far corner (Fig. 10).
Release the trigger and allow the blade to come
to a complete stop before removing it from work-
piece. Repeat the above steps for each side of
the opening. Use a Sawzall
®
reciprocating saw,
jig saw or small hand saw to nish the corners
if they are not completely cut through.
Overloading
Continuous overloading may cause permanent
damage to tool or battery pack.
WARNING To reduce the risk of elec-
tric shock, check work area for hidden pipes
and wires before making plunge cuts.
Cutting Large Panels
Large panels and long boards sag or bend if they
are not correctly supported. If you attempt to
cut without leveling and properly supporting the
workpiece, the blade will tend to bind, causing
KICKBACK.
Support large panels. Be sure to set the depth of
the cut so that you only cut through the workpiece,
not through the supports.
APPLICATIONS
Cross-Cutting Wood
Cross-cutting is cutting across the grain. Select the
proper blade for your job. Advance the saw slowly
to avoid splintering the wood.
Ripping Wood
Ripping is cutting lengthwise with the grain. Select
the proper blade for your job. Use a rip fence for rips
100 mm (4") wide or less. To install the rip fence, slide
the bar through the rip fence slot in either side of the
shoe. The width of the cut is the distance from the
inside of the blade to the inside edge of the rip fence.
Adjust the rip fence for the desired width, and lock the
setting by tightening the rip fence adjusting knob.
When ripping widths greater than 100 mm (4"), clamp
or tack 25 mm (1") lumber to workpiece and use the
inside edge of the shoe as a guide.
Fig. 8
Fig. 9
Fig. 10