
Operator's Manual


4
OPERATION
WARNING
To reduce the risk
wear proper eye protection marked
of injury, always
to comply with AS/NZS 1337.1.
Fuel Gauge
To determine the amount of charge left in the battery,
turn the tool ON. The Fuel Gauge will light up for 2-3
seconds. When less than 10% of charge is left, 1 light
To signal the end of charge, 1 light on the fuel gauge
the battery pack.
If the battery becomes too hot, the fuel gauge lights
run. Allow the battery to cool down.
Selecting Speed
To set the maximum speed, rotate the speed dial.
Set the speed dial to "1" for the lowest speed (10,000
OPM). Set the speed dial to "12" for the highest speed
(20,000 OPM).
Starting/Stopping
1. To start the tool, grasp the handle and slide the
switch forward to the ON (I) position.
2. Allow the tool to come to full speed before begin-
ning work.
3. Control pressure and surface contact between
accessory and workpiece.
4. To stop the tool, slide the switch back to the OFF
(0) position. Make sure the tool comes to a com-
plete stop before laying the tool down.
APPLICATIONS
WARNING
T
check work area for hidden pipes
o reduce the risk of electric shock,
and wires before drilling or driving screws.
Typical Applications
A large variety of accessories are available for ap-
plications such as sawing/cutting, scraping, and
sanding.
Sawing/Cutting
Install a sawing/cutting blade at an angle easy to use.
Properly clamp the workpiece. Set the speed dial to
a high speed. Start the tool and allow it to reach full
speed. Use moderate pressure to avoid burning or
scorching the workpiece.
Scraping
Install a scraping blade at an angle easy
to use.
Start the tool and allow it to reach full speed. Use
light pressure and a low angle to avoid gouging and
damaging the workpiece.
Sanding
Install a sanding backing pad at an angle easy to
backing pad. Generally, use 24 or 36 grit for heavy
stock removal; 50, 60, or 80 grit for medium stock
Properly clamp the workpiece. Start the tool and allow
it to reach full speed. Use light pressure and long,
sweeping, side to side strokes, advancing forward
ASSEMBLY
WARNING
Recharge only with the charger
-
manual supplied with your charger and battery.
Removing/Inserting the Battery
To remove the battery, push in the release buttons
and pull the battery pack away from the tool.
changing or removing accessories.
WARNING
Always remove battery pack before
1. Remove the battery pack.
2. Lift the quick release lever and
To insert the battery, slide the pack into the body
of the tool. Make sure it latches securely into place.
WARNING
reco
Only use
mmended
accessorie
for thi
s
s tool. Others
may be hazardous.
Changing Accessories
1
2
detent.(1)
3. Turn tool over.
4. Unscrew the accessory bolt.
(2)
5. Remove any accessories.
-
sories of all dirt and debris.
7. Place the accessory and bolt onto the tool.Hand
tighten securely. NOTE: If the accessory does
necessary.
8. Press the quick release lever back into place.
Adapter
Typical
Accessory
Assembly
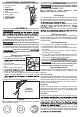
FUNCTIONAL DESCRIPTION
1
2
5
7
3
8
4
6
1. Accessory bolt
2. Adapter
3
4. LED
5. Quick release lever
6. Fuel gauge
8. Speed dial
When working in dusty situations, wear
appropriate respiratory protection.
Blade adapter (available as a spare part) required
for these arbour types.