
Operator's Manual


4
Square Drive Impact Wrench with Pin Detent
(Cat. No. M18 FIW2P12)
Sockets.
1. Use only the appropriate size Square Drive
2.
3.
To attach a socket, align the hole in the accessory
with the detent pin on the anvil. Hold the detent
pin in while pushing the socket onto the anvil.
The detent pin will snap into place in the hole to
secure the socket.
To remove the socket, insert a nail or other thin
object into the hole in the accessory and press
1. For forward (clockwise) rota-
OPERATION
WARNING
To reduce the risk
wear proper eye protection marked
of injury, always
to comply with AS/NZS 1337.1.
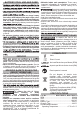
Using the Control Switch
The control switch may be set to three positions:
forward, reverse and lock. Due to a lockout mecha-
nism, the control switch can only be adjusted when
the ON/OFF switch is not pressed. Always allow the
motor to come to a complete stop before using the
control switch.
CENTRE TO LOCK
Forward Reverse
2.
tion, push the control switch
in the direction shown. Check
the direction of rotation before
use.
3.
For reverse (counterclockwise) rotation, push the
control switch in the direction shown. Check the
direction of rotation before use.
To lock the trigger, push the control switch to the
centre position. The trigger will not work when the
control switch is in the locked position.
Always remove the battery pack before performing
maintenance, changing accessories, storing the
tool and any time the tool is not in use.
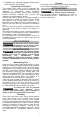
Selecting Speed
Allow the tool to come to a complete stop before
changing speeds. Press the selector button to
cycle between the settings.
In mode:
Bolt Removal - In reverse, the tool runs at full RPM
and IPM until the nut breaks free from the joint. Then,
the tool slows to a reduced RPM for better control in
removing the nut.
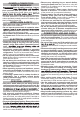
FUNCTIONAL DESCRIPTION
1. 1/2" Square drive
anvil (M18 FIW2F12)
2. LED
3. Control switch
4. Trigger
5. Handle
6. Speed control
7. Belt clip
8. 1/2" Square Drive Anvil
with pin detent
(M18 FIW2P12)
1
2
4
3
8
Cat. No. M18 FIW2F12
Cat. No.
M18 FIW2P12
7
5
ASSEMBLY
WARNING
Recharge only with the charger
-
manual supplied with your charger and battery.
Removing/Inserting the Battery
To remove the battery, push in the release buttons
and pull the battery pack away from the tool.
changing or removing accessories.
WARNING
Always remove battery pack before
WARNING
Use only sockets and other acces-
To insert the battery, slide the pack into the body
of the tool. Make sure it latches securely into place.
WARNING
reco
Only use
mmended
accessorie
for thi
s
s tool. Others
may be hazardous.
sories specifically designed for
use on impact wrenches and drivers. Other
sockets and accessories might shatter or break
causing injury.
Attaching and Removing Accessories
Square Drive Impact Wrenches
(Cat. No. M18 FIW2F12)
1. Use only the appropriate size Square Drive
Sockets.
2. To attach a socket, align the accessory with the
the anvil.
Auto Shut Off - In forward, the tool runs at a
reduced RPM and then shuts off once the torque is
achieved.
When working in dusty situations, wear
appropriate respiratory protection or use a
suitable dust extraction solution.
6
Setting
RPM
M18 FIW2F12
M18 FIW2P12
123
900
1650 2400
IPM
12 3
1000
2400 3500