
Operator's Manual


5
NOTE: Do not remove cutter unless slug is
removed. Slug may eject unexpectedly. Avoid
contact with cutter tips. Periodically inspect the
cutter tips for loose or damaged tips.
NOTE: If the cutter does not release from the arbor
when the collar is turned, use a locking pliers to
the collar securely in one hand, rotate the pliers
clockwise to release the cutter from the arbor.
WARNING
To reduce the risk of injury, do not
hold workpiece by hand.
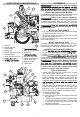
3. Select High Speed
or Low Speed , depending
on your application.
4. Position the tool so the centre pin is directly over
the desired cutting location. Rotate the magnet
knob to engage the magnet. The magnet icons will
align
. The drill motor will not start if the magnet
is not engaged with the work surface.
he
wo
e
w
WARNING
To reduce the risk of injury, always
use a safety strap on vertical, over-
head, and pipe applications. Mounting can re-
lease.
5. Use a safety strap on vertical, overhead, and pipe
applications.
A. Route the safety strap, through the lower
slots, and wrap it tightly around a solid, rigid
structure. Make sure the strap is not twisted.
B. Snap the safety strap snaphooks together.
Eliminate any slack in the strap.
C. When using on a vertical surface, secure the
safety strap with a c-clamp or similar device.
This will hold the strap in place and prevent
the tool from sliding down the vertical surface.
Do not clamp to the strap. This may damage
the strap and cause it to break.
WARNING
-
head or any other position that
-
closure.
6. Insert battery pack.
7. With the ON(I) / OFF(O) switch in the OFF(O)
as the centre pin contacts the work surface.
Failure to lubricate properly will cause cutter
damage. The use of HAWG WASH
®
is recommended for long life of these cutters.
The operator is responsible for the application of
lubricants other than HAWG WASH
®
In overhead or vertical cutting applications, do
or sprays recommended for high speed cutting.
Do not allow lubricant pastes and sprays to enter
tool.
WARNING
To reduce the risk of in-
jury, always keep hands,
gloves, rags, clothing, etc. away from
moving parts and chips. Do not try to
remove chips while the cutter is rotat-
ing. Chips are sharp and can pull objects into
moving parts.
8. Start the drill motor by pulling the
ON(I) / OFF(O) switch out, by
both sides, to the on(I) position.
The drill motor will not start if the
magnet is not engaged with the
work surface.
WARNING
Excessive force on the feed handle
will break magnet free.
9. Even large bits only require a small amount of
pressure on the feed handle.
When feeding the cutter into the material, apply
only enough force to produce a curled chip. Apply-
ing too little force will result in small broken chips
and increased cutting time. Applying too much
force will cause overheating of the cutter resulting
in short cutter life. Overheating of the cutter can
be noticed when cutter and chips turn brown or
blue. Excessive force can cause the cutter to slow
down to a point where cutting time will increase.
The use of cutting lubricants will reduce cutting
heat and increase cutter life
Use less feed pressure when slotting or notching
because there is less support for the cutting edges
in these situations.
10. Keep constant pressure throughout the entire
operation to prevent chips and burrs from falling
under the cutting edges. Cutting debris under the
11. When the cut is complete, withdraw the cutter
while the spindle is still rotating.
12. Stop the drill motor by pushing in the ON(I) / OFF(O)
switch.
13. When the spindle has stopped rotating, use a
pliers to remove cutting debris and chips from the
cutter and spindle. Use care to avoid damaging
the cutter teeth.