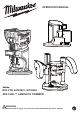
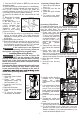
OPERATOR'S MANUAL Cat. No. M18 FTR, 48105601, 48105602 M18 FUEL™ LAMINATE TRIMMER WARNING To reduce the risk of injury, user must read and understand operator's manual.
•Remove any adjusting key or wrench before turning the power tool on. A wrench or a key left attached to a rotating part of the power tool may result in personal injury. •Do not overreach. Keep proper footing and balance at all times. This enables better control of the power tool in unexpected situations. •Dress properly. Do not wear loose clothing or jewelry. Keep your hair and clothing away from moving parts. Loose clothes, jewelry or long hair can be caught in moving parts.
•When battery pack is not in use, keep it away • Never start the tool when the bit is in contact from other metal objects, like paper clips, coins, with the material. The bit cutting edge may grab keys, nails, screws or other small metal objects, the material causing loss of control of the tool. that can make a connection from one terminal • Never lay the tool down until the bit has come to another. Shorting the battery terminals together to a complete stop.
SPECIFICATIONS Wear dust mask. Cat. No. ................................................... M18 FTR Volts............................................................ 18V DC Battery Type .................................................M18™ Charger Type................................................M18™ No Load RPM ................................ 10,000 - 31,000 Maximum Bit Size ............................. 38mm (1-1/2") Collet Size ........................... 6.
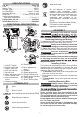
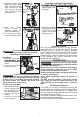
1. Turn the On/Off switch to OFF (O) and remove the battery pack. 2. Place the trimmer upside down on a workbench. 3. Press and hold the spindle lock and use the 17 mm (11/16") wrench to loosen the collet nut counterclockwise (or use the 11mm (7/16") spindle lock wrench to hold the spindle securely). 4. Insert the bit shank into the collet as far as it will go. 5. Back the bit shank out slightly to avoid Collet nut Collet bottoming out. 6. Be sure there is a minimum of 1.
Installing a Straight Edge Guide 12.Rotate the collet nut to Output align the output shaft shaft hole with the housing hole. Insert the 3 mm hex wrench through Shaft and both the output shaft housing and housing. hole 1. A s s e m b l e t h e straight edge guide, as shown. the 17mm 13. Use (11/16") wrench to securely tighten the collet nut clockwise. 14. To remove the base, reverse the procedure. 2.
Feedback Control b. Slide the depth gauge indicator to zero (0) and then raise the depth gauge rod to the desired depth of cut. Tighten the depth gauge knob. NOTE: do not exceed 3.1mm (1/8") cut in a single pass. 8. Make the cut as described in Making the Cut Accessory Plunge Base. Multiple Pass Cuts For cuts more than 3.1mm (1/8") deep, multiple passes are necessary. OFF (O) and remove the battery pack. 2. Install the bit and insert the tool into the base. 3.
Accessory Plunge Base reduce the risk of injury, NEVER WARNING To use the plunge base in a trimmer table. Hold tool with both hands on the handles at all times for maximum control. Work Trimmer feed Bit rotation Top view When working on an inside edge, move the trimmer in a clockwise direction. Moving the trimmer in the opposite direction is known as "climb cutting." reduce the risk of injury, avoid WARNING To "climb cutting.
Accessory Plunge Base Repairs hold the handles firmly For repairs, return the tool, battery pack and charger WARNING Always to the nearest service centre. with both hands during operation. Do not use a plunge base trimmer if the motor ACCESSORIES does not rise automatically when the plunge only recommended accessorelease lever is pressed. WARNING Use ries. Others may be hazardous. NEVER use the plunge base in a trimmer table. For a complete listing of accessories, go online to 1.
WARRANTY - AUSTRALIA and NEW ZEALAND Please refer to Australian and New Zealand warranty supplied with tool. This warranty applies only to product sold in Australia and New Zealand. SERVICE - AUSTRALIA and NEW ZEALAND MILWAUKEE®prides itself in producing a premium quality product that is Nothing But Heavy Duty®. Your satisfaction with our products is very important to us! If you encounter any problems with the operation of this tool, please contact your authorised MILWAUKEE® dealer.