
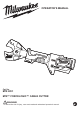
Operator's Manual


jaws (see “Specifications”).
Do not attempt to cut other materials or sizes
specified for the jaws
4
1. Remove the battery pack.
2. Remove cutting jaws from tool.
WARNING
Blades are
from cutting
sharp. Keep hands away
edge. Laceration can
the cutting edge.
6.
7.
occur.
3. Loosen, do not remove, the socket screws using
a 5 mm hex wrench.
4. Carefully slide the blade out of the jaws, keeping
OPERATION
Securely tighten socket screws.
NOTE: The tightening of the socket screws may
out of jaws, and away from cutting edges!
Repeat for other blade. Always change blades as
a set.
WARNING
To reduce the risk of explosion,
electric shock and property
damage, do not use on live electrical lines.
Tool is NOT insulated. Contact with a live
circuit could result in severe injury or death. Turn
off power before making a cut. Never cut gas or
water lines.
Blade is sharp. Keep hands away from cutting
edges and moving parts. Avoid cutting
short pieces of material that put hands
near blades. Laceration and amputation
can occur.
Always remove battery pack before changing
or removing accessories. Only use accessories
may be hazardous.
To reduce the risk of injury, wear safety goggles
or glasses with side shields.
Cutting
Before cutting, ensure retaining pin is properly
seated, and blade socket screws are tight.
ASSEMBLY
-
WARNING
Recharge only with the charger
1. Insert the workpiece squarely between the blades.
Do not attempt to make angled cuts as it will dam-
age the workpiece and blades.
Ensure the workpiece is straight and centered in
the jaws. Keep hands away from blades.
3. Pull and hold the trigger through the operation.
When the cut is complete, the blades will separate
and the tool will shut off. Release the trigger.
NOTE: Workpiece may move slightly during the cut.
4. Two LEDs will light when the trigger is pulled.
WARNING
To reduce the risk of injury
cut recommended materials for the
, only
WARNING
Always remove battery pack before
manual supplied with your charger and battery.
Inserting/Removing the Battery
To remove the battery, push in the release buttons
and pull the battery pack away from the tool.
To insert the battery, slide the pack into the body
of the tool. Make sure it latches securely into place.
SPECIFICATIONS
Cat. No. ...................................................M18 HCC
Volts ............................................................ 18V DC
Battery Type .................................................M18™
Charger Type ................................................M18™
( ACSR) Jaws (Cat. No. 49-16-2773)
Jaw Type
..... Aluminium Conductor Steel Reinforced
Maximum Capacity ........................................ACSR
Guy Wire: 10mm (3/8") Non-EHS
Rebar: 10mm (3/8")
Ground Rod: 10mm (3/8")
Replacement Blades .............. Cat. No. 48-44-0412
(Cat. No. 49-16-2772)
Jaw Type ..............Copper/Aluminium Jaws (Cu/Al)
Maximum Capacity ...........Copper Cable - 400mm
2
Aluminium Cable - 400mm
2
*
Replacement Blades .............. Cat. No. 48-44-0411
with a diameter less than 31mm (1.225")
Copper/Aluminium Jaws will cut any aluminium cable
Changing the Blades
Replace the blades when they become dull,
rounded,chipped, or damaged. Always replace
blades as a set.Use only MILWAUKEE
®
blades
and cutting jaws. Refer to Specifications for
replacement blade numbers.
changing or removing accesso-
-
mended for this tool. Others may be hazardous.
Blades are sharp. Keep hands away from cutting
edge. Laceration can occur.
®
Inserting/Removing the Cutting Jaws
Use only MILWAUKEE cutting jaws. Do not use with
other jaw types. Other jaw types can cause damage
to the tool.
1. Remove the battery pack.
2. Remove the locking thumb screw (when used)
from the back of the retaining pin.
3. Push in, then rotate the retaining pin counterclock-
wise 90°
. The pin will pop out.
4. Insert the cutting jaws. Line up the center hole with
the retaining pin.
5. Push in the retaining pin, then rotate clockwise
90°
.
6. Insert and hand tighten the locking thumb screw.
NOTE: Use the locking thumb screw to prevent the
retaining pin from being unintentionally loosened.
A loose retaining pin may damage the tool.
7. Rotate the jaws to the desired angle.
CAUTION
To a
operate the
void dama
tool
ge to the
without the
tool, do not
retain-
ing pin fully inserted and locked into position.
Damage to the cylinder may occur.
To learn more about the ONE-KEY™ functionality
for this tool, please reference the Quick Start guide
included with this product or go to
milwaukeetools.com.au/ONE-KEY. To download
the ONE-KEY app, visit the App Store or Google
Play from your smart device.
ONE-KEY™