
Operator's Manual


4
ASSEMBLY
WARNING
Recharge only with the charger
-
manual supplied with your charger and battery.
Removing/Inserting the Battery
To remove the battery, push in the release buttons
and pull the battery pack away from the tool.
WARNING
Always remove battery pack before
changing or removing accessories.
To insert the battery, slide the pack into the body
of the tool. Make sure it latches securely into place.
WARNING
recommended for this tool. Others
may be hazardous.
Blades are sharp. Keep hands away from cutting
edge. Laceration can occur.
Changing the Blades
Replace the blades when they become chipped or
damaged. Always replace blades as a set. Use only
replacement blade numbers.
1. Pull the trigger to close the blades slightly. The
®
retaining rings must be exposed.
2. Remove the battery pack.
3. Use a wrench or pliers to remove the blade nuts
and remove the blade bolt.
4. Remove the retaining ring and pull out the pin
from one of the blades.
5. NOTE: Take notice of the blade orientation so the
new blades can be installed the same way. The
and the bevels face away from each other, like a
pair of scissors.
6. Carefully remove the blade.
7. Install the new blade in the same orientation.
8. Slide the pin through the blade and bracket.
Replace the retaining ring.
9. Repeat steps 4 to 8 for the other blade.
10. Insert the blade bolt.
11. Thread the inner blade nut onto the blade bolt
and hand-tighten.
12. Thread the outer blade nut onto the blade bolt.
Holding the inner blade nut motionless, tighten
the outer blade nut to lock the nuts together.
Locking and Unlocking the Trigger
To lock the trigger, pull the trigger lock back.
To unlock the trigger, push the trigger lock to the
center position.
To lock for remote cut, pull the trigger and push the
trigger to the
position. Pull the trigger again to
release.
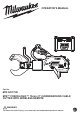
FUNCTIONAL DESCRIPTION
12
2
3
1
13
1. Blade retainer
2. Blades
3. Front handle
4. Grounding lug
5. Trigger lock
6. LED
7. Trigger
8. Release trigger
9. Handle
10. ONE-KEY battery
door
11. Remote cut light
12. Remote cut switch
13. Hanger
14. Remote power switch 1
15. Remote button 2
16. Remote button 3
17. Remote cut indicators
14
15
16
17
11
5
6
7
8
9
10
4
SPECIFICATIONS
Cat. No. ............................................ M18 HCC75R
Volts ............................................................18V DC
Battery Type .................................................M18™
Charger Type ................................................ M18™
Force...........................................................77.8 kN
1
1
2
2
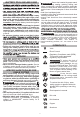
Replace the AA Batteries in the
Wireless Remote
1. Open the battery door(1-2).
2. Remove the old battery.
3. Insert the new battery into
the battery compartment.
4. Close the battery door.
Recommended Ambient
Operating Temperature ..................
-18°C to 51°C
(0°F to 125°F)
High Voltage Field Rating
Frequency...................................2400-2483.5 MHz
........................... 34.5 kV
Max Capacity *
†
Single Conductor ....................760mm
2
Cu, 15kV
760mm
2
Al, 46kV
3 Conductors .........................185mm
2
Cu, 15 kV
3 Conductor Single Cable...................3x240mm
2
3x400mm
2
MCM Al
* Do Not Cut Steel
* Rating applies to wireless remote
†
In Remote Mode, only make Single Conductor cuts
Volts
Replacement Blade Cat No.....................49162774
Remote Cat. No.......................................22802776
........................................6V DC (1.5V AA x 4)