
Operator's Manual


5
OPERATION
WARNING
To reduce the risk of explosion,
electric shock and property
damage, do not use on live electrical lines. Tool
is NOT insulated. Contact with a live circuit
could result in severe injury or death. Turn off power
before making a cut. Never cut gas or water lines.
Keep hands away from all cutting edges and
moving parts. Laceration and amputation
can occur.
Always remove battery pack before changing or
removing accessories. Only use accessories spe-
hazardous.
To reduce the risk of injury, wear safety goggles or
glasses with side shields.
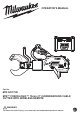
Remote Cutting
Before cutting, ensure blades are properly installed.
To set the tool on the ground, rotate the cutting head
180° to use the front handle as a "foot" and set the
tool in position on the ground.
To hang the tool, use the front handle and tool
hanger to set the tool in a hanging position.
Insert the workpiece squarely between the blades.
Do not attempt to make angled cuts as it will dam-
age the workpiece and blades.
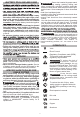
Per NFPA 70E
All steps must be completed in order! Once started,
steps 1-4 must be completed with no more than
5 minutes between each step. If more than 5 minutes
occurs, reset (see step 7) and begin again.
1. Turn ON (
) the remote cut switch on
the tool to disable the trigger and turn
on the wireless function.
The tool's remote cut light will be
steady red.
2. WARNING! Ensure the remote
cut switch is ON before pulling
the trigger.
Pull the trigger (1) and slide the
1
2
trigger lock to (2).
The tool's remote cut light will
WARNING! During the cut, remain outside the arc
system being cut.
3. Turn ON (I) the remote.
Light 1 will be steady
blue.
red.
NOTE:
blue and Light 2 off indicates the remote is
out of range of the tool. Move the remote
closer to the tool.
4. Press and hold button 2 for
2
sec
2 seconds.
Light 2 will be steady
red.
red.
5. Within 20 seconds, press and
2
sec
hold button 3 for 2 seconds
to begin the cut.
Light 3 will be steady
red.
Release button 3, cutting will begin.
Note, if more than 20 seconds passes between
step 4 and 5, reset (see step 7) and begin again.
6. When the cut is complete, the
cut indicator will light:
Green = Done Cutting
Red = Cut Failed
7. To reset, pull the trigger (1) to
1
2
3
unlock.
Pull the release trigger (2) to
reset the jaws.
Turn OFF the remote cut switch
(3).
The range for remote cutting is 10 meters.