
Operator's Manual


4
person before using it.
Protect your extension cords from sharp objects,
excessive heat and damp or wet areas.
When stringing lights together, consider the total
Amperes draw when selecting the extension cords.
READ AND SAVE ALL INSTRUCTIONS
FOR FUTURE USE.
ASSEMBLY
WARNING
Recharge only with the charger
-
manual supplied with your charger and battery.
Inserting/Removing the Batteries
Insert each battery pack by sliding battery pack(s)
into the body of the tool. Insert each battery pack
until the battery latches lock.
To remove the battery pack(s), press in both battery
latches and slide each battery pack off of the tool.
Inserting/Removing Extension Cords
When not using the AC option, make sure the AC
doors are closed completely.
When running the light on AC Power, an extension
plug in a suitable extension cord.
ONE-KEY™
To learn more about the ONE-KEY functionality for
this tool, please reference the Quick Start guide in-
cluded with this product or go to milwaukeetool.com/
One-Key. To download the ONE-KEY app, visit the
App Store or Google Play from your smart device.
LIGHT OPERATION
WARNING
To reduce the risk of injury, do not
look directly into the light when the
light is on.
Using the Light
1. Insert battery pack(s) or plug into AC power.
2. Press the Power
button to turn on the light.
NOTE: When the light is running on battery, the
Battery Power Indicator will light. When the
light is running on AC power, the AC Power Indicator
will light.
3. Press the - and + buttons to cycle through High
(9000 lumens), Medium (4800 lumens), and Low
(2500 lumens).
GROUNDING
DANGER
Improperly connecting the ground-
ing wire can result in the risk of
if you are in doubt as to whether the outlet is
properly grounded. Do not modify the plug pro-
vided with the tool. Never remove the grounding
prong from the plug. Do not use the tool if the
cord or plug is damaged. If damaged, have it
repaired by a
MILWAUKEE
®
service facility befor
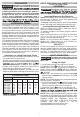
EXTENSION CORDS
Grounded tools require a three wire extension
cord. Double insulated tools can use either a two
or three wire extension cord. As the distance from
the supply outlet increases, you must use a heavier
gauge extension cord. Using extension cords with
inadequately sized wire causes a serious drop in
voltage, resulting in loss of power and possible tool
damage. Refer to the table shown to determine the
required minimum wire size.
The smaller the gauge number of the wire, the greater
the capacity of the cord. For example, a 14 gauge
cord can carry a higher current than a 16 gauge cord.
When using more than one extension cord to make
up the total length, be sure each cord contains at
least the minimum wire size required. If you are using
one extension cord for more than one tool, add the
nameplate amperes and use the sum to determine
the required minimum wire size.
Guidelines for Using Extension Cords
If you are using an extension cord outdoors, be sure
it is acceptable for outdoor use.
Be sure your extension cord is properly wired and in
good electrical condition. Always replace a damaged
To operate the light on AC Power, plug AC cord into
an AC outlet.
Recommended Minimum Wire Size (mm
2
)
For Extension Cords*
Extension Cord Length
7.5m 15m 23m 30.5m 45m
Nameplate
Amperes
0 - 2.0
2.1 - 3.4
3.5 - 5.0
5.1 - 7.0
7.1 - 12.0
12.1 - 16.0
16.1 - 20.0
of the rated amperes.
1.0
1.0
1.0
1.0
1.5
2.0
4.0
1.0
1.0
1.0
1.5
2.0
4.0
1.0
1.0
1.5
2.0
4.0
6.0
4.0 --
--
--
--
--
--
1.0
1.5
2.0
4.0
1.5
2.0
4.0
4.0
6.0
e
NOTE: The light will default to the selected brightness
the next time it is turned on.
4. Press the Area Selector button to select front,
back, or full lighting. The light will default to the
selected area the next time it is turned on.
5. Press the Power
button to turn the light off.
NOTE: On battery power, the second battery pack
inserted has reached end-of-charge.
NOTE: When using the light with AC input, the light
will default to full brightness and full lighting. Area
selector and brightness adjustment buttons will be
disabled. Adjust the brightness using the
ONE-KEY™ app. Refer to the Quick Start guide
included with this product or go to
NOTE: Do not exceed 8.8A (2100W) of output.
Reduce AC Output Amps by 1.2A (276W) per
additional light added insequence.
www.milwaukeetools.com.au/one-key /
www.milwaukeetools.co.nz/one-key
cord can be run from the light. Open the door and