
Operator's Manual


6
RADIO OPERATION
WARNING To reduce the risk of fi re
or electric shock, do not expose this radio to
rain or moisture.
WARNING Always remove battery
pack before changing or removing acces-
sories. Only use accessories specifically
recommended for this radio. Others may be
hazardous.
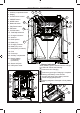
Turning On/Off and Controlling Volume
Plug the cord into an appropriate AC outlet or install
a battery pack.
Press the On/Off/Volume control button to turn
the radio on and off. The radio station (frequency)
is displayed. To display the time, press the CLOCK
button. Volume is restored to the last setting.
NOTE: When the Radio Charger is running on
battery power, the display will dim after 5 minutes
to reduce power use.
Rotate the On/Off/Volume control button to
increase or decrease the volume.
Setting the Clock
1. Press and hold the CLOCK button until the hour
begins to À ash.
2. Use the Ż and Ź buttons to change the hour.
3. Press the CLOCK button again. The minutes
will begin to À ash. Use the Ż and Ź buttons to
change the minutes.
4. Press the CLOCK button again to save.
EQ Adjustment
To manually adjust the Bass/Treble sound, press
the EQ button. Set the bass sound by rotating the
On/Off/Volume control button
. Press the EQ
button again to set the treble sound by rotating the
On/Off/Volume control button .
Selecting Band
Push the MODE button to select Bluetooth, FM,
AM, or AUX.
Tuning and Seeking
Press the Ż and Ź buttons to move up and down
the band. Press, hold, and release the Ż and Ź
buttons to SEEK through the band. When a station
is found, the SEEK will stop.
PRESET Stations
To set the PRESET stations:
1. Tune to desired station.
2. Press and hold the PRESET button until the
PRESET indicator on the display begins to À ash.
3. Use the Ż and Ź buttons to select the PRESET
location for the station. Five locations (1-5) are
available.
4.
Press the PRESET button to save the location.
To tune to a PRESET station:
Press and release the PRESET button to step
through the PRESET stations.
Using the Stereo AUX Jack
1. Open the Auxiliary Compartment
2. Plug the auxiliary device into the Stereo AUX
jack.
3. Use the MODE button to select AUX.
4. Start the auxiliary device.
Using Bluetooth
To enter the Bluetooth mode, press the but-
ton, or press the MODE button to cycle through
to Bluetooth.
Pairing
• If no Bluetooth device is connected, Bluetooth
pairing will begin automatically and the icon
will À ash on the display.
• The radio will continue to search for a signal for
3 minutes.
• To manually pair a device, press and hold blue-
tooth button until the begins to À ash.
• While the is À ashing, select "Milwaukee" on
the Bluetooth capable device.
• Enter PIN "0000".
• Once the device has successfully paired with the
radio, the will be shown on the radio's display.
Connecting
To enter the Bluetooth mode, press the but-
ton, or press the MODE button to cycle through
to Bluetooth.
When the radio locates a paired Bluetooth device,
the will be shown on the radio's display.
If connection is lost between the radio and the
Bluetooth device, the radio will try to reconnect
automatically for up to 3 minutes.
Controlling
When streaming music through to the radio via
a Bluetooth device, use the button to start
and pause the music. Use the Ż and Ź to move
through the tracks.
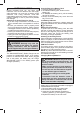
ADDITIONAL BATTERY SAFETY RULES
W
ARNING To reduce the risk of fire,
personal injury, and product damage due to
a short circuit, never immerse your tool,
battery pack or charger in fluid or allow a
fluid to flow inside them. Corrosive or
conductive fluids, such as seawater, certain
industrial chemicals, and bleach or bleach-
containing products, etc., can cause a short
circuit.