
Operator's Manual


CHARGER OPERATION
WARNING Charge only MILWAUKEE
®
M18™ Lithium-Ion battery packs in the
MILWAUKEE
®
Li-Ion Battery Charger. Other
types of batteries may cause personal injury
and damage. Battery pack and charger are
not compatible with V™-technology or NiCd
systems.
When to Charge MILWAUKEE
®
Li-Ion Battery
Packs
Remove the battery pack from the tool for
charging when convenient for you and your job.
MILWAUKEE
®
battery packs do not develop a
"memory" when charged after only a partial dis-
charge. It is not necessary to run down the battery
pack before placing it on the charger.
• Use the Fuel Gauge to determine when to charge
your MILWAUKEE
®
Li-Ion battery pack.
• You can "Top-Off" your battery pack's charge
before starting a big job or long day of use.
• The only time it is necessary to charge the
MILWAUKEE
®
Lithium-Ion battery pack is when
the pack has reached the end of its charge. To
signal the end of charge, power to the tool will drop
quickly, allowing you just enough power to ¿ nish
making a cut, drilling a hole, or driving a fastener.
Charge the battery pack as needed.
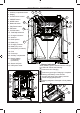
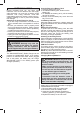
How to Charge the Battery Pack
Plug the Radio Charger into a 120V outlet. The
battery packs will not charge if the Radio Charger
is not plugged in. Place the battery pack onto the
bay by sliding the pack on from the top of the bay.
The red light will turn on, either À ashing (pack is
too hot or cold) or continuous (pack is charging).
• A fully discharged pack with an internal tempera-
ture between 32°F and 104°F will charge in 30-Min
or 1-Hour, depending on the battery pack.
• Heavily cycled battery packs may take longer to
charge completely.
• The Fuel Gauge lights on the battery pack are
displayed as the pack is being charged, indicating
how fully charged the pack is.
• After charging is complete, the continuous green
light will turn on and the fuel gauge will turn off.
• The charger will keep the battery pack fully
charged if it is left on the charger.
• If the light indicator À ashes red and green, check
that the battery pack is fully seated into the bay.
Remove the pack and reinsert. If the problem
persists, contact a MILWAUKEE service facility.
• If the light indicator does not come on, check
that the battery pack is fully seated into the bay.
Remove the pack and reinsert. If the light indicator
still does not come on, contact a MILWAUKEE
service facility.
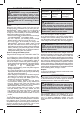
Charging a Hot or Cold Battery Pack
The Red À ashing indicator light on the charger indi-
cates that the battery pack temperature is outside
the charging range. Once the pack is within the
acceptable range, normal charging will take place
and the red light will be continuous. Hot or cold
battery packs may take longer to charge.
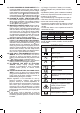
Li-Ion Charging Status
Battery Pack
Temperature
Red Charger
Indicator Light
Charging Status
Too Hot
Normal Range
Too Cold
Flashing
Continuous
Flashing
Not charging
Normal charging
Not charging
ACCESSORIES
MAINTENANCE
WARNING To reduce the risk of injury,
always unplug your tool before performing
any maintenance. Never disassemble the tool
or try to do any rewiring on the tool’s electrical
system. Contact a MILWAUKEE service facility
for ALL repairs.
WARNING To reduce the risk of injury,
electric shock and damage to the tool, never
immerse your tool in liquid or allow a liquid
to fl ow inside the tool.
Maintenance and Storage
Store your charger in a cool, dry place.
As a general practice, it is best to unplug battery
chargers and remove battery packs when not in
use. No battery pack damage will occur, however,
if the charger and battery pack are left plugged in.
Cleaning
Clean out dust and debris from charger vents and
electrical contacts by blowing with compressed air.
Use only mild soap and a damp cloth to clean the
battery pack and charger, keeping away from all elec-
trical contacts. Certain cleaning agents and solvents
are harmful to plastics and other insulated parts.
Some of these include gasoline, turpentine, lacquer
thinner, paint thinner, chlorinated cleaning solvents,
ammonia and household detergents containing am-
monia. Never use À ammable or combustible solvents
around battery packs, charger, or tools.
Repairs
If your tool is damaged, return the entire tool to the
nearest service center.
If the supply cord is damaged, it must be replaced
by the manufacturer, its service agent or similarly
qualifi ed persons in order to avoid a hazard.
WARNING To reduce the risk of injury,
always unplug the tool before attaching or
removing accessories. Use only specifi cally
recommended accessories. Others may be
hazardous.
Plug the Radio Charger into a 220-240V outlet. The
0˚C
40˚C
system. Contact your local authorised
MILWAUKEE
®
dealer or service centre.
• If the light indicator flashes red and green,
check that the battery pack is fully seated into
the bay. Remove the pack and reinsert. If the
problem persists, contact your local authorised
MILWAUKEE
®
dealer or service centre.
• If the light indicator does not come on, check
that the battery pack is fully seated into the
bay. Remove the pack and reinsert. If the light
indicator still does not come on, contact your
local authorised MILWAUKEE
®
dealer or service
centre.
For a complete listing of accessories refer to your
MILWAUKEE
®
Electric Tool catalogue or go on-
line to milwaukeetools.com.au or milwaukeetools.
co.nz. To obtain a catalogue, contact your your
local authorised MILWAUKEE
®
dealer or service
centre.