
Use and Care Manual


6
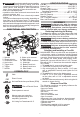
OPERATION
Selecting Speed
Select the speed according to the bit diameter and
materials. Only change speeds when core drill is
stopped.
Select 3"-6" for low speed, which is appropriate for
those core bit sizes and for cutting through rods, deep
holes, and hard aggregate.
Select 1"-3" for high speed, which is appropriate for
those core bit sizes and for cutting in softer materials.
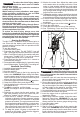
Locking the Trigger
To lock the trigger, slide the trigger lock to the locked
position.
To unlock the trigger, slide the trigger lock to the
unlocked
position.
The trigger will not work when the trigger lock is in
the locked position.
Always lock the trigger and unarm the machine or
remove the battery pack before performing mainte-
nance, changing accessories, storing the machine,
and any time the machine is not in use.
Command Center
The command center provides feedback during cor-
ing, allowing you to help prevent motor overload and
premature bit wear.
Digital Level
Use the digital level to ensure the hole is level
throughout the operation. Use the digital level
to properly align the core drill during handheld
use, or when installing into a core drill stand.
The four red arrow LEDs indicate where the machine
is o of level and the direction the machine handle
needs to be moved to become level. The center white
LED indicates the machine is level.
• When level, the center White LED will
light up (<1.5° o of level).
• When "slightly" o level, the center
White LED and the Red LED associ-
ated with the direction o of level will
light up (1.5° - 2.7° o of level).
• When "very" o level, the Red LED as-
sociated with the direction o of level
will light up (>2.7° o of level).
During Horizontal drilling, the left and right arrows
are not used.
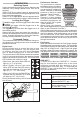
Performance Indicator
The performance indicator
-RED-
LESS
PRESSURE
-GREEN-
IDEAL PRESSURE
(STANDS)
-GREEN-
GOOD PRESSURE
-YELLOW-
OK PRESSURE
-YELLOW-
MORE
PRESSURE
provides pressure feedback.
The LEDs will light up one by
one as pressure is applied to
the bit. Increase or decrease
pressure on the bit to reach
the green "Ideal Pressure".
NOTE: Green "Ideal
Pressure"
is best obtained
using a core drill stand. Most
handheld applications will
result in yellow "OK" or green
"Good" pressures.
When using new diamond
bits, follow manufacturer's instructions for breaking
them in (see "Diamond Core Bits").
After the bits have been broken in, low feed pressure
will polish diamonds, slows penetration and contrib-
utes to bit glazing. High feed pressure can overload
the core drill motor or can cause diamonds to pull
out prematurely, particularly when coring embedded
steel. Make the bit work, but do not try to jam the bit
through the material.
Fuel Gauge
When the machine is armed, the Fuel Gauge displays
the battery pack's remaining run time. The fuel gauge
mirrors the fuel gauge on the battery pack. When less
than 10% of charge is left, 1 light on the fuel gauge
will ash. When the battery reaches 0% charge, the
fuel gauge will ash 8 times. Charge the battery pack.
Less than 10% if first light flashes 4 times
10-32% 32-55% 55-77% 77-100%
ONE-KEY™
To learn more about the ONE-KEY™ function-
ality for this machine, please refer to the quick
reference included with this machine or go to
milwaukeetool.com/One-Key. To download the
ONE-KEY™ app, visit the App Store or Google Play
from your smart device.
ONE-KEY™ Indicator
Solid Blue Wireless mode is active and ready
to be congured via the ONE-KEY™
app.
Blinking Blue Machine is actively communicating
with the ONE-KEY™ app.
Blinking Red Machine is in security lockout and
can be unlocked by the owner via
the ONE-KEY™ app.