
Use and Care Manual


7
WARNING
To reduce the risk of injury, always
check the work area for hidden
wires before coring.
Always wear proper eye protection marked to
comply with ANSI Z87.1.
When working in dusty situations, wear appro-
priate respiratory protection or use an OSHA
compliant dust extraction solution.
When drilling with water, route the water away
from the work area or use a liquid collection de-
vice to keep work area dry and reduce the risk of
electrical shock. Do not allow water to ow inside
machine or battery pack.
Use extreme care when drilling through oors.
Provide for protection of all personnel and mate-
rial below the area. Cores generally drop from bit
at the completion of the hole.
To reduce the risk of injury, always use a side
handle during handheld operations. Always brace
or hold securely. Ensure side handle is tightened
securely before each use. Always be prepared for
bit binding and core drill reaction.
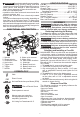
Arming the Machine
The MX FUEL™ machines must be armed prior to
use. Even with the battery pack inserted, the trig-
ger and machine functions will not operate until the
machine is armed.
To arm the machine:
1. Insert the battery pack.
2. Press the Arm button. The MX FUEL™ icon will
light. The trigger will become armed in 2 seconds.
3. After 15 minutes of inactivity, the machine will enter
sleep mode. The MX FUEL™ icon will go o and
the trigger and LEDs are un-operational.
4. Press and hold the Arm button for 1 second to
reactivate the machine.
5. Press and hold the ARM button for 1 second to unarm
(turn o) the machine. The MX FUEL™ icon will go o.
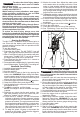
Handheld Core Drilling
1. Install the bit and select the speed.
2. Insert the battery pack.
3. Arm the machine.
4. Start the ow of water to the bit by opening the
water valve. WARNING! When drilling with water,
route the water away from the work area or use a
liquid collection device to keep work area dry and
reduce the risk of electrical shock.
5. Press the trigger lock to the unlocked
position.
6. Grasp the handles rmly and align the bit.
7. Use the digital level to ensure the core drill is level
throughout the cut.
8. To start the machine, pull the trigger.
NOTE: A worklight is turned on when the trigger
is pulled.
9. Feed bits very slowly into the work surface. Use
light feed pressure until the bit crown has pen-
etrated or "seated" into the material.
10. Once the bit is "seated", use the Performance
Indicator to determine if proper pressure is being
used throughout the cut. Increase or decrease
pressure as needed. Too much pressure will slow
the bit and reduce drilling eciency; reduce pres-
sure slightly to allow the bit to regain speed. Too
little pressure will cause the bit to slide over the
work area and dull the point of the bit.
11. To vary the speed, increase or decrease the
pressure on the trigger. The further the trigger is
pulled, the greater the speed.
12. Monitor the water ow. Adjust the water valve
so the water return is a muddy, solid color. Clear
water or clear streaks indicate too much water
volume and will reduce bit life. Adequate water
volume varies according to the bit diameter. Use
only enough water during coring to ush the cut-
tings from the work surface.
13. To stop the machine, remove the bit from the hole
and release the trigger. Make sure the bit comes to
a complete stop before laying down the machine.
14. If the bit binds, release the trigger and wait for
the bit to stop completely. Free the bit from the
workpiece.
15. Press the trigger lock to the locked
position.
16. Close the water valve.
17. Press the arm button to turn o the machine.
18. See "Retrieving Cores and Deep Coring" for
instructions on removing cores.
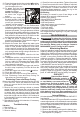
Core Drilling on a Stand
WARNING
To reduce the risk of injury, do not
core unless the proper vacuum has
been achieved when the stand is secured with a
vacuum system.
1. Install the core drill onto the stand according to
the core drill stand instructions (see "Mounting
the Core Drill to a Stand").
2. Secure the stand to the work surface according to
the core drill stand instructions. WARNING! Do not
rely on the weight of the stand, shoring pin alone,
or body weight on the stand for securing during
use. The stand will rotate and cause injury.
3. Use the digital level to ensure the core drill is level.
4. Install the bit and select the speed.
5. Insert the trigger lock-on (optional) but do NOT
engage the trigger.
6. When using a vacuum system, follow the manu-
facturer's instructions. WARNING! Do not core
unless the proper vacuum has been achieved.
Always monitor the vacuum gauge during coring.
7. Insert the battery pack.
8. Arm the machine.
9. Start the ow of water to the bit by opening the
water valve. WARNING! When drilling with water,
route the water away from the work area or use a
liquid collection device to keep work area dry and
reduce the risk of electrical shock.