Metco Part Number: 58140193 MM004231 MM004423 ECE ECE Date 07/11/2019 09/25/2019 * See back page for date code and revisions. TTi Part Number: -- TC Item ID MM00156363 NOTE: “Printed in” text is variable, to reflect the country in which the part is printed. For example “Printed in China” or “Printed in Vietnam”. The country listed in the art may change with a supplier change.
OPERATOR'S MANUAL MANUEL de L'UTILISATEUR MANUAL del OPERADOR Cat. No. / No de cat. MXF368 MX FUEL™ 1-1/8" HEX BREAKER MARTEAU PIQUEUR HEXAGONAL DE 29 mm (1-1/8") MX FUEL™ MARTILLO DEMOLEDOR HEXAGONAL DE 29 mm (1-1/8") MX FUEL™ WARNING To reduce the risk of injury, user must read and understand operator's manual. AVERTISSEMENT Afin de réduire le risque de blessures, l'utilisateur doit lire et bien comprendre le manuel.
•Remove any adjusting key or wrench before turning the power tool on. A wrench or a key left attached to a rotating part of the power tool may result in personal injury. •Do not overreach. Keep proper footing and balance at all times. This enables better control of the power tool in unexpected situations. •Dress properly. Do not wear loose clothing or jewelry. Keep your hair and clothing away from moving parts. Loose clothes, jewelry or long hair can be caught in moving parts.
•When battery pack is not in use, keep it away from other metal objects, like paper clips, coins, keys, nails, screws or other small metal objects, that can make a connection from one terminal to another. Shorting the battery terminals together may cause burns or a fire. •Under abusive conditions, liquid may be ejected from the battery; avoid contact. If contact accidentally occurs, flush with water. If liquid contacts eyes, additionally seek medical help.
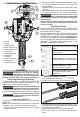
FUNCTIONAL DESCRIPTION 2. Line up the trigger handle with the install position on the right side of the machine. The trigger will face upwards. 3. Attach the second handle onto the left side of the machine. 4. Use the 4 bolts to secure the handles. Hand tighten securely with the 4 mm hex wrench provided. To reduce the risk of injury, use WARNING only specifically recommended MILWAUKEE hammer chisels. Others may damage machine. Use the correct chisel retention method for the chisel.
. To remove, rotate the clamp arm and remove the ONE-KEY™ chisel. To learn more about the ONE-KEY™ functionalNOTE: Use caution when handling hot chisels. ity for this machine, please reference the Quick Start guide included with this machine or go to Installing Collared Chisels milwaukeetool.com/One-Key. To download the 1. Clean and grease the shank. ONE-KEY™ app, visit the App Store or Google Play 2. Rotate the clamp arm to the open position. from your smart device.
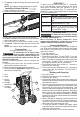
9. If a hammer iron gets stuck: • Turn off the machine and remove the battery pack. • Rotate the clamp to the unlocked position. • Pull the machine off of the stuck accessory. • Remove the accessory from the workpiece. Hammering Rubber grease plug A new hammer requires a break-in period before reaching full performance. This period may require up to 15 minutes of operation.
ACCESSORIES ACCEPTANCE OF THE EXCLUSIVE REPAIR AND REPLACEMENT REMEDIES DESCRIBED HEREIN IS A CONDITION OF THE CONTRACT FOR THE PURCHASE OF EVERY MILWAUKEE PRODUCT. IF YOU DO NOT AGREE TO THIS CONDITION, YOU SHOULD NOT PURCHASE THE PRODUCT.
RÈGLES DE SÉCURITÉ GÉNÉRALES RELATIVES AUX OUTILS ÉLECTRIQUES Lire toutes les consignes AVERTISSEMENT de sécurité, consignes, Selon les conditions, porter aussi un masque antipoussières, des bottes de sécurité antidérapantes, un casque protecteur ou une protection auditive afin de réduire les blessures. •Empêcher les démarrages accidentels. S’assurer que la gâchette est en position d’arrêt avant de brancher l’outil à une source de courant, d’insérer la batterie, de le ramasser ou de le transporter.
la tâche à effectuer. L'usage d'un outil électrique pour des applications pour lesquelles il n'est pas conçu peut être dangereux. •Garder les poignées et les surfaces de préhension sèches, propres et exemptes d’huile ou de graisse. Des poignées et des surfaces de préhension glissantes ne permettent pas de manipuler et de contrôler l'outil en toute sécurité en cas de situation imprévue. protection ou des lunettes de sécurité.
MONTAGE DE L'OUTIL Ne recharger la batterie AVERTISSEMENT qu’avec le chargeur spéci- PICTOGRAPHIE Volts fié. Pour les instructions de charge spécifiques, lire le manuel d’utilisation fourni avec le chargeur et les batteries. Direct Current Impacts par minute á charge (BPM) Enlèvement/insertion de la batterie Risque de choc Pour retirer le bloc-piles, pousser le verrou de loquet de bloc-piles vers un côté et serrer le levier du loquet.
5. Tirer le burin afin de vérifier qu’il reste sur place. 6. Pour l’enlever, faire tourner le bras de bride et retirer le burin. REMARQUE : Veuillez être prudent lors du maniement des burins chauds Burin pointu - Conçu pour des travaux de démolition et pour commencer à faire de trous dans de dalles en béton. Burin plat - Conçu pour des travaux de profilage, burinage et acheminement.
MANIEMENT de minimiser le risque AVERTISSEMENT Afin de blessures, toujours Martelage L’utilisation d’un nouveau marteau exige qu’une période de rodage ait lieu avant de n’achever son rendement maximal. Cette période peut nécessiter jusqu'à 15 minutes de fonctionnement. Si l’outil est entreposé durant une longue période ou à basses températures, la lubrification pourra se solidifier et l’outil ne pourra pas marteler initialement ou bien, le martelage pourra être faible. Dans cette éventualité : 1.
ACCESOIRES L’utilisation d’autres acAVERTISSEMENT cessoires que ceux qui Bouchon de graisse en caoutchouc sont spécifiquement recommandés pour cet outil peut comporter des risques. Pour une liste complète des accessoires, visiter le site internet www.milwaukeetool.com ou contactez un distributeur. Avertisseur d’entretien SERVICE - CANADA Milwaukee Tool (Canada) Ltd 1.800.268.4015 ONE-KEY™ de brûAVERTISSEMENT Risque lure chimique. Monday-Friday, 7:00 AM - 4:30 PM CST www.milwaukeetool.
GARANTIE LIMITÉE – MEXIQUE, AMÉRIQUE CENTRALE ET CARAÏBES SEGURIDAD ELÉCTRICA •Los enchufes de la herramienta eléctrica deben coincidir con el tomacorriente. Nunca modifique el enchufe de ninguna manera. No utilice adaptadores de enchufe con herramientas eléctricas aterrizadas. Los enchufes y tomacorrientes correspondientes sin modificar reducirán el riesgo de descarga eléctrica. •Evite el contacto corporal con superficies aterrizadas, tales como tuberías, radiadores, estufas y refrigeradores.
•Si se proporcionan dispositivos para la conexión •Utilice las herramientas eléctricas únicamente de instalaciones de extracción y recolección de con baterías específicamente diseñadas. El uso polvo, cerciórese de que estén conectados y de cualquier otra batería puede producir un riesgo se utilicen correctamente. El uso de dispositivos de lesiones e incendio. recolectores de polvo puede disminuir los riesgos •Cuando la batería no esté en uso, manténgala relacionados con el polvo.
•Nunca baje la herramienta sino hasta que el accesorio se haya detenido por completo. El accesorio puede prenderse de la superficie y provocar que pierda el control sobre la herramienta. •Después de cambiar los cinceles o realizar algún ajuste, asegúrese de que todos los dispositivos de ajuste estén bien apretados. Los dispositivos de ajuste sueltos pueden moverse de forma inesperada, lo que generará una pérdida de control, lo que generaría que se lancen intempestivamente los componentes sueltos.
Instalar los cinceles rectos reducir el riesgo de leADVERTENCIA Para siones, extraiga siempre la 1. Limpie y engrase con aceite el eje. batería antes de acoplar o desacoplar accesorios. 2. Gire el brazo de fijación hacia la posición de desbloqueo. Para introducir la batería, deslícela en el cuerpo de la herramienta. Asegúrese de que quede bien firme en su posición. Utilice únicamente accesoADVERTENCIA rios específicamente recomendados para esta herramienta.
Transportación OPERACION Con el fin de minimizar el ADVERTENCIA riesgo de lesiones, siempre (Accesorio de carro de martillo demodelor 3600) Para reducir el riesgo de lesiones, WARNING fije firmemente con correas antes de transportarlo. Retire los cinceles de la máquina antes de colocarla en el carro. Coloque el poste del carro en el receptor de cincel. No eleve/ suba el carro cargado. Utilice el accesorio de carro para martillo demoledor para transportar el martillo demoledor. 1.
Martillado Un martillo nuevo requiere un periodo de ajuste antes de alcanzar el desempeño óptimo. Este período puede requerir hasta 15 minutos de funcionamiento. Si la herramienta permanece almacenada durante un periodo prolongado o en bajas temperaturas, la Indicador de Conector lubricación podría ponerse rígida y la herramienta mantenimiento de aceite podría no martillear en un inicio o tal vez el martillado de hule sea débil. Si esto sucede: 1. Inserte un cincel en la herramienta. 2.
ACCESORIOS Utilice sólo los accesorios ADVERTENCIA específicamente recomenda- dos. Otros accesorios puede ser peligroso. Para una lista completa de accessorios, visite nuestro sitio en Internet: www.milwaukeetool.com o póngase en contacto con un distribuidor. SOPORTE DE SERVICIO - MEXICO CENTRO DE ATENCION A CLIENTES Techtronic Industries Mexico, S.A. de C.V. Av.