
Use and Care Manual


9
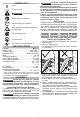
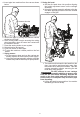
Vertical Storage Position
1. Remove battery pack.
2. Clean oil system.
3. Collapse cart.
4. Lift up and push pipe threader cart vertically.
ONE-KEY™
To learn more about the ONE-KEY™ function-
ality for this machine, please refer to the quick
reference included with this machine or go to
milwaukeetool.com/One-Key. To download the
ONE-KEY™ app, visit the App Store or Google Play
from your smart device.
ONE-KEY™ Indicator
Solid Blue Wireless mode is active and ready
to be confi gured via the ONE-KEY™
app.
Blinking Blue Machine is actively communicating
with the ONE-KEY™ app.
Blinking Red Machine is in security lockout and
can be unlocked by the owner via
the ONE-KEY™ app.
OPERATION
WARNING
To reduce the risk of injury, always
wear proper eye protection marked
to comply with ANSI Z87.1.
Do not wear gloves. Gloves may be entangled by
the rotating pipe or machine parts leading to per-
sonal injury. Wear gloves only when handling hot
parts and not when the machine is in operation.
Keep sleeves and jackets buttoned while operating
the tool. Do not reach across the tool or pipe.
Clothing can be caught by the pipe or the tool
resulting in entanglement.
Keep hands away from rotating pipe and fi ttings.
Stop the machine before wiping pipe threads or
screwing on fi ttings. Allow the machine to come
to a complete stop before touching the pipe. This
practice will reduce the risk of entanglement in
rotating parts.
Do not use the machine for other purposes such
as drilling holes or turning winches. Other uses
or modifying this machine for other applications
may increase the risk of serious injury.
Do not use this machine without the debris tray
or fi lter.
Do not use this machine if the foot switch is broken
or missing. The foot switch provides safe control
of the machine, such as emergency shutoff in
case of entanglement.
Only one person must control the work process
tool operation, and foot switch. Additional people
involved in the process may result in unintended
operation and personal injury.
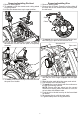
Arming the Machine
The MX FUEL™ machines must be armed prior to
use. Even with the battery pack inserted, the trig-
ger and machine functions will not operate until the
machine is armed.
To arm the machine:
1. Insert the battery pack.
2. Press the Arm button. The MX FUEL™ icon will
light. The trigger will become armed in 2 seconds.
3. After 15 minutes of inactivity, the machine will enter
sleep mode. The MX FUEL™ icon will go off and
the trigger and LEDs are un-operational.
4. Press and hold the Arm button for 1 second to
reactivate the machine.
5. Press and hold the ARM button for 1 second to
unarm (turn off ) the machine. The MX FUEL™
icon will go off .
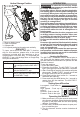
Setting Speed/Direction
Low speed - Push down to
2
1
select 1.
High speed - Push up to
select 2.
Reverse - Push to the left.
Forward - Push to the right.
Operating the Machine
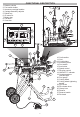
1. Make sure there is oil in the reservoir and correct
size dies are installed. Select the desired thread-
ing size on the pipe scale and set auto-opening
adjuster, if necessary.
2. Lift the cutter, die head, and reamer to open posi-
tion to install the pipe.
3. Turn the hammer chucks counter clockwise all
the way.