
Operator's Manual


5
OPERATION
WARNING
To reduce the risk of injury, always
wear proper eye protection marked
to comply with ANSI Z87.1.
When working in dusty situations, wear appro-
priate respiratory protection or use a suitable
dust extraction solution.
Methods for Securing Equipment to
Work Surface
WARNING
To reduce the risk of injury always
secure the stand to the work sur-
face to help prevent personal injury and to protect
the stand. An unsecured stand could rotate dur-
ing coring and possibly cause injury. Never rely
on the shoring pin alone for securing.
Always make sure the stand is rigidly mounted
with an expansion-type anchor or vacuum system.
Any movement or vibration will shorten the life of the
core bit. If the drill or bit moves, tighten down the
mounting system. If the drill or bit continues to move,
see "Adjusting Carrier Assembly" in the Maintenance
section for more information.
Some building materials contain steel reinforce-
ments. MILWAUKEE® core drill bits can cut through
embedded steel, but are not recommended for coring
solid steel plates.
Using an Expansion-Type Anchor
For Vertical (Wall) or Horizontal (Floor) Coring
WARNING
When drilling through walls or ceil-
ings, protect persons and the work
area on the other side. The bit may extend
through the hole or the core may fall out on the
other side.
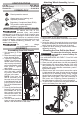
Eye
Bolts
Expansion type anchors are the most rigid method
and can be used for vertical (wall) and horizontal
anchor with an integral threaded rod, washer, and
nut (not included).
1. Locate the position of the expansion-type anchor
by measuring out 254mm to 355mm from the
center of the hole to be drilled.
2. Set your anchor(1) according to the anchor manu-
facturer's instructions.
3. Set stand over the anchor, as shown. The anchor
should extend through the slot in the center of
the stand.
4. Put the washer and nut(2) over the anchor and
hand tighten.
5. Extend the center pointer(3) and align it with
the center of the hole to be drilled.
6. Tighten the anchor nut securely.
7. Retract the center pointer.
Assembling and Using a Vacuum System
(Optional)
For Horizontal (Floor) Coring
WARNING
To reduce the risk of injury always
use an expansion-type anchor dur-
ing vertical coring. Vacuum systems can slip
when used on a vertical surface.
When securing the stand to the workpiece with a
vacuum pump, install the stand on a smooth, clean,
nonporous surface, such as poured concrete. Do
not secure to laminated surfaces such as tiles and
composite coating. If the workpiece is not smooth,
the workpiece, causing the stand to move. If the
surface is too porous or rough, the vacuum may not
hold securely or create a full seal.
Before using the vacuum:
• Always check the gaskets on the underside of the
base for wear, cracks or tears. Immediately replace
worn or damaged gaskets. To replace the gaskets,
see "Replacing Vacuum Gaskets" in the "Mainte-
nance" section.
• Make sure the gauge is at zero.
1. Raise by rotating the (4) eye bolts until the ends
are above the bottom surface of the base.
2. Extend the center pointer and align it with the
center of the hole to be drilled.
3.
surface away from the stand.
4. Connect the vacuum hose to the vacuum cou-
pler on the stand base, as recommended by the
vacuum manufacturer.
5. Plug in the vacuum pump and turn it on.
6. Step/push down on the center of the base until
it lowers and adheres to the work surface. If the
stand does not seal, check the vacuum release
pin to make sure there is no leakage around it.
7. Continue to monitor
the vacuum seal.
The vacuum gage
is used to ensure
vacuum pressure is
sufficient to
hold
stand in place. The
vacuum gauge must
read a minimum of
20" Hg
(green zone),
indicating
there is
sufficient vacuum
pressure to sustain
drilling. If the point-
er is in the r
vacuum pressure.
To reduce the risk of injury DO
less than 20" Hg.
NOT CORE if the gauge reads
8.
(floor) coring. Use a 16mm or 19mm expansion
Once the vacuum gauge reads 20"-30" Hg, lower
by rotating the four (4) eye bolts to level the stand
using the level guage located in the stand's base.
9.
To release the vacuum seal, turn off the vacuum
pump and pull out the vacuum release pin.
Over-rotating the eye bolts can lift
the gasket off the ground and
release the vacuum. After leveling, check the
vacuum gauge again.
Do not rely on the weight of the
stand, shoring pin alone, or body
weight on the stand for securing during use. The
stand will rotate and cause injury.
WARNING
WARNING
WARNING
1
2
3