
Operator’s Manual


3
OPERATION
With dust extractor:
1. Before each use, check the plastic lm for holes.
NOTICE! Discard and replace the dust cap if holes
appear. The unit is no longer OSHA compliant
once the plastic lm is punctured. Remove debris
from dust cap before each use.
NOTE: Remove debris by wiping with a rag. If using
water, make sure the dust cap is dry before use.
2. Remove bit from hammer.
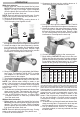
3. Compress the dust cap by pushing down on it.
Twist the spring rims together to lock.
1
2
4. Line up the dust cap to the hammer nose. Feed bit
through the unit and lock bit into place on the hammer.
5. Attach the strap to the rotary hammer by stretch-
ing it through the handle and threading beads
through the strap mounting tabs. Ensure a tight
t. Cut excess strap at the next bead to prevent
interference. Decompress the dust cap.
6. Remove the vacuum plug and attach the Milwau-
kee Power Tool Adaptor (49-90-1957) or similar
size adaptor to the vacuum port. Connect the
extractor hose to the adaptor.
7. Turn the dust extractor to "automatic-cleaning" mode.
8. Begin drilling. NOTICE! Bit may be hot after use.
NOTE: Use caution when drilling in water or wet
areas. If the bit gets wet, stop operation and let the
bit dry out thoroughly. Concrete must be properly
cured before drilling. Concrete dust will solidify in
the bit if wet.
9. To release unit, pull strap forward and release from
strap mounting tabs. Decompress the dust cap
and twist the spring rims to lock during storage.
10. Use a HEPA-ltered vacuum, or other OSHA
compliant method, to clean any residual dust
from the work area.
Without dust extractor:
1. Before each use, check the plastic lm for holes.
NOTICE! Discard and replace the dust cap if holes
appear. The unit is no longer OSHA compliant
once the plastic lm is punctured. Remove debris
from dust cap before each use.
NOTE: Remove debris by wiping with a rag. If using
water, make sure the dust cap is dry before use.
2. Remove bit from hammer.
3. Compress the dust cap by pushing down on it.
Twist the spring rims together to lock.
1
2
4. Line up the dust cap to the hammer nose. Feed bit
through the unit and lock bit into place on the hammer.
5. Attach the strap to the rotary hammer by stretch-
ing it through the handle and threading beads
through the strap mounting tabs. Ensure a tight
t. Cut excess strap at the next bead to prevent
interference. Decompress the dust cap.
6. Connect the vacuum plug to the vacuum port.
7. Begin drilling. NOTICE! Bit may be hot after use.
Empty dust cap into a bucket or similar container
placed near the drilling location that has its open-
ing no higher than the users knee (e.g., a 5 gallon
bucket on the ground) after drilling each hole.
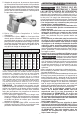
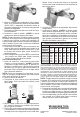
Maximum Number of Holes Per Day*
Hole Diameter
Hole Depth 3/16" 1/4" 3/8" 1/2" 5/8" 3/4" 7/8"
1"
1.5"
2"
2.5"
3"
3.5"
4"
1200
800
600
480
400
343
300
675
450
338
270
225
193
169
300
200
150
120
100
86
75
169
113
84
68
56
48
42
108
72
54
43
36
31
27
75
50
38
30
25
21
19
55
37
28
22
18
16
14
* These calculations are offered for reference and are calcu-
lated values based on previously recorded test data. The user
must drill the same number or fewer holes than those listed
above for the given application in order to be considered com-
pliant with the objective data clause of 29 CFR 1926.1153
OSHA regulation on crystalline silica dust. See https://www.
milwaukeetool.com/Silica-Dust-Extraction-Solutions for
more information related to MILWAUKEE objective data.
NOTE: Use caution when drilling in water or wet
areas. If the bit gets wet, stop operation and let the
bit dry out thoroughly. Concrete must be properly
cured before drilling. Concrete dust will solidify in
the bit if wet.
8. To release unit, pull strap forward and release from
strap mounting tabs. Compress the dust cap and
twist the spring rims to lock during storage.
9. Use a HEPA-filtered vacuum, or other OSHA
compliant method, to clean any residual dust from
the work area.