VANQUISH 440/540 USER MANUAL
Contents QUICK START ��������������������������������������������������������������������������������������������� 3 TARGET IDENTIFICATION ��������������������������������������������������������12 Target Identification Number ����������������������������������������������������12 SEARCH MODES ������������������������������������������������������������������������������������ 3 Discrimination Segments �������������������������������������������������������������12 Coin ���������������������������������
Quick Start 1 Turn On Search Modes 2 Wait For 5 Seconds 3 Go Detecting Press the Search Mode button to select the next Search Mode. The VANQUISH 440 and 540 have four Search Modes that each have unique target separation and depth abilities. Choosing the right Search Mode will help you find more of what you’re looking for. COIN JEWELLERY Find common modern coins from around the world while ignoring trash in parks and at the beach. Recover precious jewellery no matter where it was lost.
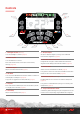
Controls 11 10 1 9 2 3 8 4 5 7 6 1. Backlight On/Off (540 only) 7. Accept/Reject Turns the backlight on and off (page 6). Accepts or Rejects targets by turning on/off individual Discrimination Segments (page 12). 2. Power On/Off 8. Discrimination Pattern Edit Turns the detector on and off. Navigates left and right to select individual Discrimination Segments when editing a Discrimination Pattern (page 13). Press and hold from Off (7 seconds) to restore factory settings (page 20). 9.
Display 10 11 1 2 9 3 4 5 6 7 8 1. Battery Level 7. Target Identification Number Indicates the current battery level (page 15). Indicates the numerical value of a detected target, allowing the identification of an object before digging. For example, a US quarter will always display the same Target Identification (ID) Number. 2. Backlight Indicator (540 only) Indicates that the backlight is On (page 6).
Detector Settings VOLUME BACKLIGHT The Volume control changes the loudness of target signals. The VANQUISH 540 has a red backlight for detecting in lowlight situations. The Backlight is turned off by default at each start-up to reduce battery consumption. Use the Volume Minus and Plus buttons to adjust the Volume Level. Each press will decrease/increase the volume by one level. Press the Backlight button to turn the backlight on or off.
Detector Settings SENSITIVITY Automatic Noise Cancel The VANQUISH Series detectors are highly sensitive and have adjustable sensitivity. Setting the correct sensitivity level for individual detecting conditions will maximise detection depth. VANQUISH Series detectors have an automatic Noise Cancel process that occurs every time the detector is powered on. It calibrates the detector so that excessive noise is not experienced.
Pinpoint LOCATE A TARGET WITH PINPOINT Pinpointing helps you to quickly narrow down the location of a buried target, allowing you to determine its exact location before digging. 1. Holding the coil away from the approximate target location, press and hold the Pinpoint button to enable Pinpoint. The Pinpoint Indicator cross-hairs will appear on the display. The difference in tone and volume will help to locate the position and depth of the target.
Pinpoint LOCATE A TARGET MANUALLY It is possible to locate a target successfully without using Pinpoint, however this requires practice. This method may be required when a desirable target is surrounded by trash. 1. Sweep the coil slowly across the target location keeping the coil parallel to the ground. 2. Locate the centre of the target by listening for the loudest target signal response. 3. Make a mental note of the position, or mark a line on the soil with your shoe or a digging tool. 4.
Depth Gauge The Depth Gauge indicates the approximate depth of a detected target. The Depth Gauge is a guide only. Fewer arrows indicate a shallower target, more arrows indicate a deeper target. The accuracy can vary depending on the target type and ground conditions. After a target is detected, the Depth Gauge will remain on the LCD for up to 5 seconds, or until the next target is detected. When there is no detection, the Depth Gauge icon and arrows are turned off.
Wireless Audio (540 only) ML 80 Wireless Headphones Any standard Bluetooth® headphones or earbuds can be used with the VANQUISH 540, however the use of aptX™ Low Latency headphones is recommended (such as the Minelab ML 80 wireless headphones) for optimum wireless audio performance. VANQUISH 540 Pro-Pack is supplied with Minelab ML 80 Bluetooth® headphones, powered by Qualcomm® aptX™ Low Latency audio. These headphones are also available as an accessory.
Target Identification TARGET IDENTIFICATION NUMBER DISCRIMINATION SEGMENTS Target Identification (Target ID) numbers range from –9 to 40 with ferrous (iron) targets ranging from –9 to 0. Discrimination Segments are located along top of the LCD. They display Target IDs grouped into zones. When a target is detected, it is represented as a number that appears on the Target Identification Number field on the display.
Target Identification DISCRIMINATION PATTERNS The Discrimination Pattern Edit buttons (Left/Right arrows) Discrimination Segments can be turned on or off to either detect or ignore targets. All segments that are on will be heard (accepted), and all segments that are off will not be heard (rejected). 4. Press the Accept/Reject button to toggle the selected segment on or off. The combinations of accepted and rejected segments are called Discrimination Patterns. 5.
Target Identification ALL‑METAL Discrimination patterns (including the Search Mode preset patterns) typically ignore ferrous targets, since these are most often trash. It is worth noting that some countries have ferrous coins, so it’s a good idea to check the Target IDs of the coins you want to find so that they aren’t accidentally masked. The All‑Metal function turns on all of the Discrimination Segments, so that all metal targets will be detected, including iron.
Batteries and Charging Battery Run/Charge Times The VANQUISH Series is compatible with both rechargeable and non-rechargeable AA batteries. Minelab rechargeable AA NiMH batteries have an approximate charge-time of 8 hours, and a run-time of approximately 11 hours. WARNING: Never use a combination of nonrechargeable and rechargeable batteries in the detector, as this may result in damage to the detector or batteries. Non-rechargeable AA alkaline batteries have a run-time of approximately 10 hours.
Detector Care and Safety Wash your hands before handling the detector after applying sunscreen or insect repellents. Do not use solvents to clean. Use a damp cloth with a mild soap detergent. Never allow the detector to come into contact with gasoline/petrol or other petroleum-based liquids. Avoid getting sand and grit in the shafts and fastenings (e.g. coil yoke assembly and camlocks). If sand and grit accumulates in these parts they should be wiped clean with a damp cloth.
Error Codes Some detector faults will display an Error Code on the Target ID Number field. Try the recommended actions shown below before contacting an Authorised Service Centre. Coil Disconnect 'Cd' will appear on the Target ID Number in the event of a Coil Disconnect Error. In the event of a Coil Disconnect Error, follow these steps: 1. Check that the coil connector is connected properly at the back of the control unit. 2. Check the coil cable for damage. 3.
Troubleshooting Detector does not turn on, or turns off by itself (with or without ‘bF’ indication) 1. Charge or replace the batteries. Erratic/excessive noise 1. Move away from local sources of Electromagnetic Interference (EMI). 2. Restart the detector and wait for Automatic Noise Cancel to complete. 3. Reduce the Sensitivity level (page 7). No sound – Wired headphones 1. Check that the detector is on, and start-up has completed. 2. Check that the headphones are plugged in. 3.
Technical Specifications Search Modes Coin, Jewellery, All‑Metal Coin, Relic, Jewellery, Custom All‑Metal Shortcut No Yes Custom User Search Profile No Yes Operating Frequencies (kHz) Multi-IQ Noise Cancel Auto (19 Channels) Bluetooth Audio Iron Bias Sensitivity 4 levels Volume 3 levels Target Tones Discrimination Segments No Yes High High (default), Low 10 levels 10 levels 3 tones (Low, Mid, High) 5 segments Discrimination Notch No Pinpoint Mode No 12 segments 25 segments Yes Ye
Factory Reset The Factory Reset function returns all detector settings, Search Modes, and Discrimination Patterns to their Factory Preset state. 1. Ensure the detector is turned Off. 2. Press and hold the Power button (for approximately 7 seconds). The Power button 3. ‘FP’ will appear on the Target ID display, indicating that Factory Presets have been restored. 'FP' will appear on the Target ID display when Factory Presets are restored. 4. Release the Power button.
Minelab Electronics Pty. Ltd. Australia & Asia Pacific +61 8 8238 0888 minelab@minelab.com.au Minelab Americas Inc. North, South & Central America +1 630 401 8150 minelab@minelab.com Minelab International Ltd. Europe & Russia +353 21 423 2352 minelab@minelab.ie Minelab MEA General Trading LLC Middle East & Africa +971 4 254 9995 minelab@minelab.ae Minelab do Brasil Brazil +55 47 3406 3898 minelabdobrazil@minelab.com minelab.