ILUMEN PID SOLUTION ILUMEN PIDBOX MINI INSTALLATION MANUAL INDOOR OUTDOOR Ilumen PIDbox mini – Version 1.
Ilumen 1 TABLE OF CONTENT 1 Information on this manual.................................................................................................................................................................................. 3 2 1.1 Validity ............................................................................................................................................................................................................... 3 1.2 Target group ..........................
Ilumen 1 INFORMATION ON THIS MANUAL This manual contains instructions on how to install the Ilumen PIDbox mini. 1.1 VALIDITY This manual applies to the Ilumen PIDbox mini v1.5. 1.2 TARGET GROUP This manual is intended for skilled persons. Only qualified persons with the appropriate skills are allowed to perform the tasks set forth in this manual. 1.3 ADDITIONAL INFORMATION Links to additional information can be found at www.ilumen.be Ilumen PIDbox mini datasheet What is PID? PID checker 1.
Ilumen 2.2 QUALIFICATIONS OF SKILLED PERSONS The work described in this document must be performed by skilled personnel only.
Ilumen 5 MOUNTING 5.1 MOUNTING LOCATION REQUIREMENTS The installation site must be freely and safely accessible at all times without the necessity for any auxiliary equipment. The mounting location should be inside a rain- and windproof location. Do not place the Ilumen PIDbox mini in a dusty environment. The ambient temperature must be between -25 and 60°C. Normally the PIDbox mini is installed right below the inverter. The ideal placement is on a flat surface.
Ilumen 5. Check if mounted securely 6 ELECTRICAL CONNECTIONS When installing the Ilumen PIDbox mini, the AC side of the PV plant must be switched off. Also the DC switch of the inverter must be switched off. After the installation is done, you can switch the DC switch back on followed by the AC side of the PV plant. A standard AC outlet must be available on installation. This outlet should be on at all times. The ideal solution is to have a single outlet with a single circuit breaker of 16A. 6.
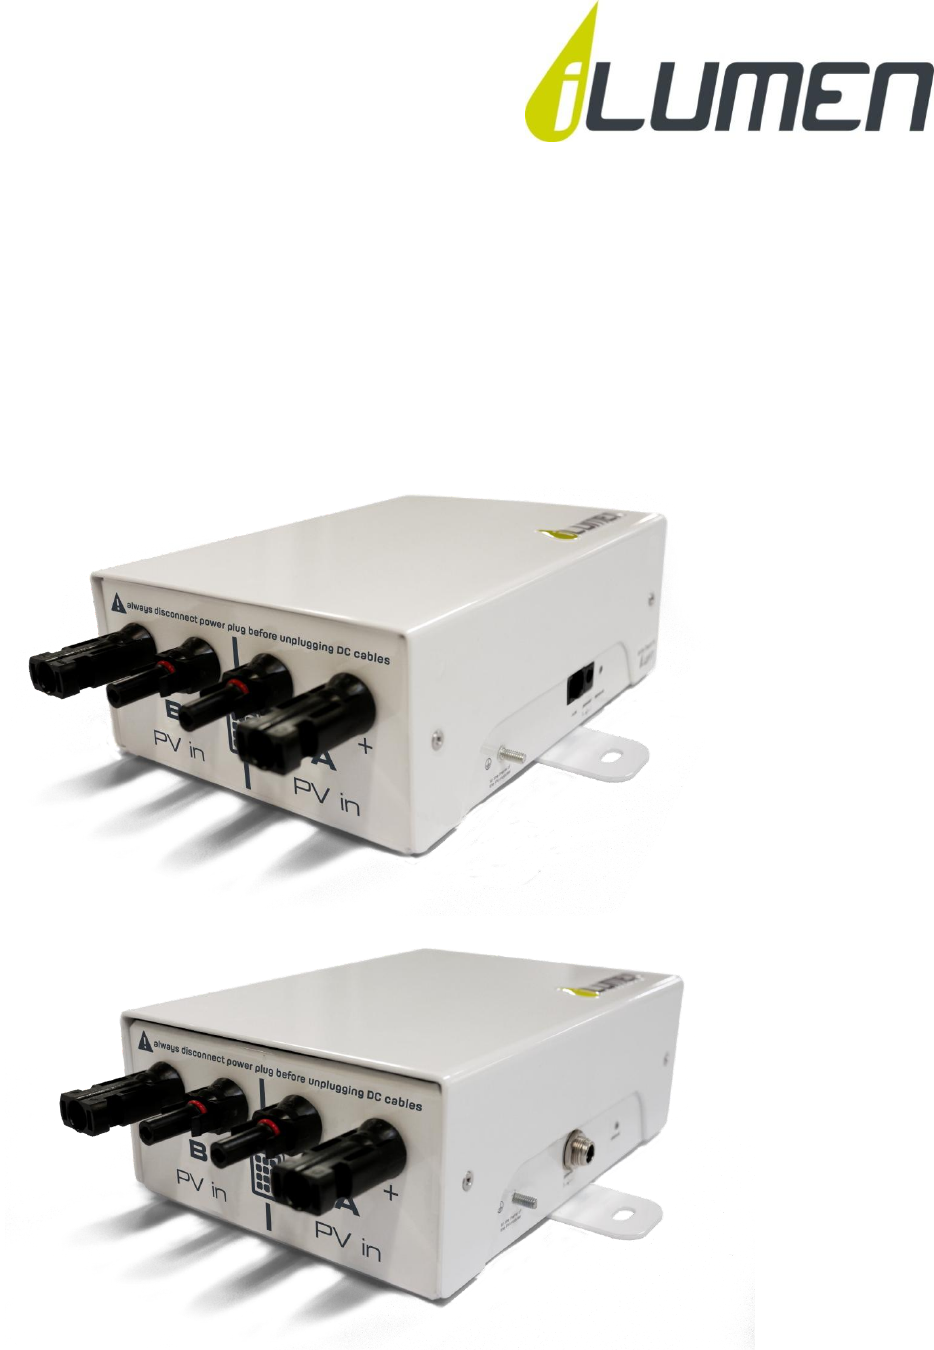
Ilumen 6.2 SOLAR ARRAY AND INVERTER (MPPT) CONNECTIONS When installing the PIDbox mini between the PV array and inverter always switch off the DC switch of the inverter When doing any kind of work on the PIDbox mini, always disconnect the DC power plug from the device before unplugging any PV-cables. Always connect the PV arrays to the PIDbox mini.
Ilumen 6.3 POWER SUPPLY It is important that you only use the included DC power supply. First connect its DC side to the Ilumen PIDbox mini power input. Next connect the AC side of the DC power supply to the unplugged power cord. You may connect the DC side to the Ilumen PIDbox mini during installation. Don’t connect the AC side until commissioning.
Ilumen 7 COMMISSIONING 7.1 CHECK Do a final check whether everything is properly mounted and connected (see chapter 5 and 6 for details): The PV frames are all connected to the same earth as the earth pin of the Ilumen PIDbox mini The PV and inverter DC cables are correctly connected Unused DC inputs and outputs are terminated with a corresponding sealing plug The DC side of DC power supply is correctly connected If all these points are installed correctly you can start up the Ilumen PIDbox mini.
Ilumen Each side (A and B) has a maximum current input of 20Amps. So multiple strings can be combined to form a bigger input per side. To do this a “DC combiner cable” can be utilized. Two versions can be ordered. One with 2 and one with 3 connectors. But always mind the maximum input current of 20Amps for each side (A and B). 5) Connect the PV array cables to the Ilumen PIDbox mini inputs (see 6.2 for details). 6) Connect the Ilumen PIDbox mini to the inverter (see 6.2 for details).
Ilumen 8) Plug the DC power supply into an outlet (LED of the Ilumen PIDbox mini lights up if the PVs are producing electricity) 8 3 7 9) Turn the DC switch from the inverter back on followed by the AC side of the PV plant 9 DECOMMISSIONING THE ILUMEN PID SOLUTION 9.1 DISASSEMBLING THE PIDBOX MINI Switch off the Ilumen PIDbox mini. Disconnect the Ilumen PIDbox mini from the AC grid. Wait for minimum 20 minutes. Make sure the AC cannot be plugged in again.
Ilumen 9.3 DISPOSING OF THE PIDBOX MINI Dispose of the PIDbox mini at the end of its service life in accordance with the disposal regulations for electronic waste currently applicable at the installation site. 10 TROUBLESHOOTING 10.
Ilumen Always contact iLumen technical service if your PIDbox mini is broken. 11 CONTACT Ilumen bvba Ambachtsstraat 19 3980 Tessenderlo Belgium Tel: +32 13 30 61 77 info@ilumen.be www.ilumen.be Installation Manual Ilumen PIDbox Mini v1.
Ilumen 12 TECHNICAL DATA Technical data ILUMEN PIDBOX MINI PV array / inverter input Input PV voltage range Output voltage to ground Maximum PV current Maximum output current in operation 80 - 1000 V Up to 1250 V 20 A 5 mA GRID (AC) Nominal AC voltage Nominal AC grid frequency Power consumption in standby operation Typical power consumption in operation Maximum power consumption 100 to 240 V 47 to 63 Hz < 0.