Instruction Manual
TABLE OF CONTENTS A. Precautions..……………………………......….... P.2 B. Checklist..……………………………...…........... P.3 C. Component Diagram..………………………….. P.3 D. Specifications..……………………………...…... P.4 E. Hardware Installation..…………………………. P.5 F. Setting Up ..……………………………...…........ P.5-9 G. Commissioning..……………………………...… P.10-14 H. Wireless Network Function............................. P.14-16 I Printing..……………………………...…............. P.17-19 J. Troubleshooting............................................... P.20 K.
A. PRECAUTIONS 1. Do not remove the print surface from the platform, it is a special tape that allows the first layer of your print to adhere to the print bed. 2. Do not remove the tape or insulation from the nozzle, it is for maintaining nozzle temperature. 3. Use this printer using the correct voltage input and follow all local laws. 4. Beware the heat blocks, nozzles, extruded filament and heating plate can be extremely hot and will burn your skin if you are not careful. 5.
B. CHECKLIST 3D Printer 1 Micro USB cable 1 Micro Memory card 1 Power adapter 1 Power line 1 Plastic scraper 1 C.
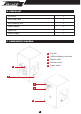
D. SPECIFICATIONS Product FDM Desktop 3D Printer Usage Rapid Prototyping, print 3D models, samples, parts, toys... Construction Aluminum Extruder Single Nozzle diameter 0.4 mm (0.015 in) Positioning Precision XY 11 microns (0.0004 in), Z 2.5 micron (0.0001 in) Layer Resolution 100 micron (0.0039 in) Input Power 100-240V, Max:80W Nozzle heating Max 250 Filaments 1.
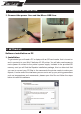
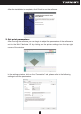
E. HARDWARE INSTALLATION 1. Connect the power line and the Micro USB line. F. SETTING UP Software installation on PC 1. Installation To get started you will need a PC or laptop with an SD card reader, that is turned on and in proximity to your Mini Fabrikator V2 3D printer. You will also need access to mains power to connect to the printer’s power supply.
After the installation is complete, click Finish to run the software. 2. Set print parameters After running the software you can begin to adjust the parameters of the software to suit to the Mini Fabrikator V2 by clicking on the printer settings icon the top right corner of the window. In the settings window, click on the “Connection” tab, please refer to the following settings to set the parameters.
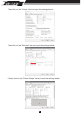
Then click on the “Printer” tab and input the settings below: Then click on the “Extruder” tab and input the settings below: Finally click on the “Printer Shape” tab and input the settings below: 7 7
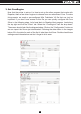
3. Set CuraEngine Now that the printer is set-up it is time to set up the slicer program that works with Repetier, there a few slicer engines to choose from we recommend Cura. To make things easier we made a pre-configured Mini Fabrikator V2 file that can just be imported. If you don’t have access to this file you can quickly configure the Cura Slicer in the following steps. Let’s head back to Repetier-Host program. Look along the top right and find the “Slicer” tab.
9
4. Connect 3D printer After setting up your parameters you can now connect to the Mini Fabrikator, click “Connect” to connect your 3D printer. When the connection is successful, the button will turn green. G. COMMISSIONING 1. Adjusting the build platform The build platform has been adjusted before leaving the factory, but it may have moved during transport, it should be checked and calibrated before printing.
Finally click on the “Printer Shape” tab and input the settings below: Using the X/Y axis buttons in the manual control move the print head to each corner (about 5mm from the edges) and adjust the bed height at each corner until the print head is very close to the printer platform, use a piece of ordinary A4 paper between the print head nozzle and the platform to set the gap. The paper should be able to slide with minimal resistance.
Why you need to calibrate the print bed: • If the distance between heat bed and nozzle is too large prints may not stick to print bed correctly. • If the nozzle is too close to the heat bed the printing surface may be damaged during printing. • Leveling the base plate before printing helps to ensure the print object stick to the heating plate correctly.
Now take the end of your filament and using sharp side cutters or a hobby knife snip the tip off at a sharp angle, this helps the filament slide through the feeder and print head easily.
Tip: When removing the filament you can use the same method in reverse, but just make sure before you pull the filament back that you push it forward first so that some filament is extruded and then pull back gently, but quickly to disengage the filament from the extruder.
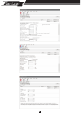
2. Setting Up Connect the printer to the PC using USB to complete the WIFI setup. Right click on Malayan link icon in the task bar and select WIFI Wizard. Enter the SSID and password for your WIFI router then click connect Disconnect the printer from the USB once prompted and click finish. The printer will now connect to the WIFI router and be available as a virtual comport (COM100) in Repetier.
3. Web Browser Interface The printer also supports control through the web interface. Please note the IP address of the printer using the Malyan link software. Entering this IP address in your web browser will allow the printer to be controlled through the web interface. Note this IP address is not always the same so check it by right clicking the Malyan Link icon.
I. Printing 1. PC printing After connecting your PC, load the STL or G Code documents and slice with Cura engine. After slicing is completed, you can click “Print” and your project will start printing over the USB cable.
2. Memory card printing After slicing is completed, save the G Code file to SD. Click save here: When the save dialogue box comes up, save the file as “auto00.g”, this name will be automatically read as the file to print by the Mini Fabrikator.
Now insert the SD card into the SD slot on the side of the printer. There is a button beside USB and Memory card slot. When you insert the SD card the button will be lit orange. When you are ready to print, click the button once and it will turn blue showing that the printer is printing or preparing to print the file you named “auto00.g”. I. Printing 3. Other functions of the button • Press the button once while printing will pause the print, pressing it once again will resume the print.
J. Troubleshooting 1 Nozzle seems blocked: First check and make sure the extruder motor is rotating and pulling filament and that temperatures are right. If the extruder motor is working and the temperature is correct you may have a blocked extruder. See below. 2 Software prompts timeout, no response while operating: Please close the software, restart the printer, then reconnect to PC printing.
K. Maintenance 1. Clean extruder and nozzle frequently 2. Oil the X/Y/Z axis occasionally with specialised belt lubricant. 3. Preheat extruder properly before loading filament. 4. Check the extruder and platform calibration regularly. 5. Keep platform clean and empty when idle. 6. Keep printer away from dust and grime. 7. Keep printer clean and dry. 8. Keep printer at room temperature.
Note 22
Ltd. ADDR.: Office K1, 9th Floor, MG Tower, 133 Hoi Bun Road. Kowloon, Hong Kong. Tel: (852) 3125 1903 Website: www.Hobbyking.