Mini Kong Bathroom Vessel Sinks Installation Instructions Attention e Please follow all local building and plumbing codes when installing this product. e This is a general installation guideline, actual installation may vary. Consult a professional if necessary. e Product drawings in this installation guide is for illustration purpose only. Actual product may vary depending on the model. o Always take extra precaution and wear appropriate safety equipment when installing this product.
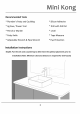
Mini Kong Recommended Tools * Plumber’s Putty and Caulking * Silicon Adhesive * Jig Saw / Power Tool * Drill with Drill bit * Pencil or Marker * Level * Putty Knife * Tape Measure * Adjustable Wrench & Pipe Wrench * Eye Protection Installation Instructions Step#1: Put the sink onto counter top to determine the optimal placement prior to installation (Note: Minimum clearance distance is required for sink faucet)
Mini Kong Step#2: Once the position is confirmed, mark the center of the drain hole and set aside the vessel sink. Draw a 3 inch diameter circle around the center of the drain hole. Use a jigsaw or a power tool to cut the opening on the counter top. Step#3: Install drain according to manufacturer's installation drain not included, and do not over tighten the drain, which will damage the sink surrounding area.
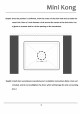
Mini Kong stet locking nut Tail pipe Step#4: Apply silicon adhesive around the bottom rim of the vessel sink and place the sink onto counter top. Plumber's putty can be used to level the sink.
Mini Kong Step#5: Install the sink well and connect P-trap to the drain and check for alignment. Apply some caulking around the base of the sink to seal any gap between the sink and the counter top. For best results in caring for your sink, we suggest the following: * Clean the outside surface with mild soap, warm water, and a soft cloth. * On stubborn stains, use a powdered detergent and damp sponge or nylon scouring pad.