WIZ - MINI AIR COMPRESSOR 0206 OPERATING & MAINTENANCE INSTRUCTIONS
Thank you for purchasing your new Clarke WIZ Mini Air Compressor, which is not intended for general outdoor use. If it is used outdoors, it must be protected for the elements at all times. Before attempting to operate the compressor, please read this instruction manual thoroughly and carefully follow all directions given. This is for your own safety and that of others around you, and to help you achieve long and trouble free service from your compressor.
SAFETY PRECAUTIONS WARNING! As with all machinery, there are certain hazards involved with their operation and use. Exercising respect and caution will considerably lessen the risk of personal injury. However, if normal safety precautions are overlooked, or ignored, personal injury to the operator, or damage to property may result. It is in your own interest to read and pay attention to the following rules: 1.
ELECTRICAL CONNECTIONS Connect the mains lead to a standard, 230 Volt (50Hz) electrical supply through an approved 13 amp BS 1363 plug, or a suitably fused isolator switch.
OPERATION NOTE: This machine is designed for use with air bushes or other devices that require a low volume, low pressure air supply. 1. Check that the mains voltage corresponds with that shown on the data label on the crankcase cover of the machine. Ensure that the ON/OFF switch (see fig. 1) is in the ‘OFF’ (O) position. Attach the air hose to the outlet on the handle, using either the 1/8"BSP thread, the 1/8" BSP adapter. Attach the air tool. 3.
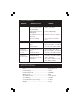
FAULT FINDING PROBLEM PROBABLE CAUSE REMEDY Air Valve Plate (item 33) or Air Valve (item 38) damaged. Renew defective Air Valve Plate or Air Valve. Diaphragm (item 31) damaged Renew Diaphragm Cyl Head screws loose (item 42) Tighten screws to 10 lbf ft Air hose leaking Check seal or renew Air Hose Cyl Head Screws too tight. Back off all screws and tighten equally.. .to 10 lbf ft Bearing Fault Consult your Clarke dealer Compressor hums but does not work. Cyl Head Screws too tight.
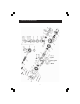
PARTS DIAGRAM 8
PARTS LIST No. Description Part No. No. Description Part No.