
User guide

SMART IP EXTENDER
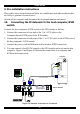
8. Connect the bracket to the IP Extender Serial port 2 using the supplied SUB-D 9
to SUB-D 9 connector.
14.
15.
16.
17.
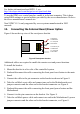
Connecting the External Reset/Power Option
Refer to the of the External Power Switch Option guide to connect this to one of the
serial ports. To date supported options are:
• Avocent—SPC 1 800/1600
• Sentry In-Line Power Module
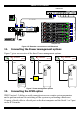
Connecting to Ethernet
The Ethernet connector on the IP Extender can be used either for a 100 Mbps
100BASE-TX connection or for a 10 Mbps 10BASE-T connection. The adapter
adjusts to the appropriate operation mode automatically.
10 Mbps Connection
For 10BASE-T Ethernet networks, the Fast Ethernet adapter uses Category 3, 4, or 5
UTP/FTP cable. To establish a 10 Mbps connection, the cable must be connected to
a 10BASE-T hub. Ensure the cable is wired appropriately for a standard 10BASE-T
adapter. Align the RJ-45 plug with the notch on the adapter's connector and insert it
into the adapter's connector.
100 Mbps Connection
For 100BASE-TX Fast Ethernet networks, the IP Extender supports Category 5 UTP
cabling. To establish a 100 Mbps connection, the cable must be connected to a
100BASE-TX hub.
1. Make sure that the cable is wired appropriately for a standard 100BASE-TX
adapter.
2. Align the RJ-45 plug with the notch on the adapter's connector and insert it into
the adapter's connector.
Note! The UTP/FTP wire pairs and configuration for 100BASE-TX cable are
identical to those for 10BASE-T cable when used with Category 5 UTP/FTP cable.
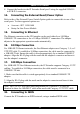
18. Connecting to ISDN
Connect the IP Extender to an ISDN network, using a standard ISDN cable.
13