KVM.net User Guide w w w . m i n i c o m . c o m International HQ North American HQ European HQ Jerusalem, Israel Linden, NJ, USA Dübendorf, Switzerland Tel: + 972 2 535 9666 minicom@minicom.com Tel: + 1 908 4862100 info.usa@minicom.com Tel: + 41 1 823 8000 info.europe@minicom.com Customer support - support@minicom.com 5UM70156 V1.
USER GUIDE About this Document This document provides installation and operation instructions for the KVM.net Manager system produced by Minicom Advanced Systems. It is intended for system administrators and network managers, and assumes that readers have general understanding of networks, hardware and software. All information in this document is subject to change without prior notice. Copyright Copyright © 2005 Minicom Advanced Systems Ltd.
KVM.NET Table of Contents 1. Introduction ................................................................................................ 4 1.1 1.2 1.3 1.4 2. Key features .................................................................................................. 4 Terminology .................................................................................................. 5 System components .....................................................................................
USER GUIDE 5.5 Creating a Target Set .................................................................................. 30 5.5.1 The General tab elements .............................................................................. 30 5.5.2 The Targets tab elements............................................................................... 30 5.5.3 The Users tab elements ................................................................................. 31 5.5.4 Deleting a Target Set ....................
KVM.NET 1. Introduction KVM.net Manager is a robust central management appliance that provides reliable and secure management of business-critical servers. KVM.net Manager integrates with IP Access, Serial console server and Power management devices to facilitate an intuitively manageable, centralized out-ofband access portal - designed to maintain all IT assets. LDAP-base, KVM.
USER GUIDE 1.2 Terminology Targets - The computers/servers that are accessed remotely via the KVM.net Manager. Client Computer - The PC running the KVM.net Manager Web interface. Remote Session - The process of accessing and controlling Target Servers connected to KVM.net Manager IP Access from a Remote PC. Permitted Target - A remote Target that a User has authorization to view or access 1.3 System components The KVM.net system comes with the following: · KVM.
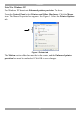
KVM.NET Note! For Windows XP For Windows XP deactivate Enhanced pointer precision. To do so: From the Control Panel select Printers and Other Hardware. Click the Mouse icon. The Mouse Properties box appears. See Figure 1. Select the Pointer Options tab. Figure 1 Pointer tab The Motion section slider bar must be in the center, and the Enhanced pointer precision box must be unchecked. Click OK to save changes.
USER GUIDE 2. Connecting and setting up the system Once the IP Access systems are set up in their locations, you can connect the KVM.net Manager and begin to set up the KVM.net system. 2.1 Connecting the hardware 1. Connect the KVM.net Manager to the network as follows: On the rear panel where the two LAN ports are next to each other connect an Ethernet cable to LAN 1. Where the two LAN ports are one on top of the other connect an Ethernet cable to LAN 2. 2.
KVM.NET 3. Enter the IP address, Default Gateway, and Netmask, obtained from your System Administrator. 4. Press OK. The command prompt appears. 5. Type Service network restart for the IP changes to take affect. Or, type reboot for the unit to restart with its new IP parameters. 2.2.1 Changing the Root user’s password To change the Root use’s default password on the KVM.net Manager system: At the /root/> command line prompt, type passwd and press Enter. Follow the prompts to change the password. 2.2.
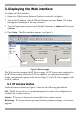
USER GUIDE 3. Displaying the Web interface To display the Web interface: 1. Open your Web browser (Internet Explorer version 6.0 or higher). 2. Type in the IP address of the KVM.net Manager and press Enter. The Login box appears. Bookmark it for easy reference. 3. Type the login name and password. Default Username is admin and Password is access. 4. Press Enter. The Web interface appears, see Figure 3.
KVM.NET 4. Configuring the system components You must configure the system by inputting details of the: · KVM switches connected to IP Access units · Target servers connected to the KVM switches / IP Access units · IP Access units As explained in the pre-installation guidelines, Appendix A on page 46 contains a list of all the details you need to prepare. 4.1 Defining the KVM switches You must define all the KVM switch types that are physically connected to the systems IP Access units.
USER GUIDE Figure 5 KVM switch model list 2. From the list, select the KVM switch brands and models physically connected to your IP Access devices. 3. Press . The switch names are saved. 4.1.1 Importing a new KVM Switch If a KVM switch is not listed, contact Minicom’s support team to obtain a new KVM switch file. When you receive the file do the following: 1. Save the KVM switch file on the remote PC on which the KVM.net Manager application is running. 2. Press 3. Press to locate the KVM switch file.
KVM.NET Click here to expand the Target Sets list Figure 6 Target Sets menu 2. Right-click All Targets. 3. Click appears. . The following appears. Figure 7 New Target 4. Select New from scratch to create an entirely new profile. (New from profile – refers to an already existing profile. Making profiles is explained later in section 5.7 on page 33). 5. Press OK. Figure 8 appears: Note! All fields with a blue asterisk are mandatory. The rest are optional.
USER GUIDE The General tab elements Target Name - Type a unique name for each server in the system. (Once created you assign the servers to the IP Access / KVM switch port using the Target servers name – explained below.) Type – Type of computer/server. E.g. Dell 360 Host IP number – IP address of computer/server, for reference. Description – Type a description. E.g. Backup server OS – Select the operating system of the Target server from the Drop-down list.
KVM.NET The system now has enough information about the Target server. The Users and Targets Sets tabs are explained later in section 5.4. Click . The Target server details are now in the system. Repeat this process to input all connected servers. To see a list of all Target servers: From the menu click All Targets. 4.2.2 Deleting Targets You can delete Target servers. To do so: Expand Targets Sets and click All Targets. All the Targets appear. Check the boxes of the Targets to be deleted.
USER GUIDE 4.3.1 Assigning a name to an IP Access unit You must assign a name to an IP Access unit before associating the KVM switch and Target servers connected to it. To assign an IP Access name: 1. From the menu, click Devices, the Devices page appears, see Figure 3 page 9. 2. Click a MAC address. The Device properties box appears see Figure 10. Figure 10 General tab In the Name box, type a name for the device and click Apply. The device can now be configured.
KVM.NET 4.3.1.2 The KVM Switches tab elements Click the KVM Switch tab. The following appears. Figure 11 KVM Switch tab The drop-down list consists of pre-defined switch files that you defined in section 4.1 on page 10. Select the KVM switch model (if any) physically connected to this IP Access unit. 4.3.1.3 The Target tab elements Click the Target tab. The following appears. KVM switch ports Figure 12 Targets tab All the Target servers you created appear in the Targets list.
USER GUIDE To remove a Target name from a port: Click the green port number. The Target name disappears and the port number changes from green to red. 4.3.1.4 The Network tab elements Click the Network tab. The following appears. Figure 13 Network tab Configure and modify Network parameters and security levels of the IP Access device. Interface I and II represent the 2 LAN interfaces on the current IP Access. Interface I displays the IP address of the IP Access as discovered by the KVM.
KVM.NET Enable DHCP – Enable DHCP to provide you with dynamic IP addressing for IP Access, if a DHCP server exist. Active – Enable/disable Network activity of the IP Access via KVM.net. Note: Any change in the Network configuration forces IP Access to restart. 4.3.1.5 The Serial tab elements Click the Serial tab. The following appears. Figure 14 The Serial tab You can access a Serial Network device during an IP Access remote session by emulating its Serial connection via RS232 (VT100 & TTY).
USER GUIDE 4.3.1.6 The Advanced button Press . The following appears: Figure 15 Advanced parameters You can modify the performance settings - bandwidth, compression and colors of the IP Access. Adaptive The Adaptive setting auto-detects the best settings for the IP Access connection. Low-Bandwidth For optimal performance when using a Dialup connection, select Low bandwidth. This will adjust the performance to high compression and 16 colors.
KVM.NET 4.4 Deleting an IP Access unit To delete an IP Access from the KVM.net system: 1. From the menu, click Devices a list of all IP Access units appears. 2. Check the boxes of the units to be deleted. Press checkboxes. to select or deselect all 3. On the menu bar, press Delete. 4. Uncheck Enable KVM.net on IP Access Configuration Web page. This will prevent the deleted IP Access from being rediscovered.
USER GUIDE 5. Using the system – an overview You can create users with different access permissions and you can form users into groups. In the example below 3 users are formed into the Finance group. Users A B C D Finance Group B C D Figure 16 Forming users into groups Target servers can also be formed into sets. In the example below 3 Target servers are formed into Target Set 8.
KVM.NET Note! Although users are members of the same Group, they can have different access permissions to Targets. E.g. some could be Users allowing them to control the Target servers, and some could be View Only, letting them see the server screens but without being able to take control. Also, users can be members of many different groups. 5.1 Creating a user To create a new user: 1. From the menu, expand User Groups. The User Groups sub-menu appears. appears. 2. Right-click All Users.
USER GUIDE A User name cannot consist solely of periods (.) or spaces. Full Name - type the User’s real name Password / Confirm Password - type a password, up to 14 characters. E-mail address, Phone number, Description – you can fill in these optional fields. Account privileges – select the Account type. Administrator or User or view only. User - When a User logs in only the components that the user has permission to execute appear. The window displays only the user’s permitted targets.
KVM.NET Choose the Targets/Sets that the User can access. Only the permitted Targets appear when the User logs into the KVM.net interface. The All Targets list contains the individual Targets created. The All Target sets list contains the Target sets. Section 5.5 will explain how to create a Target set. 1. Select the desired Targets/Target Sets and press the arrow. The Targets move to the Associated box. You can press and hold Shift or Ctrl to select more than one at a time.
USER GUIDE 2. From the Toolbar, press . The User summary appears, see Figure 23. Figure 23 User summary You can expand the folders in the summary. You can also view and edit the Groups and Targets from here. Click the desired Group or Target / Set and it appears. 5.1.4 Deleting a User Deleting a User immediately removes the User’s authorization from the KVM.net Manager System and all IP Access devices. To delete a User: 1. Select User Groups / All Users. All the Users appear. 2.
KVM.NET Figure 25 General tab 3. Type a unique Group name. 5.2.1 The Members tab elements Click the Members tab. The following appears. Figure 26 Members tab Select from the All Users list those you wish to be part of the User Group and press the arrow. The selected members move to the Group Members box. To remove members, select them and press the arrow.
USER GUIDE 5.2.2 The Targets tab elements Press the Targets tab. The following appears. Figure 27 Targets tab Here you select Targets or Target Sets that this User group has access to. Creating Target Sets is explained in section 5.5 on page 30. Select the desired Targets or Target Sets and press the arrow. Click . The new User group appears in the list of User Groups. To see a list of all User Groups: From the menu, expand or click User Groups. 5.
KVM.NET 1. Select the Groups that the new User will be a member of. 2. Press the arrow. The groups move to the Member box. 3. Click . The new User is created. (2) When editing a User. 1. Select User Groups / All Users. 2. Double-click the desired User. The User Properties appear. 3. Click the Users Group tab and follow the procedure as outlined above. 4. Click Ok or Apply. 5.3.
USER GUIDE You can associate Users (red characters) or User Groups (blue characters) with this Target. To do so: 1. Select the Users or Groups. 2. Press the arrow. The User or Group appears in the associated with this target box. (2) When editing a Target. 1. Select Target Sets / All Targets. 2. Click the desired Target. The Target Properties appear. 3. Click the Users tab and follow the procedure as outlined above. 4. Click Ok or Apply. 5.4.
KVM.NET 5.5 Creating a Target Set You can group Targets into sets. E.g. make a set of all financial servers in the system. To create a new Target Set: 1. From the menu, right-click Target Sets. 2. Click appears. . The following screen appears. Figure 30 Create Target Set – General tab 5.5.1 The General tab elements Target Set Name - type a unique name for the Target set. Description – type a description. 5.5.2 The Targets tab elements Click the Targets tab. The following appears.
USER GUIDE 5.5.3 The Users tab elements Click the Users tab. The following appears. Figure 32 The Users tab To associate Users or User Groups with the new Target set: 1. Select the desired Users/Groups and press the arrow. 2. Click . The new Target set appears in the list of Target sets. To see a list of all Target sets: From the menu, click Target Sets. 5.5.4 Deleting a Target Set You can delete a Target Set from the menu or from the working area. Deleting from the menu: 1. Expand Target Sets. 2.
KVM.NET Deleting from the working area: 1. From the menu, click Target Sets. The Sets appear in the working area. 2. Check the Set boxes to be deleted. You can press checkboxes with one click. to select or deselect all 3. From the Toolbar, press Delete. Note: Deleting a Set will not delete the individual Targets. 5.6 Associating Target servers with Target Sets Once you have created Target Sets you can associate Target servers with Target Sets at any time. You can do this in one of 2 ways.
USER GUIDE 5.7 Creating Profiles You can create Target Profiles and IP Access Profiles, with particular configuration settings such as Description and Mouse setup. Once a Profile exists, you can give a new Target this Profile and it will inherit the Profile’s properties. To create a Profile: Expand the Settings menu, and then expand the Profiles menu. 5.7.1 Creating a Target Profile To create a Target Profile: 1. Right-click Target Profile. The words New Profile appear. 2.
KVM.NET . The profile appears in the list of Select the desired settings and click Target Profiles. When creating Targets – see section 4.2 you can create the target from an existing Profile where suitable. 5.7.2 Creating an IP Access Profile 1. Right-click Device Profiles. New Profile appears. 2. Click New Profile, Figure 36 appears. Figure 36 Create Device Profile Type the appropriate information in the dialog box: Name - type a unique profile name.
USER GUIDE 5.7.2.2 The Network tab elements Click the Network tab. The following appears. Figure 38 Network tab Here you configure and modify Network parameters and security levels of the IP Access device. Interface I and II represent the 2 LAN interfaces on the IP Access. In First TCP Port type a TCP port number (above 800) – choose three consecutive ports, and enter the first port number of the series.
KVM.NET 5.7.2.3 The Serial tab elements Click the Serial tab. The following appears. Figure 39 The Serial tab Here you define the console parameters for controlling Network devices over RS232, that are physically connected to the IP Access’ Serial connector. Device Name - type the name of the device (i.e. Power Management; CISCO router; etc) Baud Rate, Data Bits, Parity, Stop bits - type the appropriate values according to the network device specifications, attached to IP Access. Click .
USER GUIDE 6. Maintenance features You can upgrade the firmware of the KVM.net and all connected IP Access units. You can also backup the KVM.net Manager database. 6.1 Upgrading the KVM.net/IP Access firmware You can upgrade the firmware version of all connected IP Access units from the KVM.net system. To do so: 1. Obtain the latest firmware version from Minicom. 2. Save the file on the client computer running the KVM.net Manager application. 3. From the Settings menu, click Upgrade. Figure 40 appears.
KVM.NET Figure 42 Backup 6.2.1 The backup elements Activate backup schedule - Check the box to activate the backup schedule. Credentials for backup share - Enter the user credentials (name, password, and domain) of the network share path to which the backup file will be saved. Destination path - enter the remote machine name or IP address i.e. ://Server/Share. Schedule Backup time - Select the time (hour and minute) that the backup should initiate.
USER GUIDE 7. Account policy You have a number of different policy options: · Password · Account blocking · Idle timeout To set these options: From the Settings menu click Policy. The Account policy window appears, see Figure 43. Figure 43 Account policy 7.1 Password policy Choose the desired password policy. The different password policy options are explained below.
KVM.NET Standard Policy password: · Any 6 characters · Must not include the user name None: You can write any character and any number of characters for the password. 7.2 Account blocking You can block entry into the system after a number of unsuccessful attempts by a User inputting the wrong password. To do so: 1. Check the Account blocking box. The following appears. Figure 44 Account blocking Choose the number of attempts within a time period, and for how long to block the account for. 7.
USER GUIDE 8. General Administration of the system The following sections explain how to update and exit, reboot, shutdown the system. You can also view an event log of all system activity. 8.1 Updating the system To initiate an immediate system update of any changes in configuration: From the Toolbar, press Update system. See Figure 45. (Pressing Save or OK also updates the system).
KVM.NET 8.3 Rebooting KVM.net Manager system There is no option to reboot the KVM.net Manager system from the navigation area since no update requires this. If you need to reboot the system, do so as follows: From the local console, type reboot at the Command prompt. Or 1. Open a secure Telnet application (such as CRT, or Putty) and enter the IP address of the KVM.net Manager unit. 2. When prompted type the appropriate administrator login information. 3. Type reboot at the Command prompt.
USER GUIDE 9. Accessing the system as a User Once the Administrator has set up and configured the KVM.net system, Users can access the system. For a User to access the system: Type the system’s IP address (obtained in section 2.2) into a Web browser and press Enter. The Login box appears. Type the Username and Password and press Enter. The window only displays Targets and Target Sets that the User has permission to access. See Figure 46. KVM.net system supports multi-user login.
KVM.NET 9.2 Connecting to a Target server To connect to a Target server: From the Name list click the Target. The Target’s screen appears. 9.2.1 Navigating the Web display Click My Targets for a list of all permitted Targets and Target Sets Click a Target Set to reveal a list of Target servers in that set. From this list you can click a Target to access it. Note: The Target list consists of Targets that reside on different KVM switches and IP Accesses (depending on the infrastructure).
USER GUIDE 11. Technical Specifications Form factor Rack Rack height 1U Network connectors 2 x RJ45 Protocols: HTTP, HTTPS, XML, Telnet, SSH Serial port DB9, Console Redirection for Out of Band Management Platform Red Hat Linux 8.
KVM.NET Appendix A IP Access Target server KVM switch Identifying Name e.g.
USER GUIDE Regional Offices Germany France Italy Kiel Vincennes Rome Tel: + 49 431 668 7933 info.germany@minicom.com Tel: + 33 1 49 57 00 00 info.france@minicom.com Tel: + 39 06 8209 7902 info.italy@minicom.com www.minicom.