
User manual

miniDSP Ltd, Hong Kong / www.minidsp.com / Features and speci fi cations subject to change without prior noti ce 42
6.4 TROUBLESHOOTING
The following table lists the most common causes of issues with the nanoAVR DL. If following this table does not
provide a solution, see Obtaining Support below.
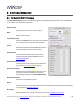
Item#
Symptoms
Troubleshooting recommendation
1
Cannot install software
a. Confirm that you downloaded and installed the required
frameworks first (see Software Installation).
2
The Dirac activation screen
does not recognize the serial
number
a. Do not use the serial number printed on the label of the unit.
You must use the serial number obtained from the firmware
using the nanoAVR DL Utility program.
3
The license validation screen
doesn’t accept my username
and password
a. The “username” must be the email address that you used
when activating your license on the Dirac Live activation
screen. Check that you are using the same email address and
password.
4
The nanoAVR doesn’t appear
in the Sound System tab
a. Check that the USB cable to the nanoAVR DL is firmly
connected.
b. Check that you do not have any other program running that is
attempting to communicate with the nanoAVR DL, such as the
nanoAVR DL utility program.
c. Check that you have the miniDSP version of the software
installed, called Dirac Live Calibration Tool For miniDSP.
d. Go to the Sound System tab and click the Rescan button.
5
The measurement test signal
produces no output
a. Check the Output volume slider.
b. Ensure that the nanoAVR DL processor is connected correctly
into the audio system.
c. Ensure that an HDMI video source is connected to the nanoAVR
DL, that the source is selected, and not asleep.
d. Check that the downstream device (AVR or AVP) has the
nanoAVR DL processor selected for input.
e. Check that any downstream volume control is not set to zero.
f. Check that no downstream device is muted.
6
No input from measurement
microphone
a. Check that the USB cable to the UMIK-1 is securely seated
b. Check that the UMIK-1 is selected in the Mic config tab.
7
Insufficient recording level
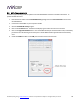
a. Increase microphone level in the Output & Levels tab.
b. Go to the Control Panel and view the Recording tab of the
Sound pane. Select the UMIK-1 and view its Properties. In