
Owner`s manual


AVP INSTRUCTIONS E
13
INPUT NAMES ASSIGNMENT
However in order to simplify the operation of AVP
we have embedded into the software the possibility to
give to each input a name from a list of names
included in AVP memory.
This allows you to designate each input by the
name of the equipment attached to it.
A list of standard names that covers the great
majority of equipment types used in consumer
electronics is loaded into AVP program memory.
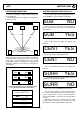
Press on the INPUT key until AVP displays:
If you were on a different input, AVP will indicate
the name of the input you had selected. The name on
the left is the name of the input as printed on the back
panel and the name between brackets the assigned
name of this input.
When you turn then the rotary encoder the names
between brackets change assigning then a specific
name to this input. For Digital inputs, the following
names are available : OFF, DVD, DVD1, DV2, LD,
LD1, LD2, CD, CD1, CD2. For Analog inputs the
following names are available OFF, DVD, DVD1,
DV2, LD, LD1, LD2, CD, CD1, CD2, TV, SAT, SAT1,
SAT2, VCR, VCR1, VCR2, AUX, AUX1, AUX2,
GAME.
Once a name has been assigned to an input, this
name is not present in the list for the next input.
To assign a name to another input press the input
key again and the next input will be displayed. Once
you are finished, press on the MODE key to exit the
procedure.
If you assign the OFF name to any input, this input
will not be selected anymore when you select the
different inputs via the unit or the remote control
handset INPUT key.
For example, if you had assigned DVD to CO-1,
OFF to CO-2, LD to OP-1, OFF to OP-2, VCR to AN-1
and SAT to AN-2, the input selection will display :
DVD then LD, then VCR, then SAT.
This function is extremely useful when you have a
small number of inputs.
DECODING SYSTEM INDICATION
AVP automatically detects the type of signal present
at the different inputs and displays this on the system
indicators located between the keys of the Front
panel.
If you feed AVP with a pure Stereo signal you have
the possibility to listen in Stereo mode by pressing on
the Stereo key.
IN SESSION TRIMMING
Although you will reach an ideal set-up by following
the instructions of the Test procedure it is very
possible that in certain cases you may wish to trim
your system to give you a better result with a
particular film or program. AVP gives you this
possibility.
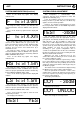
While you are playing a movie or any encoded
material, press one time on the Mode key on the AVP
front panel or on the Minium remote control handset.
The display now indicates :
By using the rotary encoder of the unit or the
Main ∆∇ keys of the remote control handset you can
trim the Center speaker level by ± 10dB.
Press on the Mode key once again and the
displays indicates :
By using the rotary encoder of the unit or the
Main ∆∇ keys of the remote control handset you can
trim the Surround speakers level by ± 10dB.
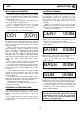
Press on the Mode key once again and the
displays indicates :
if you have no amplified Sub-woofer or
By using the rotary encoder of the unit or the
Main ∆∇ keys of the remote control handset you can
trim down the Bass or the Sub-woofer level by 10dB.
Although the range of trimming is rather large, we
can only encourage you to use this feature with
moderation, as the overall sounding results will be
affected by this trimming.
NOTE : The Test procedure values are
considered as Reference values. The unit will
automatically revert to the Test procedure
values any time you enter the Standby mode
or when you change Input.
CO1 [CO1]
CENT 00dB
SURR 00dB
BASS 00dB
SUB 00dB