magicolor 2300W User’s Guide ® 1800727-001A
Thank You Thank you for purchasing a KONICA MINOLTA printer. Trademarks The KONICA MINOLTA and KONICA MINOLTA logo are trademarks or registered trademarks of KONICA MINOLTA HOLDINGS, INC. magicolor is a trademarks or registered trademarks of KONICA MINOLTA PRINTING SOLUTIONS U.S.A., INC. Other trademarks and registered trademarks are the propery of their respective owners. Acrobat ® Reader Copyright © 1987-2002 Adobe Systems Incorporated. All rights reserved.
Registering the Printer Mail (Americas only)—Fill out and send in the registration card enclosed in your shipment. Internet—Go to http://printer.konicaminolta.net/register and follow the instructions. CD-ROM—Follow the instructions on the CD-ROM.
Contents 1 Software Installation ............................................................................ 1 Utilities and Documentation CD-ROM ................................................................. 2 Drivers and Utilities ....................................................................................... 2 Installing the Printer Drivers and Software .......................................................... 3 System Requirements ...........................................................
Transparencies ............................................................................................17 What Is the Guaranteed Imageable (Printable) Area? .................................18 Page Margins ..............................................................................................19 Loading Media ...................................................................................................20 Tray 1 (Multipurpose Tray) ..............................................................
Replacing Consumables ................................................................................... 48 Refilled Toner Cartridges ............................................................................ 49 Replacing a Toner Cartridge ....................................................................... 49 Replacing the Waste Toner Bottle ............................................................... 55 Replacing the OPC Drum Cartridge ............................................................
Repacking the Printer ......................................................................................111 A. Turn off the Printer, Unplug the Power Cord, and Remove the Interface Cables ............................................................112 B. Remove the Media and the Tray 1 Media Support ................................113 C. Remove the Options (if Attached) .........................................................113 D.
Software Installation 1
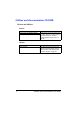
Utilities and Documentation CD-ROM Drivers and Utilities Drivers Drivers/Operating System Printer Driver for Windows Me/98 Printer Driver for Windows XP/2000 Use/Benefit These drivers give you access to all of the printer features, including finishing and advanced layout. See also “Working with the Printer Driver” on page 29. Utilities Utilities Status Display 2 Use/Benefit This utility allows you to monitor the printer’s status and perform various printer functions.
Installing the Printer Drivers and Software System Requirements ! PC with a clock speed of 300 MHz or more Intel Pentium/Celeron series, AMD K6/Athlon/Duron family, or compatible processor ! Microsoft Windows 98 SE, Windows Me, Windows 2000 Professional, Windows XP Home Edition/Professional ! Free hard disk space – Approximately 128 MB of free hard disk space for printer driver and Status Display – Approximately 128 MB of free hard disk space for image processing ! Memory capacity – Windows 98 SE: At
8 9 10 11 12 13 14 15 16 4 If the computer onto which you are installing the driver is a print server, check the Server Install checkbox, and then type in a name for Share Name. Click OK. From the Select Port list, select the port to which the printer is connected. If the printer is to be used as the default printer, select the Set as default printer? check box. Click OK. Check and, if desired, change the description that appears in the Printer Name box, and then click OK.
For a Shared Network Printer 1 2 3 4 5 6 7 8 9 10 11 12 13 14 Insert the magicolor2300W Utilities and Documentation CD-ROM in your PC’s CD-ROM drive. The CD-ROM installer program starts automatically (if not, browse with the Windows Explorer to the CD-ROM location and double-click on setup.exe). Select the language, and click OK. Click . Click Printer Setup. Click Accept. Click OK. Select Network Printer, and then click OK.
Selecting Driver Options/Defaults Before you start working with your printer, you are advised to verify and, if necessary, change the default driver settings. Also, if you have any options installed on the printer, you should configure the driver for these options. 1 2 3 4 5 6 Choose the driver’s properties as follows: – (Windows Me/98) From the Start menu, choose Settings and then Printers to display the Printers dialog box. Right-click the magicolor2300W printer icon and choose Properties.
7 Click Apply. "# 8 Depending on the version of the operating system, Apply may not appear. If this is the case, continue with the next step. Click OK to save your changes and exit from the Printing Preferences dialog box.
Uninstalling the Printer Driver This section describes how to uninstall the magicolor2300W printer driver if necessary. 1 2 3 8 From the Start menu choose Programs, magicolor2300W Utilities, and then magicolor2300W Uninstall. In the Uninstall window, select the magicolor2300W. Then click Uninstall. The magicolor2300W driver is uninstalled from your computer. Restart your computer.
Using Media 2
Introduction This chapter provides information on handling, selecting, loading, and storing media. Getting Started What types and sizes of media can I load? page 11 What Is the guaranteed imageable (printable) area? page 18 Other Information How do I load media? page 20 How do I duplex? page 23 How do I store media? page 24 Where can I order KONICA MINOLTA-approved media or get more information? page 24 ! All media is fed short edge first, face up. ! There is a 0.
Media Specifications What types and sizes of media can I load? Media Media Size Inches Duplex Driver media Type Weight Plain Paper 16–24 lb bond (60–90 g/m²) Millimeters A4 8.2 × 11.7 210.0 × 297.0 Yes A5 5.9 × 8.3 148.0 × 210.0 No B5 (JIS) 7.2 × 10.1 182.0 × 257.0 No Custom, Minimum 3.6 × 5.8 92.0 × 148.0 No Custom, Maximum 8.5 × 14.0 216.0 × 356.0 No Executive 7.25 × 10.5 184.0 × 267.0 No Folio 8.3 × 13.0 210.0 × 330.0 Yes Foolscap 8.0 × 13.0 203.2 × 330.
Media Types Before purchasing a large quantity of special media, do a trial printing with the same media and check print quality. Check our web site www.konicaminolta.net/printer/ for a list of currently approved media. Keep media on a flat, level surface in its original wrapper until it is time to load it. Plain Paper Capacity Tray 1 200 sheets of 22 lb bond (80 g/m2) paper; (multipurpose capacity for other weights varies accordingly. tray) Orientation Face up Type Check http://printer.konicaminolta.
! Dusty ! Wet (or damp) "# Keep media between 35% to 85% relative humidity. Toner does not adhere well to moist or wet paper.
Do not use thick stock that is ! Mixed with any other media in the media trays (as this will cause media jams) Envelopes Print on the front (address) side only. Some parts of the envelope consist of three layers of paper—the front, back, and flap. Anything printed in these layered regions may be lost or faded. Capacity Tray 1 Up to 10 envelopes, depending on their thickness Orientation Face up Type Check http://printer.konicaminolta.net/support (click on "Answer Base") for currently approved media.
Labels A sheet of labels consists of a face sheet (the printing surface), adhesive, and a carrier sheet: ! The face sheet must follow the plain paper specification. ! The face sheet surface must cover the entire carrier sheet, and no adhesive should come through on the surface. You can print continuously with label paper. However, this could affect the media feed, depending on the media quality and printing environment. If problems occur, stop the continuous printing and print one sheet at a time.
! Are precut or perforated OK to use Do not use Full-page labels (uncut) Shiny backed paper Letterhead and Memo Media Format letterhead or memo data within your application. Try printing your data on a plain sheet of paper first to check placement. Capacity Tray 1 Up to 200 sheets, depending on their size and thickness Orientation Face up Type Check http://printer.konicaminolta.net/support (click on "Answer Base") for currently approved media.
Use postcards that are ! Recommended for laser printers Do not use postcards that are ! Coated ! Designed for inkjet printers ! Precut or perforated ! Warped "# If postcards are warped, press on the warped area before putting them in Tray 1. Preprinted or multicolored postcards may cause media jams. Transparencies Attention Use only the KONICA MINOLTA-approved media. Using unsupported transparencies will result in damaging your printer and in voiding your warranty. Check www.konicaminolta.
"# If you have problems feeding 50 sheets, try loading only 1–10 sheets at a time. Loading a large number of transparencies at a time may cause static buildup, thus causing feeding problems. Capacity Tray 1 Up to 50 transparencies, depending on their thickness Orientation Face up Type Check http://printer.konicaminolta.net/support (click on "Answer Base") for currently approved media. To order approved transparency media, go to www.q-shop.com.
Color printing starts 0.157" (4 mm) from the top of the page and extends as far as 13.4" (341.6 mm). Monochrome printing starts 0.157" (4 mm) from the top of the page and extends as far as 13.7" (347.6 mm). a a = nonprintable area (0.157"/4 mm) c = 13.7"/347.6 mm c = monochrome guaranteed printable area = up to 13.7"/ 347.6 mm a b = 13.4"/341.6 mm b = color guaranteed printable area = up to 13.4"/ 341.
Loading Media How do I load media? Take off the top and bottom sheets of a ream of paper. Holding a stack of approximately 200 sheets at a time, fan the stack to prevent static buildup for the paper before inserting it in a tray. "# Do not fan transparencies. Attention Although this printer was designed for printing on a wide range of media types, it is not intended to print exclusively on a single media type except plain paper.
2 3 Adjust the media guides to fit the appropriate media sizes. Load the media face up, short edge (or letterhead) first. Often, an arrow on the paper package label indicates the face-up (printing) side of the paper. "# 4 A fill limit mark is provided on the inside of the media guides on Tray 1 (the multipurpose tray). Tray 1 holds 200 sheets of 22 lb bond (80 g/m²) paper. Slide the media guides up against the edge of the media. Attention Always adjust the media guides after inserting the media.
Other Media When loading media other than plain paper, set the media mode (Envelope, Label, Thick Stock, Postcard, Letterhead, or Transparency) in the driver. "# For optimum printing results it’s important to specify the type of media loaded into Tray 1. Envelopes 1 2 3 4 Flex the envelope stack (including the edges) to remove any stiffness. Place the envelopes on a flat surface, and flatten them by pressing down the corners.
Duplexing How do I print back-to-back (duplex)? Select paper with high opacity for duplex (2-sided) printing. Opacity refers to how effectively paper blocks out what is written on the opposite side of the page. If the paper has low opacity (high translucency), then the printed data from one side of the page will show through to the other side. Check your application for margin information. For best results, print a small quantity to make sure the opacity is acceptable.
Output Tray All media is output to the output tray on top of the printer. The face-down output tray has a capacity of 150 sheets (legal-size) or 200 sheets (letter/A4) of 22 lb (80 g/m2) bond paper. "# "# If the media is stacked too high, your printer may experience media jams, excessive media curl, or static buildup. Remove transparencies as soon as possible from the output tray to avoid static buildup.
Working with the Printer 3
About the Control Panel The control panel, located on the top of the printer, allows you to direct the printer’s operation. In addition, it displays the current status of the printer, including any condition that needs your attention. ! One key allows you to control the printer configuration through access to frequently used printer functions. ! Four indicator lights (LEDs) provide printer status information. Control Panel Key Key Function Cancels printing when held down for at least 5 seconds.
Indicator Lights Printer Status**** Green LED Orange LED Off Off Power off Blinking slowly* Off Energy Saver mode On Off Printer idle Blinking normally** Off Processing data Printing Blinking normally** Communication error Blinking rapidly*** Off Warming up Calibrating Off On Cover open Off Binking slowly* Off Blinking normally** Media jam Waste toner bottle is full Off Blinking rapidly*** Fatal error Service Call On On No paper in Tray 1 Blinking slowly* Waste toner bottle
Black Toner Condition Orange LED Blinking normally** Black toner low On Blinking rapidly*** *Blinking slowly ***Blinking rapidly Black toner empty Ready to change black toner cartridge Refer to “Replacing a Toner Cartridge” on page 49. 1 blink every 2.4 seconds 2 blinks every 1.
Working with the Printer Driver 4
Introduction The printer driver functions are summarized in this chapter. For information on connecting the printer to the computer, refer to “Connect the Interface Cable” in the Installation Guide. For information on installing the printer driver, refer to chapter 1, “Software Installation”, in this manual. Displaying Printer Driver Settings "# In addition to the printer driver tabs described in this section, the Windows operating system also uses tabs.
Common Settings on All Tabs Save [Easy Set] 1 To save the current settings, click Save.... "# 2 Multiple settings can be saved. Select your preferred settings, and type a title in the dropdown list box. The saved settings can later be selected from the dropdown list. Select Default from the dropdown list to reset the functions of the tab to their original values. Page Layout Click this radio button to display a sample of the page layout in the figure area.
Printer Figure Click this radio button to display an image of the printer in the figure area. Common Buttons OK Click this button to exit the Properties dialog box, saving any changes made. Cancel Click this button to exit the Properties dialog box without saving any changes made. Apply Click this button to save all changes without exiting the Properties dialog box. "# Apply is displayed when the Properties dialog box is opened from the Printer folder.
Setup Tab This tab allows you to: ! Print several pages of a document on the same print page (N-up) ! Provide printouts with a watermark ! Design and edit custom watermarks ! Specify duplex and booklet printing ! Specify paper source ! Define the type of media Refer to the printer driver’s online help for complete information on all of these features.
Paper Tab This tab allows you to: ! Select an original document size ! Set up custom paper sizes ! Select the output paper size ! Scale (enlarge/reduce) documents upon printout ! Specify the orientation of the paper ! Specify the number of copies ! Select uncollated/collated ! Print using a form overlay ! Add and edit form overlays Refer to the printer driver’s online help for complete information on all of these features.
Quality Tab This tab allows you to: ! Switch between color and monochrome printing ! Specify color matching (Images, Graphics and Text) ! Specify the resolution for the printout ! Control the tones of an image (Contrast) ! Control the darkness of an image (Brightness) ! Control the color purity of an image (Saturation) ! Control the clarity of an image (Sharpness) Refer to the printer driver’s online help for complete information on all of these features.
Color Matching You can specify whether or not to use the Color Matching function, which adjusts the printer’s color tones to accurately reproduce the color tones of the monitor. Choices Off Does not use color matching. With certain applications, such as desktop publishing applications, data is color-matched to be the most suitable for the printer. If this type of output setting is used in the application, Color Matching should be turned off. On Uses color matching.
Notes The ICM color profile, which is automatically defined when the driver is installed, is used and a color conversion is made in the driver so that sRGB colors can be output. sRGB is a general Windows color space with the color space international standard (IEC61966-2-1) defined by the IEC (International Electrotechnical Commission). There are also additional ICM profiles available on the Utilities and Documentation CD-ROM for specific applications, such as Photoshop.
Device Options Setting Tab This tab allows you to: ! Activate the duplex option ! View information about the printer driver Refer to the printer driver’s online help for information on all of these functions.
Working with the Status Display 5
Working with the Status Display The Status Display displays information about the current status of the computer’s local printer. If you used the CD-ROM Installer to install the printer driver, the Status Display was also installed. However, if you used Add Printer to manually install the printer driver, Status Display is not installed. Environment The Status Display functions over parallel and USB connections on all supported Windows operating systems, but only for the default printer.
Using the Status Display ! When the background of the right-hand printer graphic is green, the printer is in standby mode or a job is printing normally. ! When the background of the right-hand printer graphic is red, there is an error and the job has been interrupted. The status of the printer and the error message are shown in the dialog boxes on the left. The function areas include: ! Printer Status—Displays text messages that describe the current operational status of the printer.
! Printer Information—Displays the total print count, the list of installed options and the memory size. ! Supplies status—Displays consumables usage (percentage remaining) for the toner cartridges and OPC drum cartridge. Refer to the Status Display’s online help for information on all of its functions. Working with the Print Menu ! Power On Test—Performs an AIDC (Auto Image Density Control) calibration cycle.
! Toner Replace... $ Replacing Toner Allows you to replace a toner cartridge. 1. From the list, select the color of the toner cartridge to be replaced. 2. Click OK. 3. Open the front door, and then replace the toner cartridge. Refer to “Replacing a Toner Cartridge” on page 49 for complete details. $ Changing Capacity Allows you to replace a toner cartridge capacity setting. 1. Select the Change Capacity only check box. 2. From the list, select the color of the toner cartridge to be change capacity. 3.
Closing the Status Display To close the Status Display from the File menu, choose Exit. "# 44 If you click the X button in the upper-right corner of the Status Display window to close the window, the Status Display remains available at the right end of the taskbar. Double-click the icon to open it again.
Replacing Consumables 6
Consumable Life Expectancies Plain Paper The stated life expectancy of each consumable is based on printing under specific operating conditions such as media type, number of color planes, page size, and page coverage (at normal 5% coverage of letter-/A4-size media). The actual life expectancy will vary depending on these and other printing variables, including continuous or intermittent printing, ambient temperature, and humidity.
Special Media The stated life expectancy of each consumable on page 46 is based on letter-/A4-size plain paper. If you are using special media such thick stock or transparencies, the life expectancy will vary depending on those printing variables and the print speed automatically determined by the thick stock or transparency selection on the driver’s Setup Tab. Consumables This item needs replacing by user after...
"# The printer also pauses to do a 90-second AIDC cycle after 200 1-sided pages of a continuous print run, and a 150-second AIDC cycle when waking up from ENERGY SAVER with more than 1,000 pages since the last AIDC cycle or when there has been an environmental change such as in temperature or humidity.
Refilled Toner Cartridges Attention Do not use refilled toner cartridges. Any damage to the printer or quality problems caused by a refilled toner cartridge will void your warranty. Replacing a Toner Cartridge Characters and images are created in your laser printer through a photosensitive process that applies toner to the Optical Photo Conductor (OPC) drum cartridge (which functions like photographic film). Your printer uses four toner cartridges: black, yellow, magenta, and cyan.
! Level during storage. Do not stand or store cartridges on their ends or turn them upside down; the toner inside the cartridges may become caked or unequally distributed. ! Away from salty air and corrosive gases such as ammonia. Procedure You can use this procedure to replace either an empty toner cartridge or one that is not empty.
7 8 Insert you thumb and index finger into the two holes in the front of the toner cartridge, and then pull the cartridge straight out about 6" (15 cm). Support the middle of the cartridge with your left hand, and then pull out the cartridge. WARNING! Contact toner_recycle@bpus.konicaminolta.us for toner recycling availability, or dispose of the used toner cartridge according to your local regulations. Do not dispose of it by burning. 9 Remove the new toner cartridge from its shipping carton.
10 Check the color and size (volume) written on the toner cartridge to be installed. ! Color: C/Cyan, M/Magenta, Y/Yellow, K/Black ! Standard-Capacity Toner cartridge: Standard-capacity toner cartridge (1500) K ! High-Capacity Toner Cartridge: High-capacity toner cartridge (4500) 11 12 Holding both ends of the toner cartridge, shake it side-to-side a few times to distribute the toner evenly. Remove the yellow protective cover marked “Remove.
13 Verify that the color of the label in the toner compartment is the same as the color of the toner in the cartridge. K Attention Installing a cartridge with toner of a different color than the label in the compartment may damage the printer.
20 21 22 23 24 25 Select the Change Capacity Only check box. In the Color list box, select the color of the toner cartridge to be replaced (CYAN, MAGENTA, YELLOW, or BLACK). Click the Capacity option (1500 or 4500). Click OK. From the Display menu, choose Supplies Status to display the Supplies Status dialog box. Check the capacity of the installed toner cartridge. Place the used toner cartridge in the box that the new toner cartridge was packed in.
Replacing the Waste Toner Bottle When the waste toner bottle becomes full, the message Waste Toner Box Full appears in the Status Display. The printer stops and will not start again until the waste toner bottle is replaced. Removing the Used Waste Toner Bottle 1 2 Turn off the printer, then open the printer’s front door. Grasp the waste toner bottle’s handle and then lift the bottle out and up to remove it. Keep the waste toner bottle upright so the toner does not spill.
Installing a New Waste Toner Bottle 1 2 3 4 Remove the new waste toner bottle from its carton. Insert the bottom of the waste toner bottle % into its installation position in the printer. Push the top of the waste toner bottle & into position until it is firmly seated. Close the printer’s front door. If the waste toner bottle is not correctly installed or the transfer belt release lever is at its top position (11 o’clock), the front door cannot be closed.
Removing the Used OPC Drum Cartridge 1 With the front door open and the used waste toner bottle removed (see page 55), rotate the transfer belt unit release lever clockwise to the top (11 o’clock) position. This releases the pressure on the transfer belt unit. 2 3 Grasp the release lever for the OPC drum cartridge, and then pull the cartridge straight out about 6 inches (15 cm). Support the bottom of the drum with your hand, then carefully pull the cartridge toward you and remove it.
Installing a New OPC Drum Cartridge Attention The OPC drum is extremely sensitive to bright light and direct sunlight. Always leave it in its protective bag until you’re ready to install it. Any exposure to light should be avoided, or permanent damage could result. Any damage resulting from mishandling of the OPC drum will void the warranty of the OPC drum cartridge. Handle the cartridge carefully by its sides so you don’t touch the surface (the green part) of the drum.
4 5 Press on the front handle of the OPC drum cartridge with one hand and hold the handle of the OPC protective cover with the other hand. Peel the protective cover straight toward you. "# 6 Dispose of it properly according to your local regulations. Rotate the transfer belt release lever counterclockwise to its correct position (7 o’clock). This lowers the transfer belt. Attention If the transfer belt release lever is not at its correct position (7 o’clock), the waste toner bottle cannot be installed.
Maintaining the Printer 7
Maintaining the Printer Attention Read all caution and warning labels carefully, making sure to follow any instructions contained in them. These labels are located on the inside of the printer’s doors and the interior of the printer body. Handle the printer with care to preserve its life. Abuse may cause damage and void your warranty. If dust and paper scraps remain on the inside or outside of the printer, printer performance and print quality will suffer, so the printer should be cleaned periodically.
! Do not open the printer during printing. ! Do not tap paper stacks on the printer. ! Do not tilt, lubricate, or disassemble the printer. ! Do not touch the electrical contacts, gears, or laser beam devices. Doing so may damage the printer and cause the print quality to deteriorate. ! Keep media in the output tray at minimum level. If the media stacks too high, your printer may experience media jams and excessive media curl. ! Make sure two people are available to lift the printer when moving it.
Cleaning the Printer Always test any cleaning solution (such as a mild detergent) on a small area of your printer to check the solution’s performance. Exterior This item needs cleaning... After... Control panel Every 30,000 A soft, dry cloth single-sided Cotton swab pages or every 12 months, whichever A soft, damp comes first.
Interior Attention Be sure to turn off the printer and unplug the power cord before cleaning inside. This item needs cleaning... After... Use Duplex option feed rollers Media misfeeds occur frequently or the printout is dirty. A damp Abrasives or cloth that detergents has been wrung out well Tray 1 interior feed Every 30,000 single-sided rollers pages, every 12 months, or as needed, whichever comes first.
Media Rollers The accumulation of paper dust and other debris on the paper transport roller can cause media-feeding problems. Tray 1 (Multipurpose Tray) Interior Feed Rollers 1 2 Remove all media from Tray 1. Pull the right-side door release %, and then open the right-side door &. & % 3 4 5 6 While pressing down the media guide with one hand, clean the media feed roller by wiping it with a soft, dry cloth. Media guide Close the media guide. Close the right door. Load the media into the tray again.
Duplex Option Feed Rollers 1 2 3 Open the duplex option door. Clean the feed rollers by wiping them with a soft, damp cloth that has been wrung out well. Close the duplex option door. Printer Interior and Laser Lens Cover 1 2 Open the front door. Remove the waste toner bottle. "# 3 The waste toner bottle contains waste toner. Be careful not to tilt the bottle while removing it. Hold the waste toner bottle vertically, and then plug the two openings with the caps.
4 Pull out the laser lens cover. "# 5 6 7 68 The laser lens cover cannot be removed from the printer. Do not pull it with too much force. Wipe the surface of the laser lens cover with a soft, dry cloth. Reinsert the laser lens cover. Wipe the inside of the printer with a soft, dry cloth.
8 9 10 11 12 Hold the waste toner bottle vertically, and then move the two caps from the openings onto the cap holders. Turn the caps clockwise to secure them. Set the bottom of the waste toner bottle into its compartment, and then push the top of the bottle into place. Wipe the inside of the front door with a soft, dry cloth. Wipe the outside of the waste toner bottle with a soft, dry cloth. Close the front door.
Troubleshooting 8
Introduction This chapter provides information to aid you in resolving printer problems you may encounter, or at least guide you to the proper sources for help.
Preventing Media Jams Make sure that... Media matches the printer specifications. Media is flat, especially on the leading edge. The printer is on a hard, flat, level surface. You store media in a dry location away from moisture and humidity. You remove transparencies from the output tray immediately to avoid static buildup. You always adjust the media guides in Tray 1 after inserting the media (a guide that is not properly adjusted can cause poor print quality, media jams, or printer damage).
Understanding the Media Path Understanding the printer’s media path will help you locate media jams. 1 Media exit 2 Output tray 3 Transfer belt 4 OPC drum cartridge 5 Tray 1 (multipurpose tray) 6 Fuser unit 7 Duplex option 8 Transfer roller 9 Registration rollers 10 Pickup rollers Tray 1 (Multipurpose Tray) Tray 1 is located at the left of the printer.
Clearing Media Jams To avoid damage, always remove jammed media gently, without tearing it. Any pieces of media left in the printer, whether large or small, can obstruct the media path and cause further jams. Do not reload media that has jammed. Attention The image is not fixed on the media before the fusing process. If you touch the printed surface, the toner may stick to your hands, so be careful not to touch the print face when removing the jammed media.
Tray 1 (Multipurpose Tray) 1 2 3 Remove the media from Tray 1. Carefully remove the jammed media. Fan the removed media to prevent static buildup and even up the front edges. "# 4 5 Do not fan transparencies before loading them. Resulting static electricity may cause printing errors. Reinsert the media printing face up. Make sure the media is lying flat and doesn’t exceed the media limit mark. Check to see if the media width guides are correct. Open the right-side door, then close it.
Inside the Printer Media Path Jam 1 Pull the right door release lever, and then carefully open the right door. Attention Do not pull jammed media from the top of the printer through the fuser unit because unfused toner may contaminate the fuser rollers. If it is difficult to remove the jammed media, turn the misfeed-clearing dial counterclockwise to feed the media downward.
Fuser Jams 1 Lift up the two fuser unit levers. When removing the jammed media, be careful not to touch the transfer belt. Touching the transfer belt may result in poor print quality. 2 3 4 Open the misfeed-clearing guide for the fuser unit, and then, while checking the misfeed, pull the jammed media down to remove it. Close the misfeed-clearing guide for the fuser unit. Lower the two fuser unit levers. Attention Be sure to lower the two fuser unit levers before closing the right door.
5 Close the right-side door securely. The media jam message is no longer displayed in the Status Display message window. Duplex Option 1 2 Pull off the top of the duplex option to open the duplex option cover. Remove the jammed media in the directions shown in the illustration.
3 Open the right-side door, then close it. The media jam message is no longer displayed in the Status Display. Output Tray Remove jammed media from the output tray by gently pulling it to the left away from the media exit area.
Solving Problems with Media Jams "# Frequent jams in any area indicate that area should be checked, repaired, or cleaned. Repeated jams may also happen if you’re using unsupported print media. Symptom Cause Solution Several sheets go through the printer together. The front edges of the media are not even. Remove the media and even up the front edges, then reload it. The media is moist from humidity. Remove the moist media and replace it with new, dry media. Too much static electricity is present.
Symptom Cause Solution Media is jamming. The media is not Remove the jammed media and correctly positioned in reposition the media properly in the the tray. tray. The number of sheets Remove the excess media and reload in the tray exceeds the correct number of sheets in the the maximum tray. allowed. The media guides are Adjust the regulation guides in the tray not correctly adjusted to match the size of the media. to the media size.
Solving Other Problems Symptom Cause Solution Printer The power cord is not Turn the power switch off (O position), power is not correctly plugged into then remove the power cord from the on. the outlet. outlet and plug it back in. Something is wrong with the outlet connected to the printer. Plug another electrical appliance into the outlet and see whether it operates properly. The power switch is not correctly turned on (I position).
Symptom Cause Solution Printing takes too much time. The printer is set to a slow printing mode (for example, thick stock or transparency). It takes more time to print with special media. When using regular paper, make sure that the media type is set properly in the driver. The printer is set to power saving mode. It takes time for printing to start in power saving mode. If you do not want to use this mode, disable it (Status Display’s Print/Maintenance... menu). The job is very complex. Wait.
Symptom Cause Printer resets or turns off frequently. The power cord is not Turn off the unit, confirm that the power properly connected to cord is properly connected to the AC the AC outlet. outlet, and turn the unit back on. A system error occurred. You are Media or settings are experiencing not correct. problems duplexing. Solution Contact Technical Support with the error information. See the Service & Support Guide for a list of sources of service and support in many areas of the world.
Symptom Cause Solution Booklet Left and Right Binding output is incorrect. Both the driver and For Booklet Left Binding and Booklet the application have Right Binding, choose Collate only in been set for collation. the driver’s Paper Tab. Do not set collation in the application. The printer pauses approximately 90 seconds. The printer pauses for the color calibration procedure (also known as the Auto-Image Density Control [AIDC] cycle).
Symptom Cause Solution The printer pauses approximately 150 seconds. The printer pauses for the color calibration procedure (also known as the Auto-Image Density Control [AIDC] cycle). Wait while your printer automatically pauses to do an AIDC calibration cycle after rebooting your printer when there has been an environmental change such as in temperature or humidity. This process is provided to make sure reliable printer operation with optimum output quality.
88 Symptom Cause Solution Media is wrinkled. The media is moist from humidity or having water spilled on the paper supply. Remove the moist media and replace it with new, dry media. The transfer roller or fuser unit may be defective. Check them for damage. If necessary, contact Technical Support with the error information. Go to http:// printer.konicaminolta.net/support or see the Service & Support Guide for support telephone numbers. Unsupported media is being used.
Solving Problems with Printing Quality Symptom Cause Solution Nothing is printed, or there are blank spots on the printed page. One or more of the toner cartridges are damaged. Remove the toner cartridge and check for damage. If it is damaged, replace it (Status Display’s Print/Toner Replace... menu). The printer driver is not set correctly. Select the proper setting in the printer driver to switch from transparency (OHP) film to plain paper.
Symptom Cause Solution Entire sheet One or more of the is printed in toner cartridges are black or defective. color. Remove the toner cartridge and check for damage. If it is damaged, replace it (Status Display’s Print/Toner Replace... menu). The OPC drum Remove the OPC drum cartridge and cartridge is damaged. check for damage. If it is damaged, replace it. Image is too Laser lens cover is light; there is dirty. low image density.
Symptom Cause Solution Image is blurred; background is lightly stained; there is insufficient gloss of the printed image. One or more of the toner cartridges are defective. Remove the toner cartridge and check for damage. If it is damaged, replace it (Status Display’s Print/Toner Replace... menu). The OPC drum may be misinstalled or defective. Reinstall the OPC drum cartridge. If it is damaged, replace it. The print or color density may be uneven.
Symptom Cause Solution There is insufficient fusing or the image comes off when rubbed. The media is moist from humidity. Remove the moist media and replace it with new, dry media. There are toner smudges or residual images. 92 Media with Use media that is covered by the specifications not printer warranty. covered by the printer warranty is being used. The media type may be incorrectly set.
Symptom Cause There are The paper transport toner rollers may be dirty. smudges on the back side of the page (whether or not it has been duplexed). Solution Clean the paper transport, pressure, and fuser oil rollers. If you think the transport roller should be replaced, contact Technical Support with the error information. See the Service & Support Guide for a list of sources of service and support in many areas of the world. The most current worldwide information can be found at www.konicaminolta.
Symptom Cause Solution Image defects. The laser lens cover is dirty. Clean the laser lens cover with a soft, dry cloth. The toner cartridge is Remove the toner cartridge and check leaking. for damage. If it is damaged, replace it (Status Display’s Print/Toner Replace... menu). The toner cartridge is Remove the toner cartridge with the damaged. color causing the abnormal image. Replace it with a new toner cartridge. The OPC drum Replace the OPC drum cartridge. cartridge is damaged.
Symptom Cause Solution Colors are not registering properly; colors are mixed or have pageto-page variation. The front door may not be properly closed. Make sure that the printer’s front door is closed. The OPC drum cartridge is not correctly seated. Remove the OPC drum cartridge and reinstall it. One or more of the toner cartridges are defective. Remove the toner cartridge and check for damage. If it is damaged, replace it (Status Display’s Print/Toner Replace... menu).
Status, Error, and Service Messages Status, error, and service messages are displayed in the Status Display. They provide information about your printer and help you locate many problems. When the condition associated with a displayed message has changed, the message is cleared from the Status Display message window. Standard Status Messages This message... means... do this... Canceling Job The job is being cancelled. No action needed.
This message... means... do this... Video Under-run The amount of data to be printed exceeds the printer's internal data transmission speed. Turn the printer off, and then, after a few seconds, turn it on again. Decrease the amount of data to be printed (for example, by decreasing the resolution), and then try printing again. Paper Jam at Duplex Lower Media has jammed in Locate and remove the the duplex unit. jam.
This message... means... COLOR Toner Low The specified toner is Replace the specified low and should be color toner. replaced within 200 pages at 5% coverage of letter/A4 pages. Drum Near End The OPC drum Replace the OPC drum cartridge is nearing cartridge. end of life and should be replaced or the quality eventually fades. Printer Cover Open Printer’s front door is Close the front door. open and must be closed.
This message... means... do this... Waste Toner Box Full The waste toner in Replace the waste toner the waste toner bottle bottle. is full. Put Waste Toner Box The waste toner Install the waste toner bottle is not installed. bottle.
Service Messages A service message sometimes occurs as a result of an unusual combination of events, not because of an actual problem. When the printer stops and a service message displays in the Status Display message window, turn the printer off and then back on. This often clears the service message indicator, and printer operation resumes. Always try this before making a service call. Service calls should be placed to the vendor from whom you purchased the printer.
This service message... means... do this... ROM Error ROM error. Contact Technical Support with the error information. Service Call:XX An error has been detected with the item indicated “XX” in the service message. Reboot the printer. This often clears the service message indicator, and printer operation can resume. If the problem persists, contact Technical Support. See the Service & Support Guide for a list of sources of service and support in many areas of the world.
Installing Accessories 9
Introduction Attention Use of accessories not manufactured/supported by KONICA MINOLTA is not supported by your printer and will void your warranty. This chapter provides information about the following accessories. Contact your local vendor or www.konicaminolta.net/printer/ for compatibility and purchase information. Duplex Option Automatic duplexing Check www.konicaminolta.net/printer/ for availability of additional accessories.
Installing the Duplex Option 1 2 Turn off the printer, and unplug the power cord and interface cable. Remove the cover from the right side of the printer. Use a Phillips screwdriver to remove the two screws securing the right cover. "# 3 4 Keep the removed cover and screws in a safe place for future use. Remove the duplex option from the shipping carton. Remove any tape from the duplex unit.
5 Attach the duplex option to the printer. a Hook the two tabs at the bottom of the duplex option onto the notches on the right side of the printer. b Push the duplex option toward the printer until it clicks on the top. c While still supporting the duplex unit, carefully open the right-side door, and then check that the tabs on the duplex unit are correctly hooked onto the printer. Attention If the duplex option is released before it is secured with the screws, it may fall and break.
6 Attach the support wire for the duplex option to the printer. a Pull the right-side door release lever, and open the right-side door. % & b Pull the tab for the support wire on the right side of the duplex option, and then hook the wire onto the hook of the printer. 7 8 c Close the right-side door. Reconnect the interface cable. Reconnect the power cord, and turn on the printer. "# 9 10 In compliance with UL guidelines, “The appliance inlet is considered to be the main disconnect device.
Repacking the Printer 10
Attention The instructions and replacement partnumbers given in this chapter are for the Americas. For locations outside the Americas, refer to www.konicaminolta.net/printer/ or contact your local KONICA MINOLTA representative. Attention Failure to follow these instructions could result in voiding your warranty. Storing the Printer Unplug the printer when storing it for an extended period. Protect it from extremes in temperature and humidity, and from dust.
You can also refer to the Service & Support Guide for sources of service and support in many areas of the world. The most up-to-date worldwide information can be found at www.konicaminolta.net/printer/. Repacking the Printer Attention Failure to follow these instructions could result in voiding your warranty. If you need to relocate or ship your printer after it’s been installed, follow the procedures in this chapter to prevent damage to the printer and to keep your warranty valid.
What’s Involved? Repacking your printer for shipment involves the following steps. Each is described in more detail in the following sections. Obtain Proper Packaging: Original packaging or replacement packaging (KONICA MINOLTA 2300W Replacement Packaging Kit 2600723-300) page 111 Repacking kit (KONICA MINOLTA 2300 Series Repacking Kit 2600733-100) Prepare the Printer for Shipment: A. Turn off the printer, unplug the power cord, and remove the interface cables. page 112 B.
B. Remove the Media and the Tray 1 Media Support 1 2 Remove the media. Place it in its original packaging and store in a cool, dark place on a level surface. Avoid moisture, excess humidity, direct sunlight, excess heat (above 95°F/35°C), and dust. Lift the media support from the three holes in Tray 1 and remove the media support. C. Remove the Options (if Attached) Duplex Option "# 1 If you don’t have a duplex option installed, skip to the next section.
4 5 6 7 Open the duplex option’s cover and loosen the two thumbscrews until the duplex option moves freely away from the right side of the printer. Lift duplex option up and away from the printer. Install the original right-side cover that came with the printer with two screws. Repack the duplex option in its original shipping carton for storage or shipment. "# If you’re returning the printer for service, you don’t need to return the duplex option, unless the problem is with the duplex option. D.
6 Dispose of the used waste toner bottle. WARNING! Dispose of the used waste toner bottle properly according to your local regulations (do not dispose of it by burning). E. Remove the OPC Drum Cartridge 1 Rotate the transfer belt release lever clockwise to the top (11 o’clock) position. "# 2 This releases the pressure on the transfer belt unit. Grasp the release lever on the OPC drum cartridge, and then pull the cartridge straight out about 6 inches (15 cm).
3 4 Support the bottom of the drum with your hand, then carefully pull the cartridge toward you and remove it. Place the OPC drum cartridge in the protective bag supplied in the repacking kit (KONICA MINOLTA 2300 Series Repacking Kit 2600733-100). F. Remove the Transfer Belt 1 2 3 116 With the front door open and transfer belt release lever at its top (11 o’clock) position, unscrew the two thumbscrews. Grasp the transfer belt and pull it straight out.
4 Replace the packaging and tape, then close the front door. G. Repack the Printer for Shipment Use your own original packaging or order KONICA MINOLTA 2300W Replacement Packaging Kit 2600723-300. 1 Replace the tape and packaging.
2 3 4 5 Place the lower cushions into the shipping carton. Place the printer’s plastic bag over the printer. Pack the printer for shipment as shown. If you’re also shipping the power cord and any manuals with the printer, place them in the shipping carton. "# 6 7 Don’t ship these items if you’re returning the printer for service. Securely tape the top flaps of the shipping carton closed. Ship the printer.
2 Place the OPC drum cartridge and transfer belt unit in the appropriate position in the box supplied in the repacking kit. "# 3 Also pack the supplied roll of tape in this box. If you return the printer for service in the Americas, be sure to also write the RMA (Return Merchandise Authorization) number you received from your customer support representative on the outside of the box before shipping the consumables. Securely tape the top flaps of the box closed.
Reinstalling a Transfer Belt Unit 1 2 3 4 120 With the front door open, remove the transfer belt unit from its packaging and reinsert it. Replace the two thumbscrews. Rotate the transfer belt release lever counterclockwise to its correct (7:00 o’clock) position. Close the front door.
Technical Specifications A
Requirements Space Requirements The illustration below shows the amount of space required for operating the printer, replacing supplies, and removing media jams. "# Allow enough space around the printer to allow adequate ventilation and easy servicing. For best output quality and longest consumables life, install the printer on a hard, flat, level (within ±1°slant) surface. Top View 5.9" (150 mm) 27.6" (700 mm) 19.
15.4" (390 mm) 23.2" (590 mm) Side View 13.4" (340 mm) 27.8" (705 mm) 23.2" (590 mm) Printer with Accessories Side View 27.
Location Requirements ! On a surface capable of supporting the printer, accessories, consumables, and media. Component Weight Printer 56.2 lbs (25.5 kg) Consumables (such as toner cartridge, OPC drum cartridge) 6.6 lbs (3.0 kg) (total) Media 5.2 lbs (1.9 kg) per ream of 20 lb bond (75 g/m2) paper Duplex option 4.4 lbs (2.0 kg) With these characteristics... On a hard, flat, stable, level (±1° or less slant at any point around the machine).
WARNING! Obstructing the ventilation grilles could present a fire hazard. ! Do not tilt the printer more than 1° when moving it. ! If the printer is located in a cold room that is rapidly heated, or if the printer is moved from a cold place to a warm, humid place, condensation may occur within the printer, degrading print quality. If this occurs, allow the printer to adapt to the environment for about one hour before use.
Power Requirements WARNING! Connect the power plug to an outlet with the same rated voltage as the printer. No other devices should be connected to this outlet, as overheating could cause fire or electric shock. The printer draws 13 A at 100 V, 11 A at 120 V, or 7 A at 220–240 V. Your printer requires a properly grounded AC outlet. The grounding terminal on the power cable should be connected to a good earth ground to prevent electric shock and fire.
ENERGY STAR Compliance The magicolor2300W basic configuration is compliant with US Environmental Protection Agency (EPA) ENERGY STAR regulations. After a user- configurable period of inactivity, the printer changes to a low-power state (the engine remains on, but the fuser turns off). When a print job is received, the printer returns to normal power.
Engine and Controller Specifications Engine Duty cycle Simplex letter/A4 pages per month Notes The duty cycle is affected by the media type and percent coverage. 1,000 average prints and up to 35,000 maximum prints per month* *Continued usage at this rate will reduce the life of the printer. Print Speed—Simplex The following table defines the maximum print speed in pages per minute (ppm) at 600x600 dpi resolution. Page size Monochrome ppm 4-color ppm Letter/A4 or smaller 16 4 Legal/Folio 8 2.
General Printer type Desktop, non-impact, color printer Print method Scanner: Semiconductor laser with rotating mirror Recorder: Black writing electrophotographic Process: Cyan, magenta, yellow, and black toner image transfer to print media Fuser: Heated rollers Native resolution 600 × 600 dpi Available resolution 1200 × 600 dpi Toner Type: Dry, single component Packaging: User-replaceable toner cartridges Warm-up time Maximum: 100 V/120 V/220 to 240 V: 180 seconds or less Input sources Standar
Electrical Voltage and Power Voltage and frequency Japan: 100 volts ±10% at 50/60 Hz ±3 Hz US: 120 volts ±10% at 50/60 Hz ±3 Hz International: 220–240 volts +10% at 50 Hz ±3 Hz Phase Single Power consumption Mode Average Black monochrome printing Color printing Standby Power saver 600 W or less 1100 W or less 450 W or less 250 W or less 30 W or less Certification Maximum ENERGY STAR compliant Current 130 Mode Maximum Operation (100 V) Operation (120 V) Operation (220–240 V) 13.
Environmental Acoustic noise Printing: Less than 54 dB (A) data Standby: Less than 39 dB (A) Noise Maschinenlärminformationsverordnung 3. FSGV, Declaration for 18.01.1991: Der höchste Schalldruckpegel beträgt Germany 70 dB (A) oder weniger gemäß EN 27779.
Hazardous Chemical Substance Reporting Material Safety Data Sheets (MSDS) Title 29 CFR Ch. XVII, Part 1920.1200 EINECS/ELINCS (EU) Physical Dimensions Weight 132 Main Body Main Body with Duplex Option W: 14.02 in. (356 mm) W: 15.98 in. (406 mm) H: 15.43 in. (392 mm) H: 15.43 in. (392 mm) D: 19.69 in. (500 mm) D: 19.69 in. (500 mm) Main Body (including consumables, excluding media) 62.8 lbs (28.5 kg) Duplex option 4.4 lbs (2.
Consumable Life Expectancies The stated life expectancy of each consumable is based on printing under specific operating conditions, such as media type, page size, content of material printed, and page coverage (usually 5% coverage of letter/A4-size media). The actual life expectancy will vary (or be reduced) depending on these and other printing variables, including continuous (optimal consumable life) or intermittent (for example, one-page jobs) printing, ambient temperature, and humidity.
Special Media Consumables OPC Drum Cartridge Toner Cartridge (pages per cartridge at 5% coverage of each color) Waste Toner Box This item needs replacing by user after... Up to 15,000 continuous monochrome or 7,500 continuous color pages, or 5,000 intermittent (one-page jobs) monochrome or 4,100 intermittent color pages. Standard capacity (black): Approximately 1,500 continuous single-sided pages or 1,000 intermittent single-sided pages (if monochrome black printing only).
Regulatory Compliance CE Marking (Declaration of Conformity) For European Users This product complies with the following EU directives: 89/336/EEC, 73/23/EEC, and 93/68 EEC directives. This declaration is valid for the areas of the European Union. This device must be used with shielded interface cables. The use of non-shielded cable is likely to result in interference with radio communications, and is prohibited under EU directives.
Product Safety Laser Safety UL (USA) cUL (Canada) International (EU) China CDRH (USA) International (EU) UL 60950 CAN/CSA C22.2 60950 EU Directive 73/23/EEC, EN 60950 and IEC 60950 GB 4943 Title 21 CFR Ch. I, Subchapter J EN 60825-1 and IEC 60825-1 FCC Compliance Statement For American Users This equipment has been tested and found to comply with the limits for a Class B digital device, pursuant to Part 15 of the FCC Rules.
Safety Information Toner Do not throw the toner cartridge or toner into an open flame. The hot toner may scatter and cause burns or other damage. CAUTION: Keep out of reach of children. Laser Safety This printer is a page printer which operates by means of a laser. There is no possibility of danger from the laser, provided the printer is operated according to the instructions in this manual.
Laser Safety Label—CDRH Requirement CAUTION: Use of controls, adjustments, or performance other than those specified in this manual may result in hazardous radiation exposure. This is a semiconductor laser. The maximum power of the laser diode is 5 mW, and the wavelength is 770–795 nm. International Notices—Power Cord The following power cord requirements are in effect for your 220 V printer. Minimum: 0.
For Finland, Sweden Users LOUKAN 1 LASERLAITE KLASS 1 LASER APPARAT VAROITUS! Laitteen käyttäminen muulla kuin tässä käyttöohjeessa mainitulla tavalla saattaa altistaa käyttäjän turvallisuusluokan 1 ylittävälle näkymättömälle lasersäteilylle. Tämä on puolijohdelaser. Laserdiodin suurin teho on 5 mW ja aallonpituus on 770–795 nm. VARNING! Om apparaten används på annat sätt än i denna bruksanvisning specificerats, kan användaren utsättas för osynlig laserstrålning, som överskrider gränsen för laserklass 1.
Warning and Precaution Symbols Ignoring this warning could cause serious injury or even death. or WARNING!! Ignoring this caution could cause injury or damage to property. or Attention Meaning of Symbols A triangle indicates a danger against which you should take precaution. This symbol warns against burns. A diagonal line indicates a prohibited course of action. This symbol warns against dismantling the device. A black circle indicates an imperative course of action.
• Do not modify this product, as a fire, electrical shock, or breakdown could result. If the product employs a laser, the laser beam source could cause blindness. • Do not attempt to remove the covers and panels which have been fixed to the product. Some products have a high-voltage part or a laser beam source inside that could cause an electrical shock or blindness. • Only use the power cord supplied in the package. Failure to use this cord could result in a fire or electrical shock.
• Do not use flammable sprays, liquids, or gases near this product, as a fire could result. • Do not leave a toner cartridge or OPC drum cartridge in a place within easy reach of children. Licking or ingesting any of these things could injure your health. • Do not let any object plug the ventilation holes of this product. Heat could accumulate inside the product, resulting in a fire or malfunction.
Working Safely with Your Laser Printer WARNING! Working improperly with the printer can result in health hazards, electric shocks, and even fires. Before you unpack the laser printer, you should make yourself familiar with this information on your safety and operating safety. Power Supply/Cord/Plug Do This... Make sure that the power supply to the unit has the correct voltage. Otherwise the result could be a fire or an electric shock.
Printer Body Do This... Perform only the procedures that are described in this manual. Using the machine improperly can result in a fire or an electric shock. Notes on your safety and operating safety Working improperly with the printer can result in health hazards, electric shocks and even fires. Before you unpack the laser printer, you should make yourself familiar with this information on your safety and operating safety.
Index A D AIDC 47, 86, 90, 95 Auto-Image Density Control 47 Duplex Autoduplex 23 B E Booklet Binding 86 Bottle, also known as box 46 Box, also known as the waste toner bottle 46 ENERGY Star 127 Envelopes 14 Environmental requirements 131 Error messages 96 C I Connecting Parallel cable 125 Controller Specifications 129 CPU 129 Imageable area Margins 19 Interfaces 129 Index 145
J Jams 82 Media path 74 Preventing 73 Removing 75 L Labels Continuous printing 15 Lables 15 Letterhead 16 Loading media 20 M Margins 19 Media Clearing media jams 75 Loading 20 Margins 19 Path 74 Preventing jams 73 Media jams 82 Media path 74 Media storage 24 Memo media 16 Messages 96 N N-up 85 O OPC drum cartridge 58, 115 Output tray 24 Overlay printing 84 P Page margins 19 Paper Jams 82 Type 18 Parallel Connection 125 146 Path, media 74 Physical specifications 132 Plain paper 12 Postcards 16 Power r
Status Display Closing 44 Environment 40 Using 41 T Temperature requirements 131 Test for levelness 124 Thick paper also known as cardstock 13 Toner 129 Toner cartridges 133 Transparencies 17 Continuous printing 17 Troubleshooting 72 Duplexing 85 Media jams 82 Nothing is printed 89 Printer resets 85 Status, service, and error messages 96 V Ventilation grilles 125 W Warm-up time 129 Waste toner bottle 46 Index 147